Connect to Outbound Apps
Once you've created an Outbound App, you can start connecting your users to third-party services through Descope Outbound Apps. You can choose between:
- Using Frontend SDKs - For custom UI integrations in your application
- Using Descope Flows - For low-code integration with pre-built UI components
- Using APIs - For non-JavaScript platforms
Connecting to Outbound Apps
Descope Outbound Apps support two main connection types:
1. OAuth Provider Connection
- Use the SDKs, Flows, or API to initiate the OAuth flow and connect a user to a third-party provider.
- Use the Outbound App / Connect (user-level) or Outbound App / Tenant Connect (tenant-level) action in your flow, or call the corresponding API.
- Descope manages the consent, token storage, and refresh.
2. API Key Connection
- For services that use static API keys, you can collect and store a key for each user or tenant.
- Use the Outbound App / Connect API key (user-level) or Outbound App / Connect tenant API key (tenant-level) action in your flow, or call the corresponding API.
- The process is similar to connecting an OAuth provider: the user provides their API key, and Descope stores it securely in the token vault.
Connecting with Frontend SDKs
Install the appropriate Descope SDK for your application:
# For vanilla JavaScript applications
npm install @descope/web-js-sdk

# For React applications
npm install @descope/react-sdk

# For Next.js applications
npm install @descope/nextjs-sdk
Using the connect() Function
You must be logged in to use the connect() function. If you signed in with a client SDK, the JS SDKs will automatically rely on the same session already created. Otherwise, you can use the optional token parameter to pass in a valid authentication token.
The outbound.connect() function initiates a redirect to the authorization endpoint of your Outbound App provider, handling all OAuth redirect mechanics for you.
Parameters
- providerId (required): The ID of the Outbound App you've configured in Descope
- options (optional): Configuration for the connection:
- redirectURL: Custom URL to redirect after authentication
- scopes: Array of specific scopes to request
- token (optional): Authentication token (if not already set in the SDK)
Code Examples
import { useDescope } from '@descope/react-sdk';

function ConnectButton() {
  const { sdk } = useDescope();

  const handleConnect = async () => {
    try {
      await sdk.outbound.connect('<outbound-app-id>', {
        redirectURL: 'https://app.example.com/post-connection',
      });
    } catch (error) {
      console.error('Error connecting to Google:', error);
    }
  };

  return (
    <button onClick={handleConnect}>
      Connect to Outbound App
    </button>
  );
}

export default ConnectButton;
Customizing the Connection
You can provide additional options to the connect function to customize the authorization request:
// Works with any of the SDKs
await sdk.outbound.connect(
  'google-calendar',
  {
    // Override the redirect URL (must be registered in your Outbound App)
    redirectURL: 'https://your-app.com/post-connection',

    // Specify particular scopes (overrides the default scopes)
    scopes: [
      'https://www.googleapis.com/auth/calendar',
      'https://www.googleapis.com/auth/contacts.readonly'
    ]
  }
);
If you don't specify the scopes parameter, the connection will use the default scopes you configured in the Descope Console for this outbound app. This makes it easy to maintain consistent scope permissions across your application without hardcoding them in your frontend code.
Handling the Redirect
After successful authentication, the provider redirects back to your application. Descope will automatically handle the redirect back to where you set your redirect URL shown above.
At this point, Descope will now be managing the tokens for this user. You can use the Management API to retrieve the tokens for backend operations.
Connecting with Descope Flows
For a low-code approach with pre-built UI components, you can use Descope Flows to manage the connection process.
Descope Flows provide:
- Pre-built UI components for connection buttons
- Managed redirect handling
- Easy customization options
Flow Components for Outbound Apps
There are two main components:
- Outbound App Button - A button component that initiates the connection
- Outbound App Connect Action - The action that processes the connection request
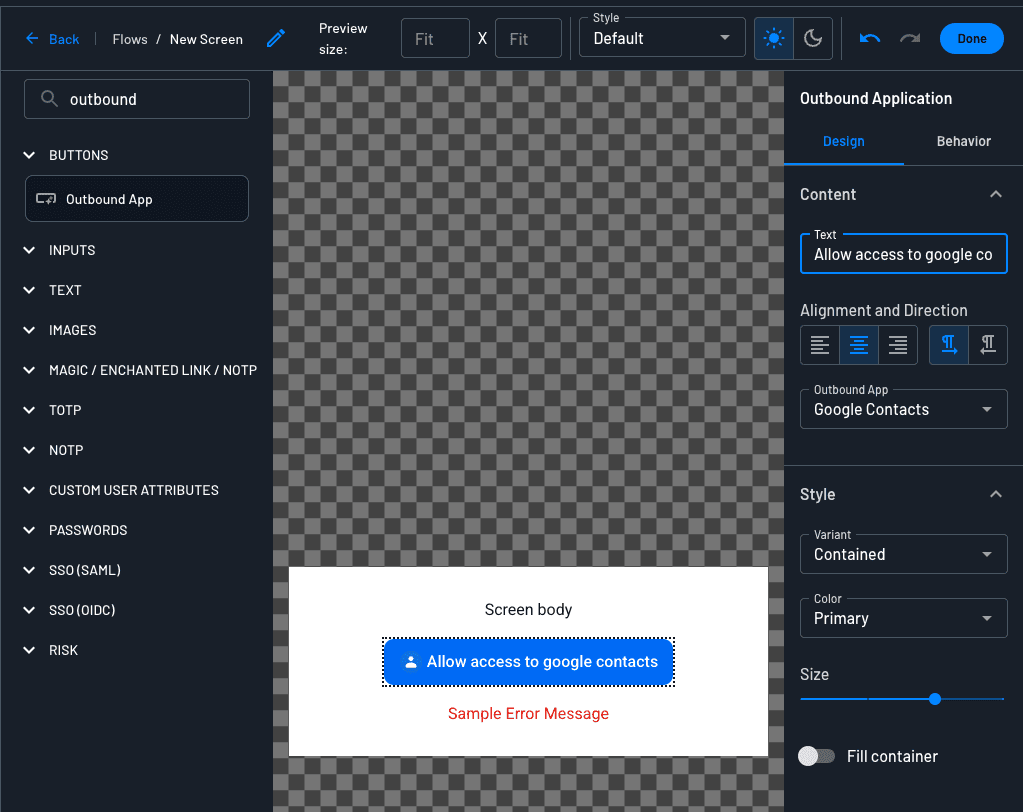
Implementation Options
If you're using the Descope Flows, you must first sign in using the flow, before you can connect to an outbound app. The previous authenticated session will be used to establish a connection and associate the outbound app tokens with the respective user.
You can implement outbound app connections in flows in two ways:
Option 1: Using the Outbound App Button
Place an Outbound App button on your flow screen that users can click to initiate the connection. The button can be customized with text and styling options, and it automatically displays the outbound app's logo.
You can point the button at a specific outbound app, or set its app to Dynamic Application. A dynamic button doesn't name an app in the flow. Instead, the app comes from a value passed into the flow, such as a flow input. Descope sets the button's label and icon from that app when the screen renders. One screen can then connect a user to whichever app your application asks for, without a separate screen per app.
Option 2: Using the Connect Action Directly
If you want to use your own UI elements, you can trigger the Outbound App Connect action directly from your application.
You can set a default outbound app in the action's configuration to bypass the need for Descope's UI components.
In addition to this, you can also configure custom scopes, that will override the default scopes configured in your Outbound App Settings.
Opening the Provider in a Popup
To keep the user on your page, you can check Open in Popup on the Outbound App Connect or Outbound App / Tenant Connect action. The provider's consent screen then opens in a popup instead of a full-page redirect.

Connecting with APIs
If you're using the APIs, you must first sign in and create a session for the user. You will then use the refresh token of the user to initiate the connection.
For non-JavaScript platforms, you can use this API directly to initiate connections:
POST __BaseURL__/v1/outbound/oauth/connect
Authorization: Bearer __ProjectID__:<refreshJWT>
Content-Type: application/json

{
  "appId": "<outbound-app-id>",
  "options": {
    "redirectUrl": "https://your-redirect-url.com",
    "scopes": ["scope1", "scope2"]  // Optional
  }
}
https://api.descope.com might be different for your project depending on your region or base URL. Read more here.
The redirectUrl parameter in the options object is required and specifies where the user will be redirected after the authorization process completes. The scopes parameter is optional and allows you to request specific permissions different from the default scopes configured in your Outbound App.
After calling this endpoint, the server will respond with a redirect URL that you should redirect your user to in order to begin the OAuth consent flow.
Viewing and Managing Tokens in the Console
After connecting users to an outbound app, you can view and manage their tokens directly in the Descope Console under the Token Management tab for your outbound app.
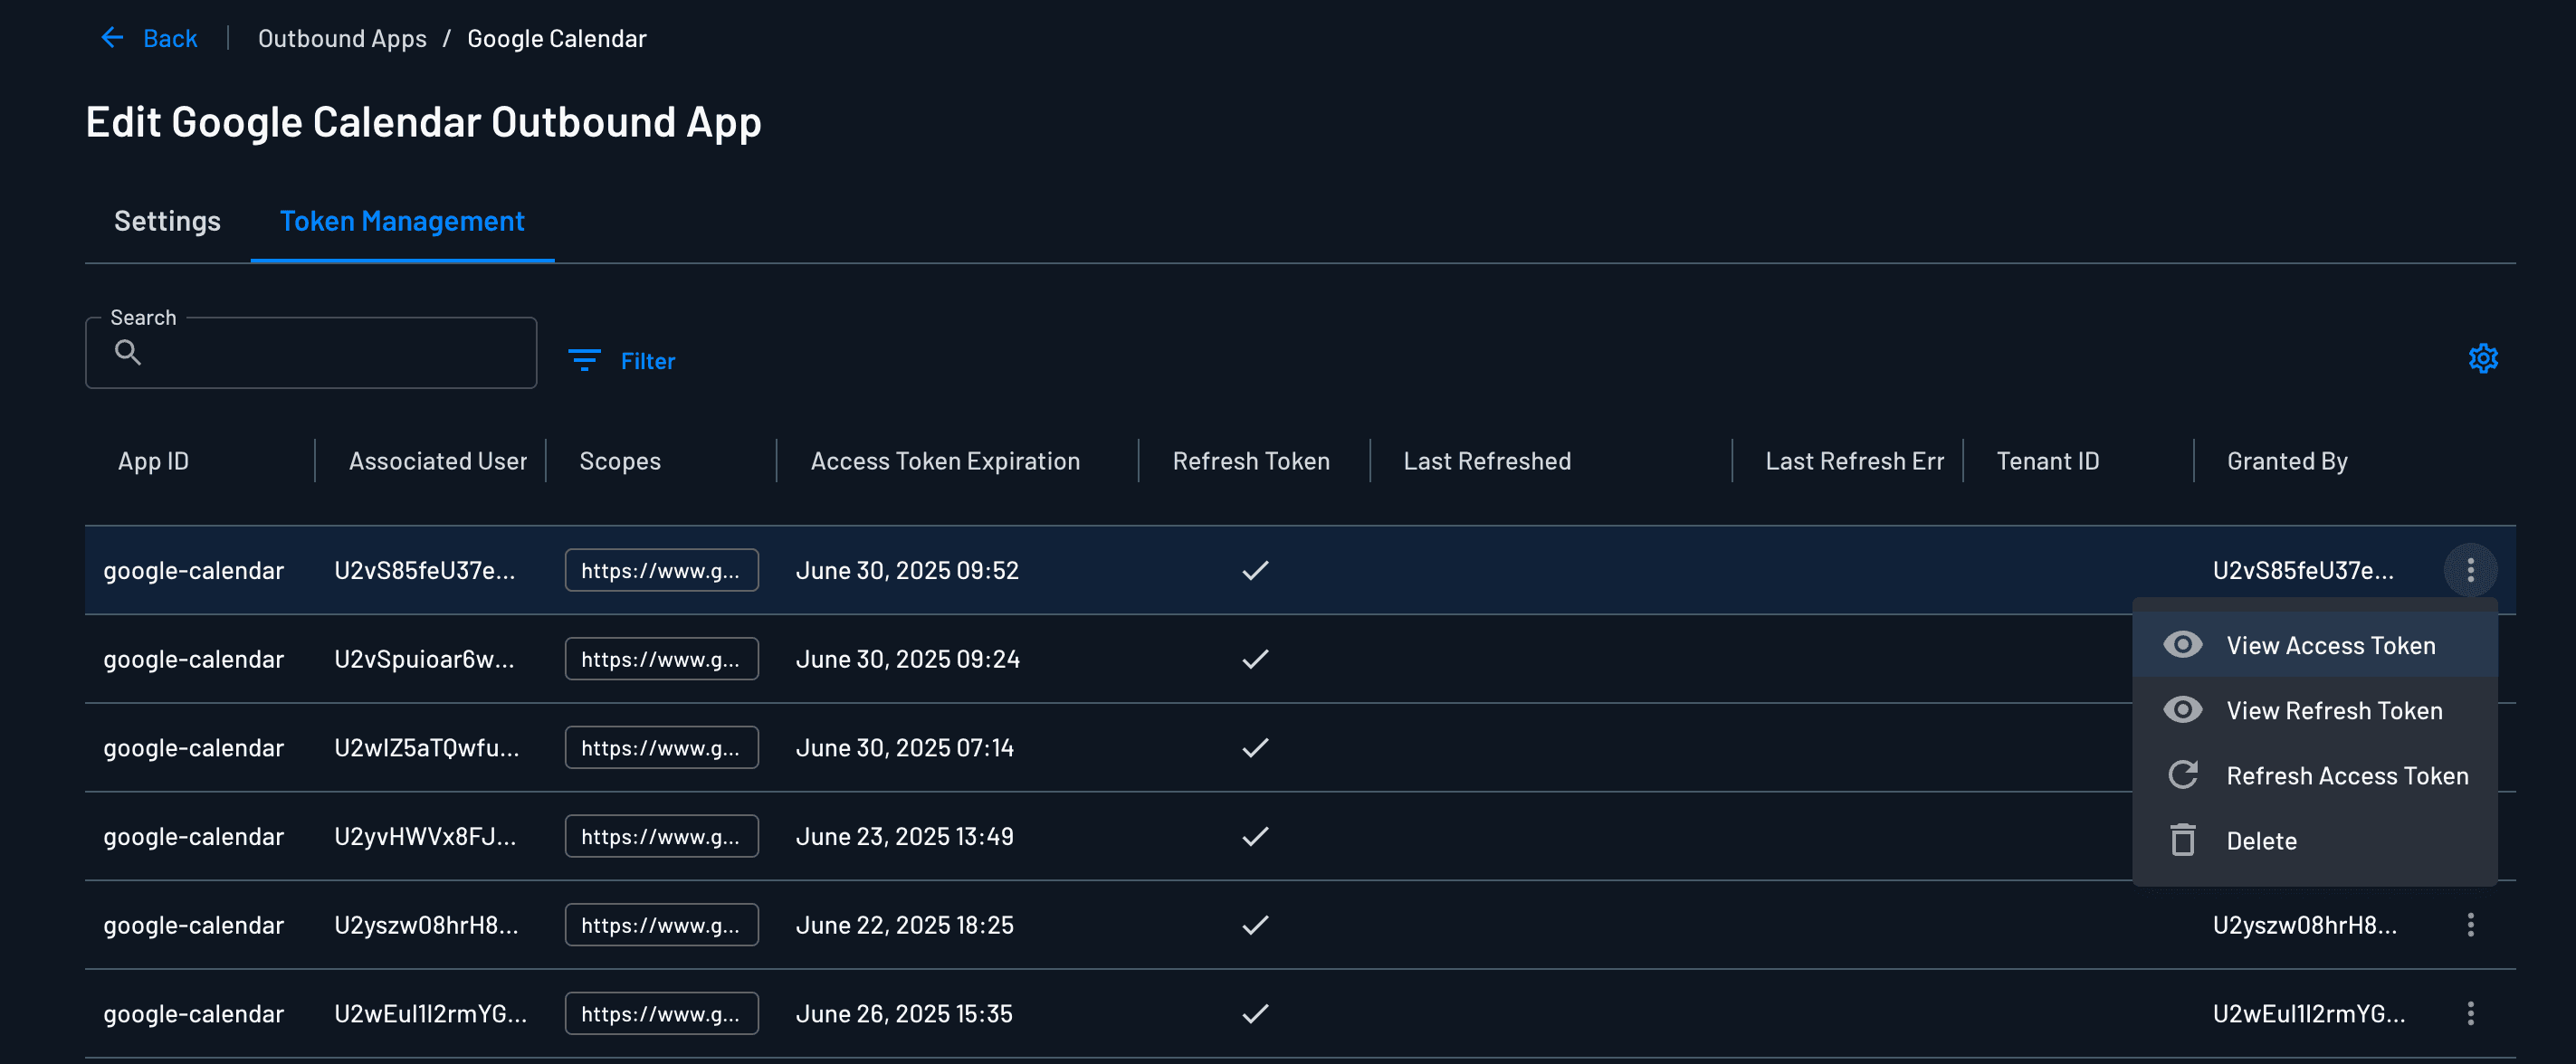
For each user or tenant-level token, you can:
- View the access token (and refresh token, if applicable)
- Manually refresh the access token
- Delete the token
This provides a convenient way to audit, troubleshoot, or revoke access for specific users or tenants without writing any code.
Deleting Outbound App Tokens
You can delete outbound app tokens in two ways:
1. Using the Descope Console
Navigate to the Token Management tab for your outbound app in the Descope Console. Find the user or tenant whose token you want to delete, and use the delete option in the dashboard (see image above).
2. Using the REST API or SDK
Token deletion is supported in the NodeJS, Python, Java, Go, PHP, and Ruby SDKs. See Managing with SDKs for installation and client setup.
Delete a Specific Token by ID
await descopeClient.management.outboundApplication.deleteTokenById('token-id-123');Delete Tokens by App ID and User ID
Both appId and userId are optional, but at least one must be provided. Passing only an app ID deletes the stored tokens for every user connected to that app.
await descopeClient.management.outboundApplication.deleteUserTokens('google-contacts', 'user-123');Importing Pre-existing OAuth Tokens
If you already hold valid OAuth tokens for your users or tenants, for example when you migrate from another system, you can import them directly into Descope's token vault. Users then don't have to run the OAuth flow again. Importing requires a management key, so you would run it from your backend.
You can import tokens with the Node, Python, and Go SDKs, or with the REST API. The SDK methods send the same fields as the REST requests below.
// Import one user token
await descopeClient.management.outboundApplication.uploadUserToken({
  appId: 'google-contacts',
  userId: 'user-123',
  refreshToken: '<refresh-token>',
  scopes: ['https://www.googleapis.com/auth/contacts.readonly'],
});

// Import one tenant token
await descopeClient.management.outboundApplication.uploadTenantToken({
  appId: 'google-contacts',
  tenantId: 'tenant-123',
  accessToken: '<access-token>',
});

// Import many user tokens at once. The batch is all-or-nothing.
const res = await descopeClient.management.outboundApplication.batchUploadUserTokens([
  { appId: 'google-contacts', userId: 'user-1', accessToken: '<access-token-1>' },
  { appId: 'google-contacts', userId: 'user-2', accessToken: '<access-token-2>' },
]);
// res.data.failures lists each rejected token with its errorCode and reason
Each token needs a refresh token, an access token, or both. The Node and Python SDKs also have batchUploadTenantTokens and batch_upload_tenant_tokens for tenant tokens, and the Go SDK has UploadTenantToken and BatchUploadTenantTokens.
The REST requests below show every field you can send.
Batch endpoints are all-or-nothing: if any token fails validation, the entire batch is rejected and no tokens are committed. Fix the reported failures and retry the full batch.
Import a Single User Token
curl -X POST "__BaseURL__/v1/mgmt/outbound/app/user/oauthtoken/upload" \
  -H "Content-Type: application/json" \
  -H "Authorization: Bearer <PROJECT_ID:MANAGEMENT_KEY>" \
  -d '{
  "appId": "<outbound-app-id>",
  "userId": "<user-id>",
  "accessToken": "<access-token>",
  "refreshToken": "<refresh-token>",
  "accessTokenExpiry": 1700000000,
  "accessTokenType": "Bearer",
  "scopes": ["scope1", "scope2"],
  "externalIdentifier": "<provider-user-id>",
  "idToken": "<id-token>",
  "grantedBy": "<granting-user-id>",
  "verifyRefresh": false
}'
Import a Single Tenant Token
curl -X POST "__BaseURL__/v1/mgmt/outbound/app/tenant/oauthtoken/upload" \
  -H "Content-Type: application/json" \
  -H "Authorization: Bearer <PROJECT_ID:MANAGEMENT_KEY>" \
  -d '{
  "appId": "<outbound-app-id>",
  "tenantId": "<tenant-id>",
  "accessToken": "<access-token>",
  "refreshToken": "<refresh-token>",
  "accessTokenExpiry": 1700000000,
  "accessTokenType": "Bearer",
  "scopes": ["scope1", "scope2"],
  "externalIdentifier": "<provider-tenant-id>",
  "idToken": "<id-token>",
  "grantedBy": "<granting-user-id>",
  "verifyRefresh": false
}'
Batch Import User Tokens
curl -X POST "__BaseURL__/v1/mgmt/outbound/app/user/oauthtoken/batch/upload" \
  -H "Content-Type: application/json" \
  -H "Authorization: Bearer <PROJECT_ID:MANAGEMENT_KEY>" \
  -d '{
  "tokens": [
    {
      "appId": "<outbound-app-id>",
      "userId": "<user-id>",
      "accessToken": "<access-token>",
      "refreshToken": "<refresh-token>",
      "accessTokenExpiry": 1700000000,
      "accessTokenType": "Bearer",
      "scopes": ["scope1", "scope2"],
      "externalIdentifier": "<provider-user-id>",
      "idToken": "<id-token>",
      "grantedBy": "<granting-user-id>"
    }
  ]
}'
Batch Import Tenant Tokens
curl -X POST "__BaseURL__/v1/mgmt/outbound/app/tenant/oauthtoken/batch/upload" \
  -H "Content-Type: application/json" \
  -H "Authorization: Bearer <PROJECT_ID:MANAGEMENT_KEY>" \
  -d '{
  "tokens": [
    {
      "appId": "<outbound-app-id>",
      "tenantId": "<tenant-id>",
      "accessToken": "<access-token>",
      "refreshToken": "<refresh-token>",
      "accessTokenExpiry": 1700000000,
      "accessTokenType": "Bearer",
      "scopes": ["scope1", "scope2"],
      "externalIdentifier": "<provider-tenant-id>",
      "idToken": "<id-token>",
      "grantedBy": "<granting-user-id>"
    }
  ]
}'
For full request/response schemas, see the API reference.
Storing API Keys from Your Backend
For an API key app, the user usually enters the key in a flow. Sometimes your backend already has the key instead, for example when a user pastes the key into your own settings page, or when you provision a key for a tenant. In those cases, you can store the key in the token vault directly with a management key.
The management key can write any user's or tenant's key. Take the user ID and tenant ID from the caller's validated session, not from the request. Before you upload a tenant key, check that the caller may manage that tenant.
A user key can carry an optional tenant ID, which associates the key with a tenant. The key still belongs only to that user. To store one key that everyone in a tenant shares, upload a tenant key instead.
// Store an API key for a user
await descopeClient.management.outboundApplication.uploadUserApiKey(
  'my-api-key-app',
  'user-123',
  '<the-users-api-key>',
  'tenant-123' // optional
);

// Store an API key for a tenant
await descopeClient.management.outboundApplication.uploadTenantApiKey(
  'my-api-key-app',
  'tenant-123',
  '<the-tenants-api-key>'
);
To store a tenant key without code, you can also add it in the Console.
Next Steps
After a user connects to an outbound app, you can:
- Use the SDKs or APIs to retrieve tokens for backend operations.
- Connect to multiple providers for the same user.
- Create multiple outbound connections for a user with different scopes.
For working code examples, see our Outbound Apps Examples.