Segment Connector
This guide covers implementing Descope's segment connector. Segment is an analytics product that allows you to collect events from web and mobile apps. Descope enables you to capture data from Segment to better understand your customer's needs.
Configure Segment connector
Descope uses your Segment Write Key to programmatically send event updates during your authentication flow. Start by navigating to the Descope Segment connector: Connectors then select Segment
Now, complete the required fields:
- Connector name: Custom name for your connector. This will come in handy when creating multiple connectors from the same connector template.
- Write Key: The Segment Write Key generated for the Descope service. Read more on how to find it in Segment's documentation. You can also configure the optional fields:
- Connector description: Describe what your connector is used for.
- Custom base URL: The base URL of the Segment API, when using a custom domain in Segment.
You can test if your connector's configuration is working properly simply by hitting the Test button and viewing the Test Results panel.
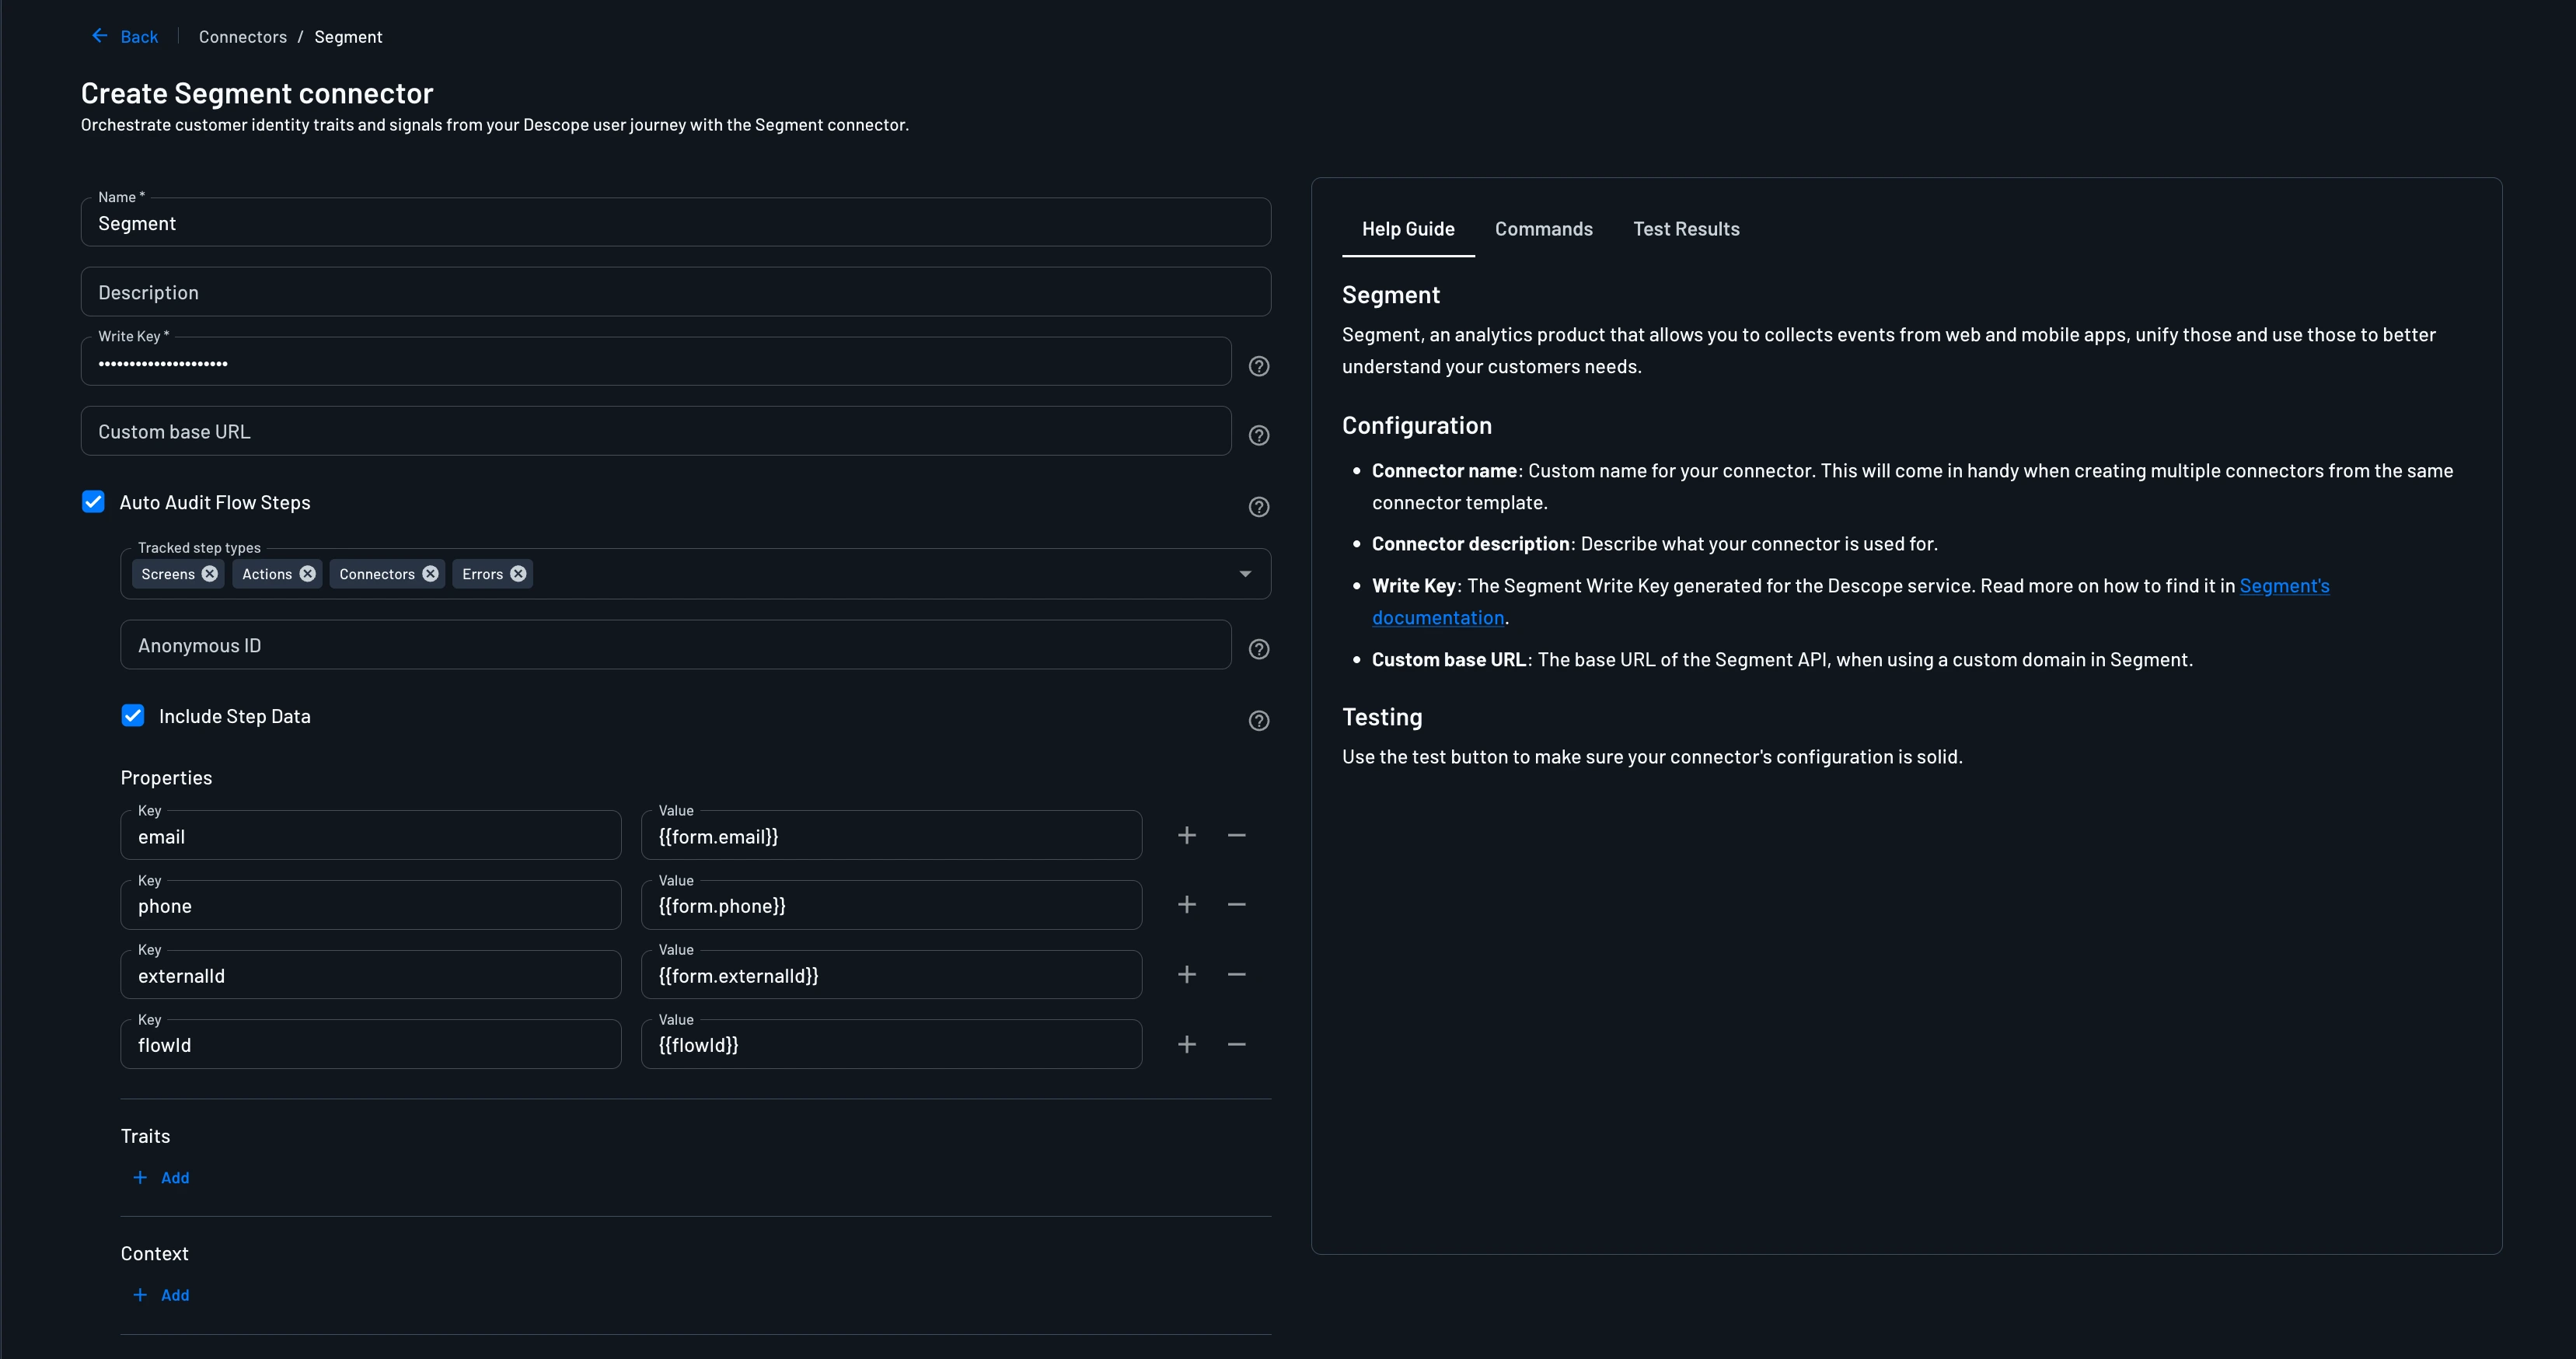
Save your configuration by hitting Create.
Auto Audit Flow Steps
Enable Auto Audit Flow Steps to have Descope send Segment events on its own, without placing the connector in a flow. When enabled, this connector is automatically triggered after every flow step of the types you select below — no need to add it to flows manually.
- Tracked step types: Choose which kinds of flow steps should trigger an event — Screens, Connectors, Errors, Actions, and/or Conditions.
- Anonymous ID: The ID associated with your user when you don't know who they are.
- Include Step Data: When enabled, data about the flow step that triggered the event (such as its step ID or type) is automatically included as additional properties, on top of anything you configure below.
- Properties: Key/value pairs sent as event properties, for example
email→{{form.email}}, orflowId→{{flowId}}. Use+/-to add or remove rows. - Traits: A dictionary of traits you want to record on your user, like email or name.
- Context: Key/value pairs sent as Segment context data (for example, information about the device, page, or app the event originated from).
- Integrations: A dictionary of destination-specific options keyed by destination name (e.g.
Amplitude (Actions)). Use it to pass destination-specific data such as theAmplitude session IDanddevice ID.
Additional Step-Type Groups
Note
Each step type can only belong to one group at a time. Once a step type is assigned to a group, it no longer appears as an option when configuring another group.
Since different step types often need different attributes, you can configure more than one Auto Audit Flow Steps group instead of a single set of settings that applies to every tracked step type.
- Under Additional step-type groups, click Add group config.
- In the new group's Tracked step types field, select one or more step types.
- Configure the same fields for this group as described above (Anonymous ID, Include Step Data, Properties, Traits, Context, Integrations).
- Click Add group config again to add further groups for the remaining step types.
For example, you could keep Screens in the default group with one set of properties, and add a second group covering Connectors, Errors, and Actions together with a different set of properties.
Browser Analytics
Enable Browser Analytics to let Segment connector actions load Segment's analytics.js library in your end users' browsers during flows. The library sets Segment's anonymous ID cookie (ajs_anonymous_id), so Segment can recognize a visitor whose first visit is a Descope flow as the same visitor on your other pages. Read more in Segment's cookie documentation.
- Public Write Key: The write key of a Segment JavaScript Website source, separate from the source used for the Write Key field. Unlike the Write Key, the Public Write Key is visible to end users, because Segment's browser library runs in the end user's browser. Read more on how to find the write key in Segment's documentation.
Enabling Browser Analytics does not load the library on its own. To load the library in a flow, add a Segment connector action (Identify, Track, or Page) to the flow and turn on Load Browser Analytics Script in the action's settings. See Add your Segment connector to a flow.
When the library loads:
- The library does not send any events from the browser. Events are still sent from Descope's servers through the Segment connector actions in your flows (Identify, Track, and Page) and by Auto Audit Flow Steps.
- The library doesn't delay the flow. If Segment's CDN is blocked or slow, the first screen loads without waiting for Segment.
- If the page that embeds your flow already loads Segment, Descope uses that instance instead of loading a second copy.
Content Security Policy
If your site enforces a Content Security Policy, add cdn.segment.com to script-src, and add cdn.segment.com and api.segment.io to connect-src. Segment destinations you enable may load additional hosts.
Add your Segment connector to a flow
Note
This is a manual, per-flow alternative to Auto Audit Flow Steps. Use this if you only want to send an event from a specific point in a specific flow, rather than automatically after every step of a given type.
Navigate to: Flows, choose your flow. Then, tap the create button
(designated via the + icon), select Connector, and choose the Segment tracking option you'd like.
Click to set down the connector in your flow editor and fill out the fields.
Identify and Track
- Load Browser Analytics Script: When enabled, Segment's
analytics.jslibrary loads in the end user's browser at the start of the flow. Requires Browser Analytics to be enabled, with a Public Write Key, in the connector configuration. - User ID: The unique ID of the user
- Anonymous ID: The ID associated with your user when you don't know who they are
- Traits: A dictionary of traits you want to record on your user, like email or name.
- Integrations: A dictionary of destination-specific options keyed by destination name (e.g.
Amplitude (Actions)). Use it to pass destination-specific data such as theAmplitude session IDanddevice ID.
Page
Use the Page action to record page views, so you can see what pages your users are visiting.
- Load Browser Analytics Script: When enabled, Segment's
analytics.jslibrary loads in the end user's browser at the start of the flow. Requires Browser Analytics to be enabled, with a Public Write Key, in the connector configuration. - User ID: The unique ID of the user
- Anonymous ID: The ID associated with your user when you don't know who they are
- Category: The category of the page, for example
RetailorBlog. - Name: The name of the page, for example
HomeorCheckout. - Properties: A dictionary of properties of the page view, such as
url,path,title, orreferrer. - Context: A dictionary of extra information about the tracked datapoint, such as the user's IP address or locale.
Note
Provide a User ID or an Anonymous ID so Segment can associate the page view with a user.
Start typing in the empty field to view attribute options. For the User ID, you could use the {{user.userId}} field.
Now, link your connector in your authentication flow, making sure it's placed after any required attributes you just chose are defined. Simply by adjusting the attributes and location of the connector, you can track anything from a user sign up/in to the method used for authentication.
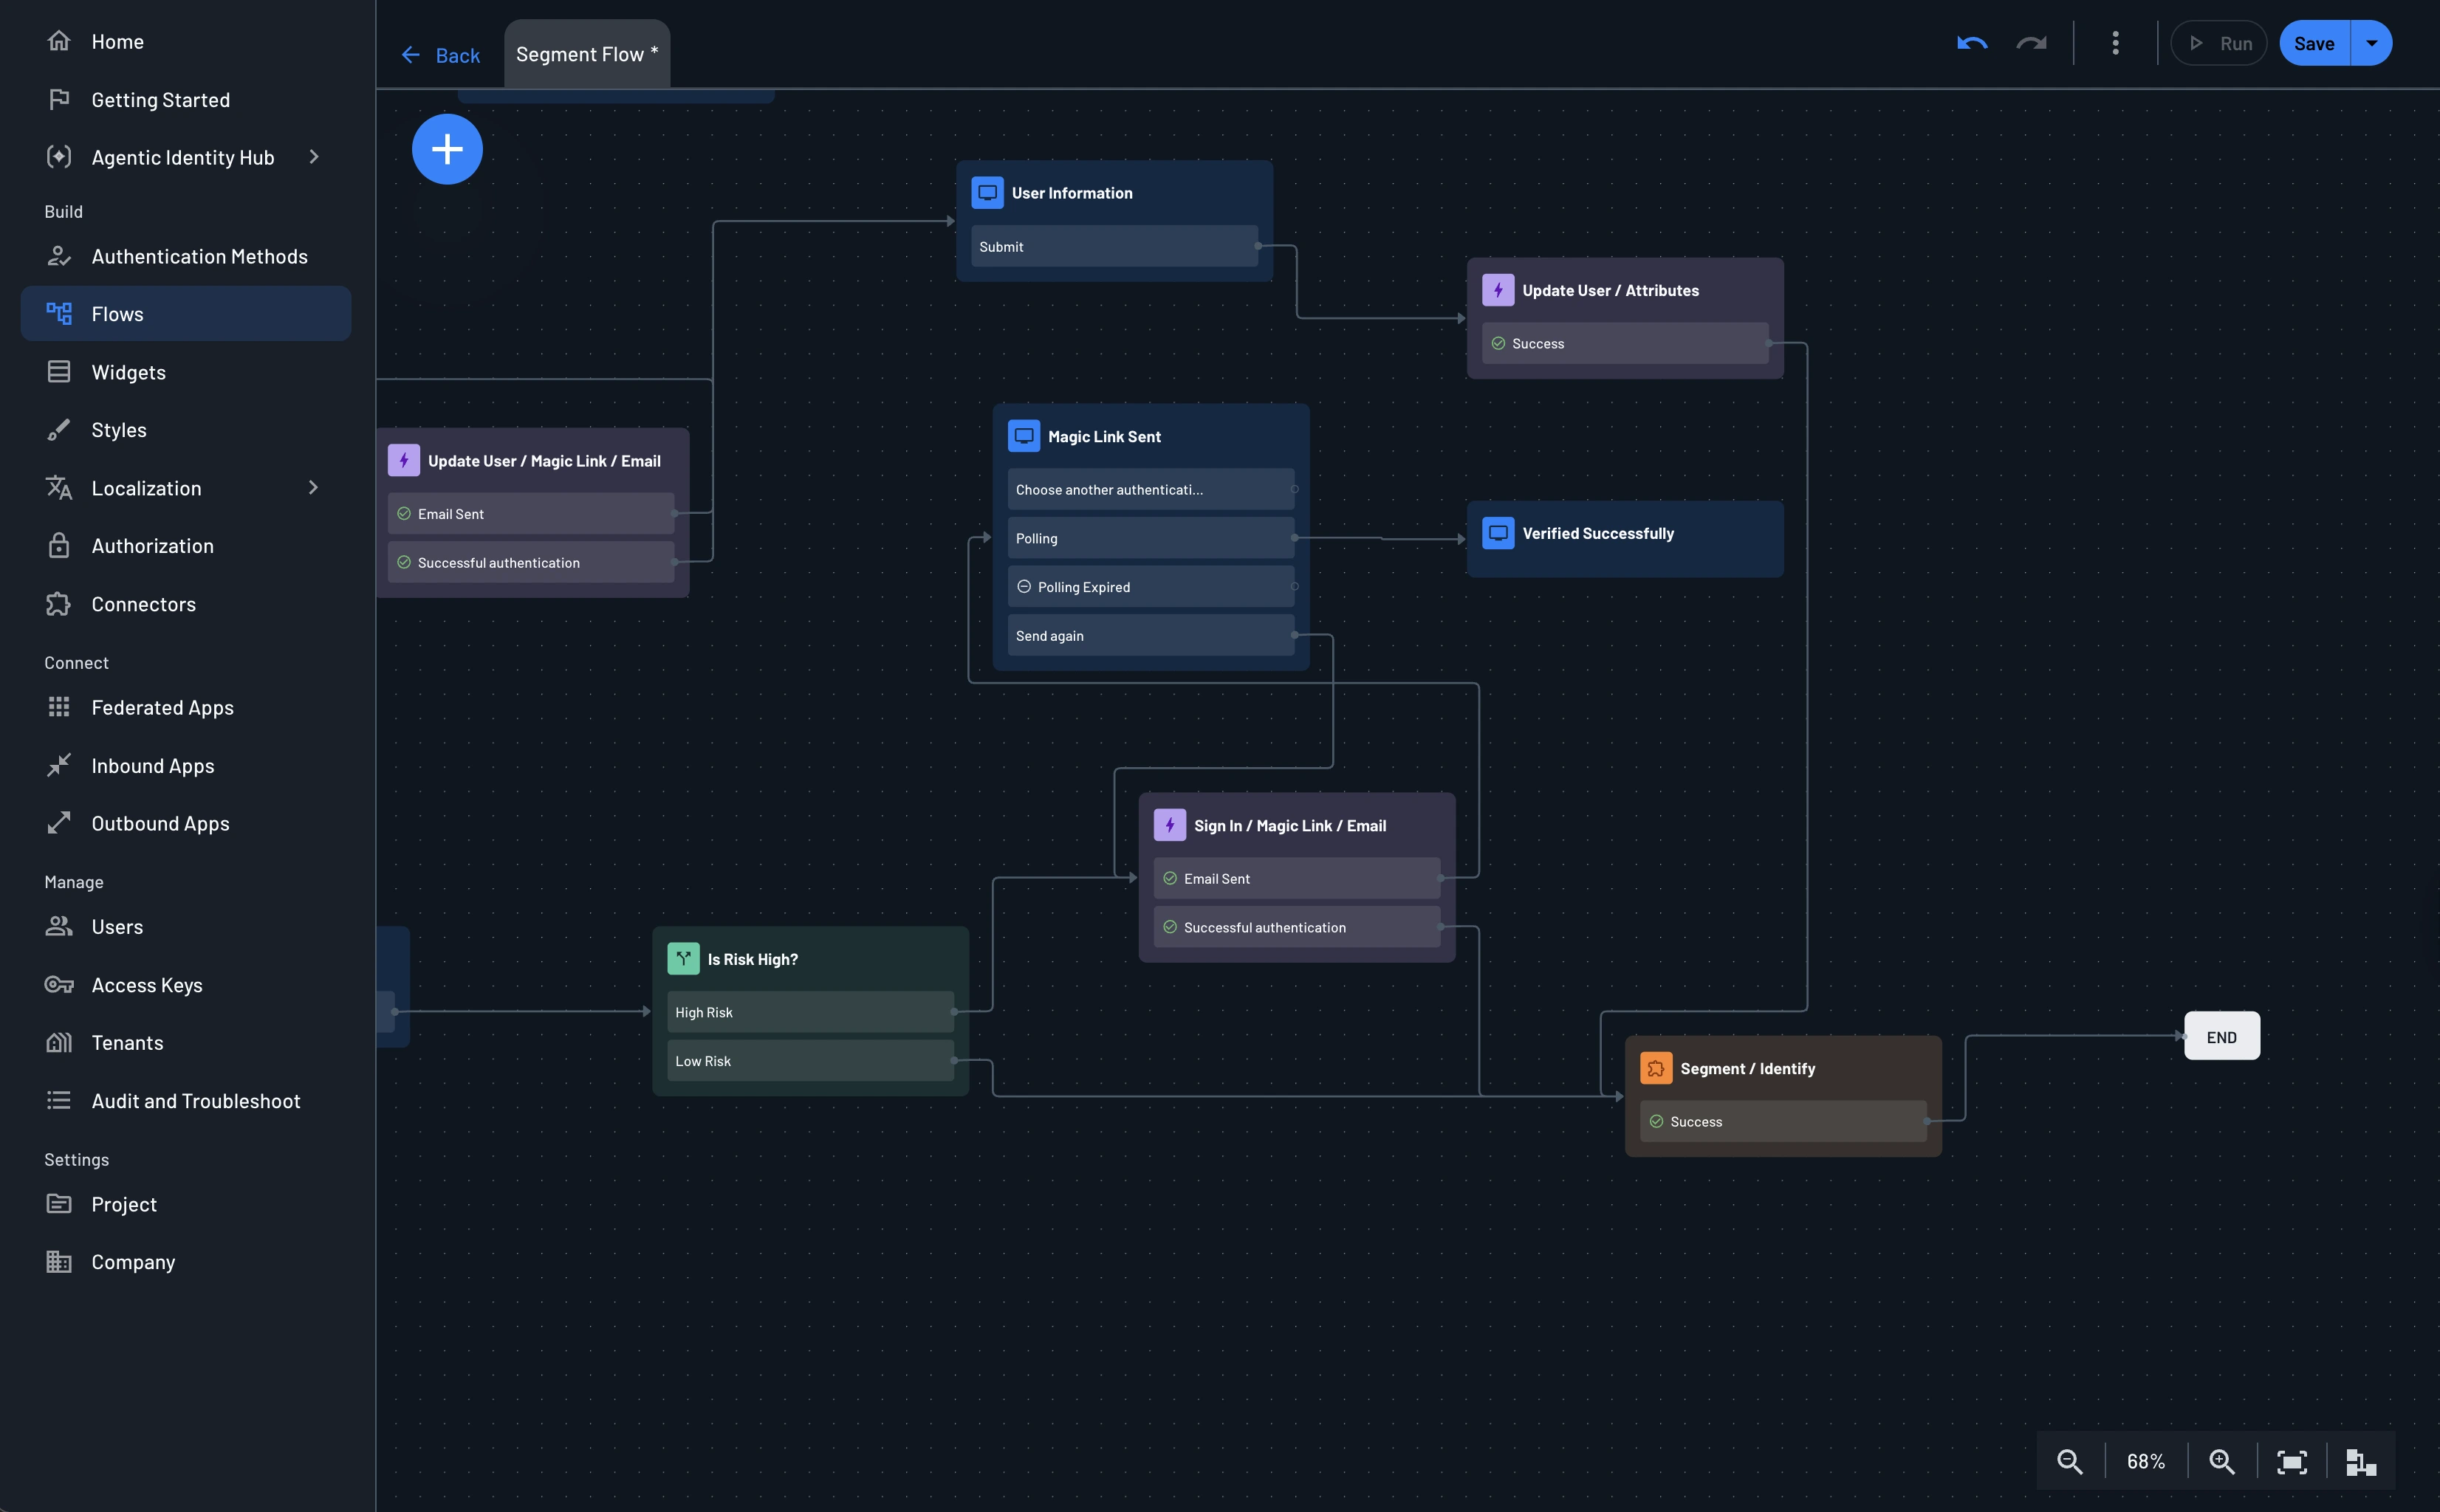
That's it! Whenever a user goes through your authentication flow, the Segment connector will be automatically triggered and the event will appear in your Segment workspace.
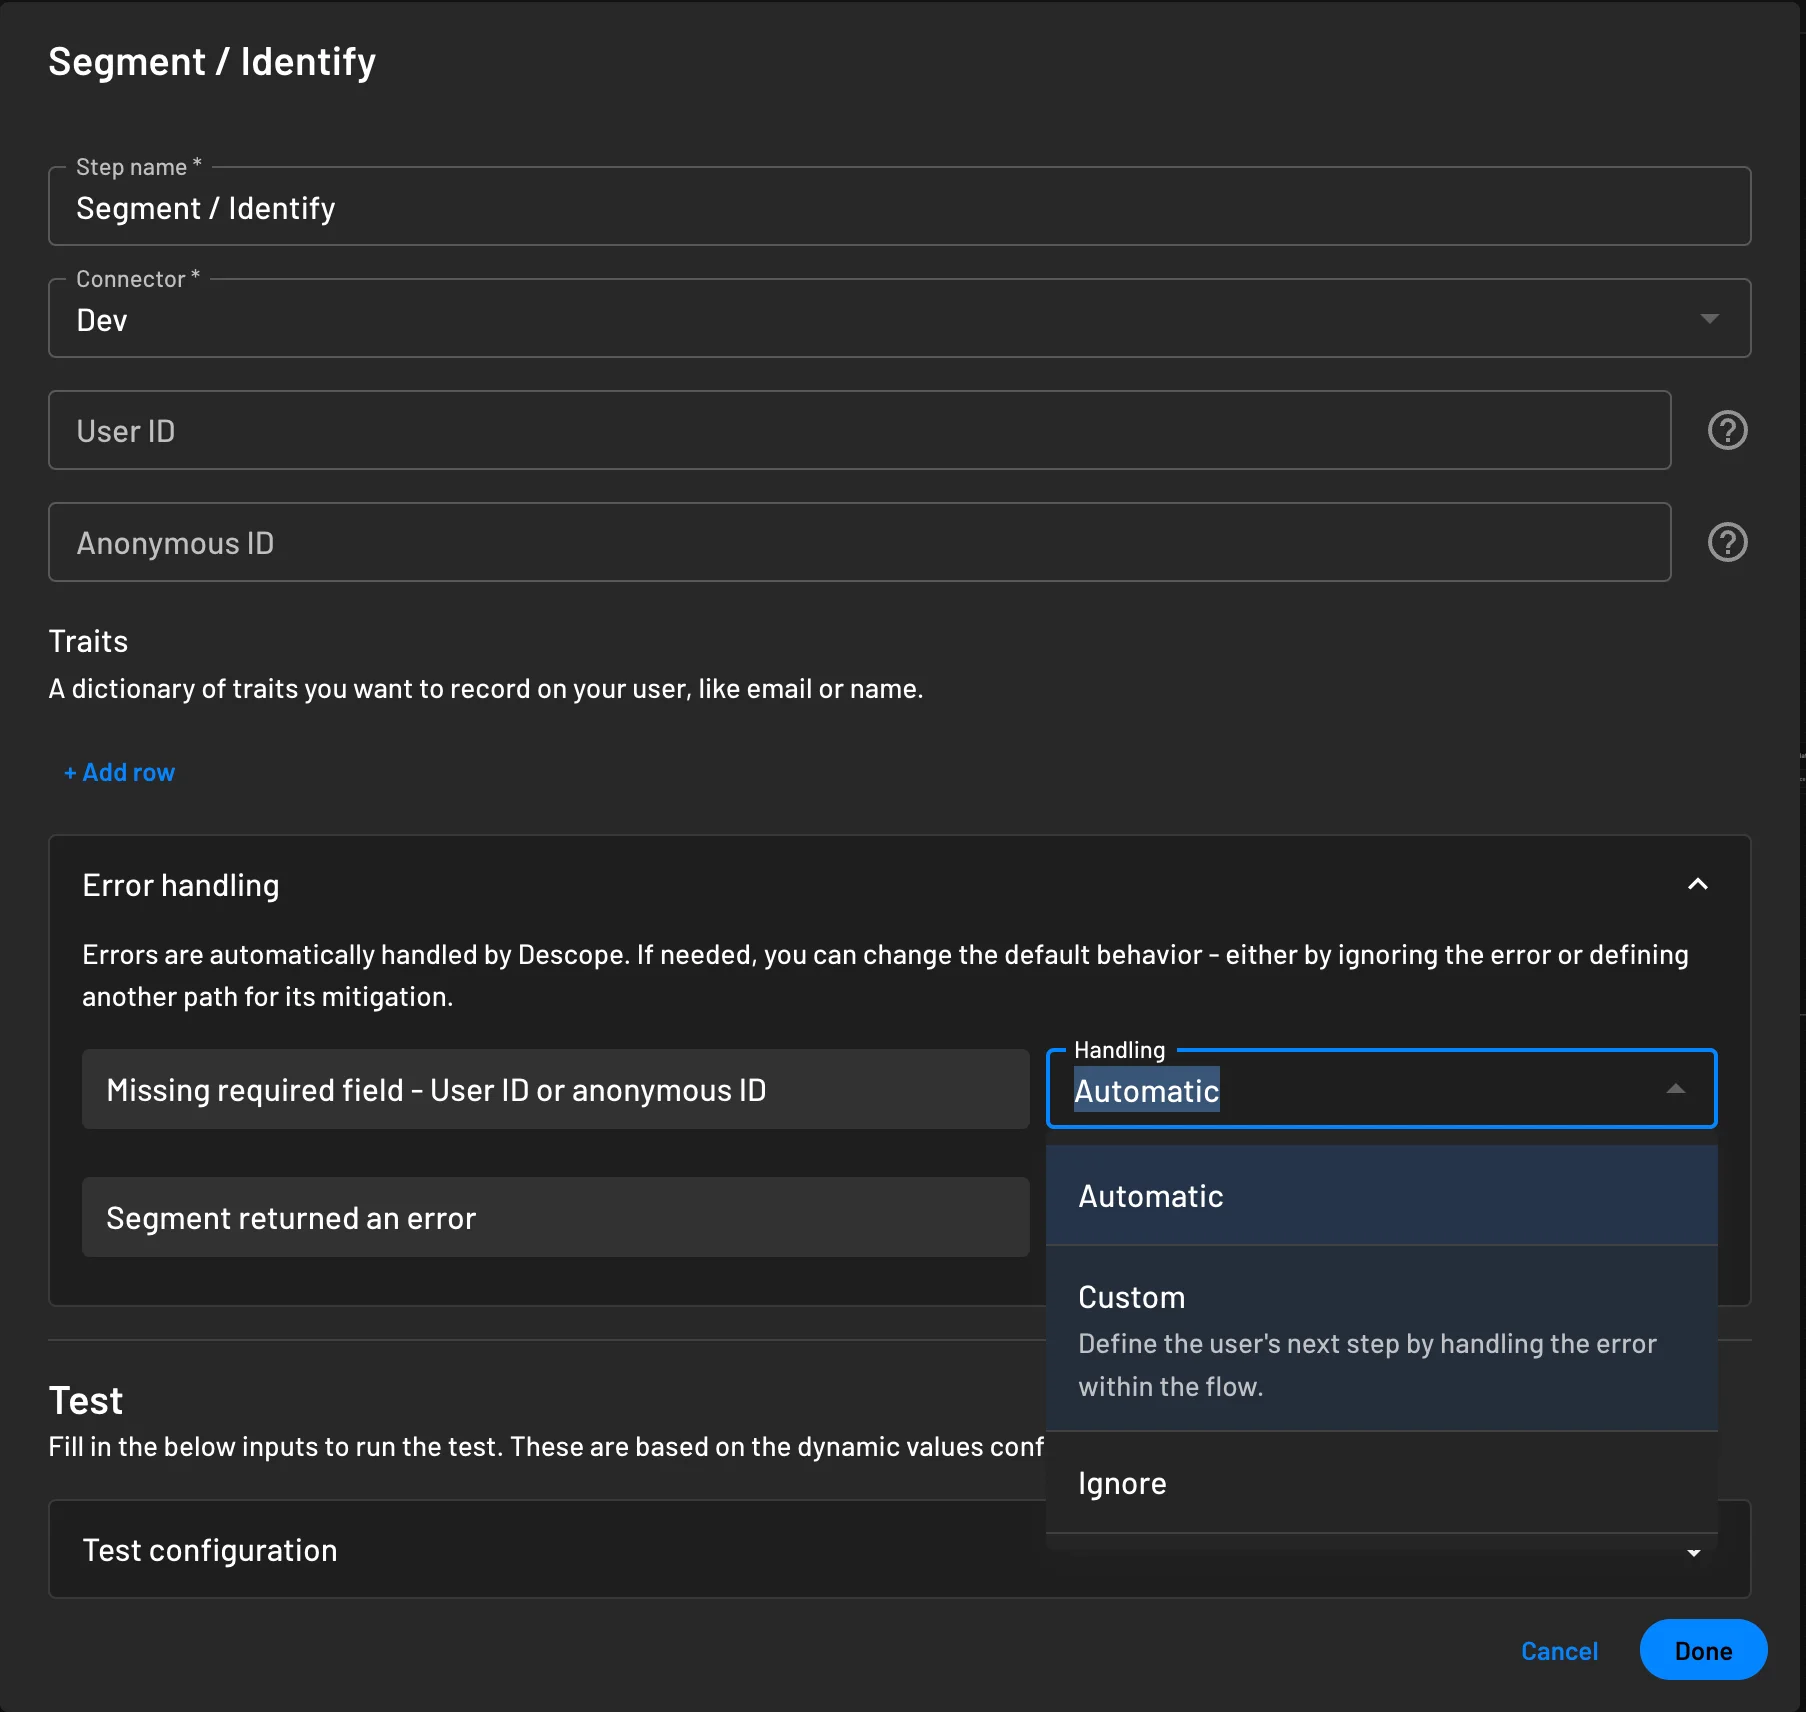
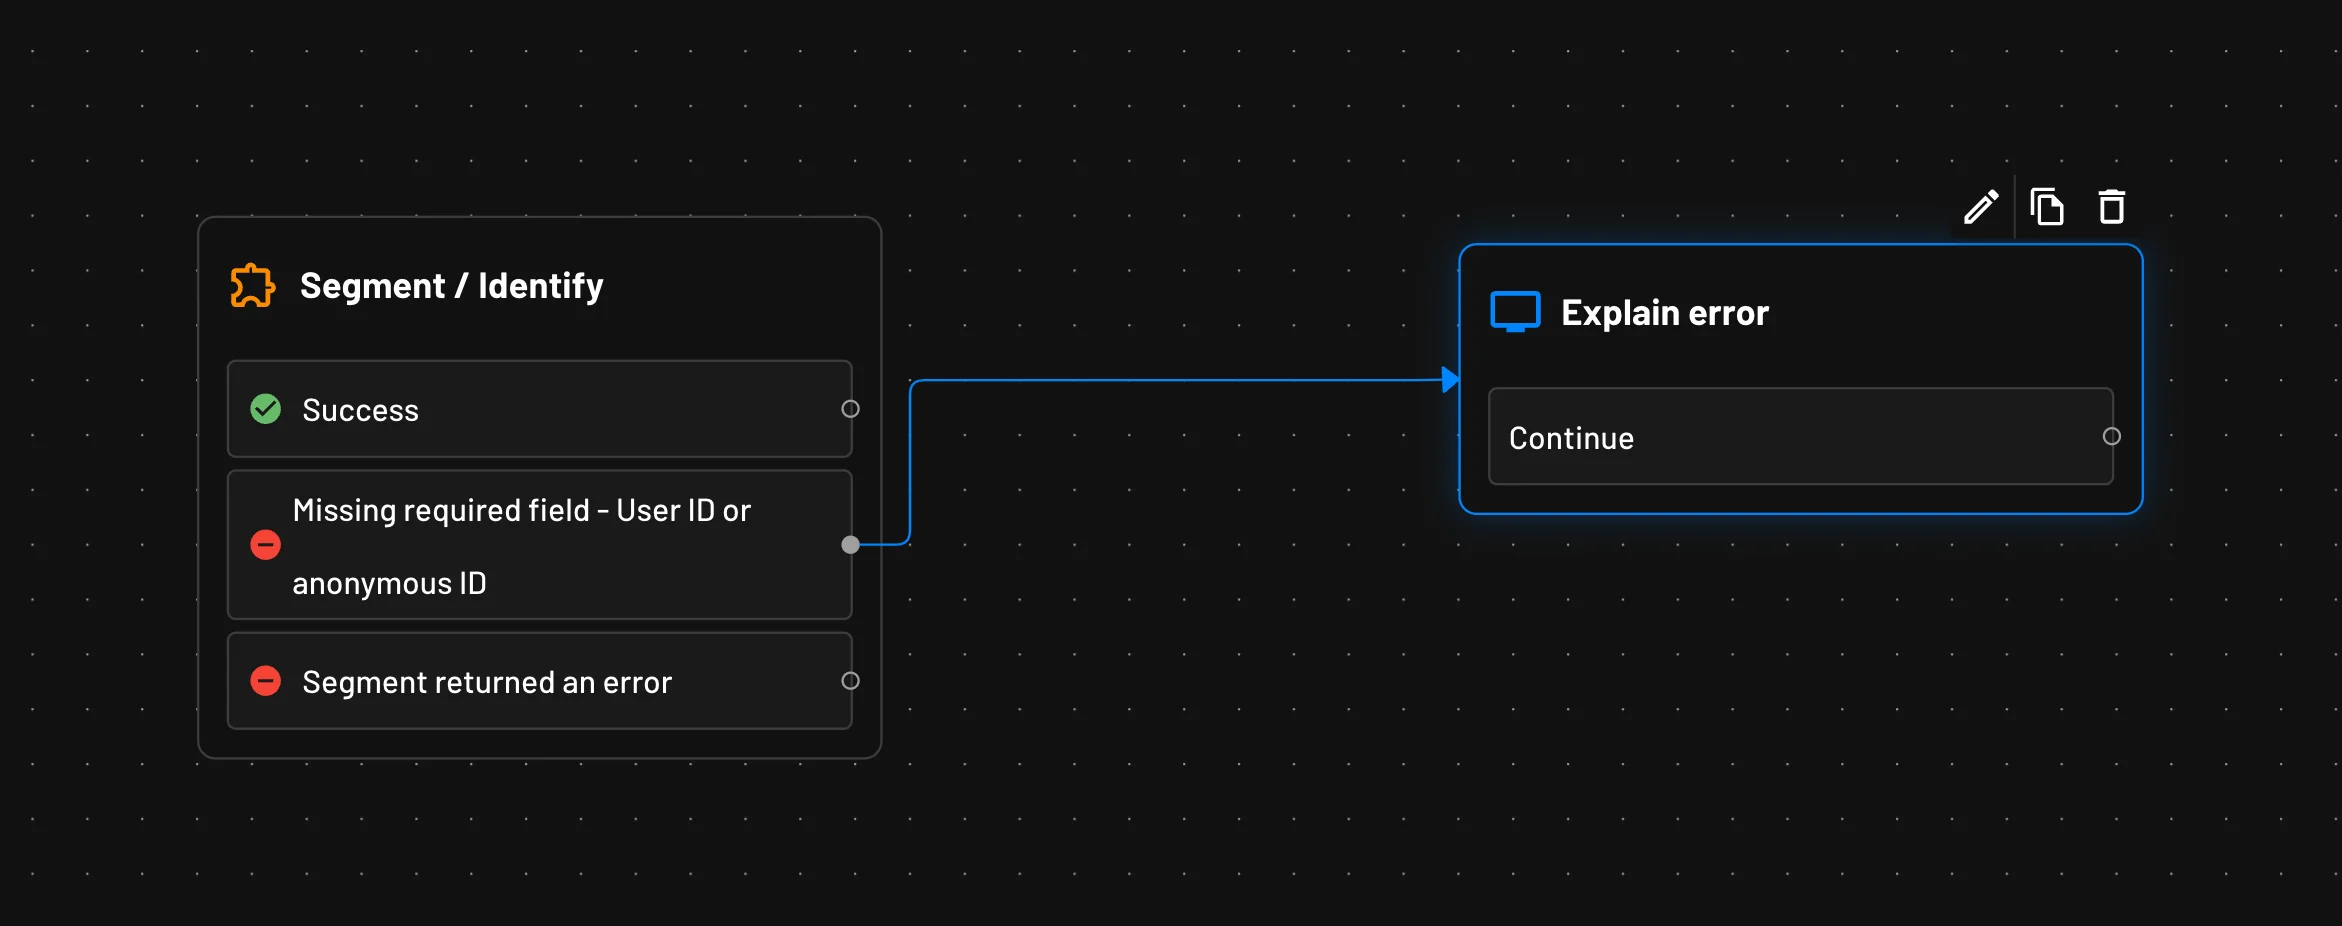
Handle errors
The Segment connector allows for custom handling of errors. After adding the connector (identify, track, or page) to a flow, you can scroll down to the 'Error Handling' section. There, you can change the error handling from 'Automatic' to 'Custom', then link to a custom error handling flow.