SSO & SCIM Migration
Note
Seamless SSO and SCIM migration is only supported for Growth and Enterprise customers. See the Descope pricing page for more information.
If you have a previous SSO or SCIM setup with a different authentication provider or a home-grown solution, usually, the tenant's IT management team is forced to re-configure the setup within their IdP to match the new provider, repointing the SAML/OIDC app, or the SCIM base URL and token. This can cause a lot of friction and unnecessary time consumption, especially when this process requires reaching out to the customers, changing, and testing the authentication or provisioning.
To prevent this friction, Descope supports the ability to consume and eventually migrate the current customer's setup, for both authentication and provisioning.
This creates a totally seamless experience for your end users, who keep signing in through their pre-configured IdPs, without forcing your tenant's IT admins to re-configure their SAML/OIDC or SCIM settings on their end at all.
In this article, we will cover all of the steps required to eventually migrate your customer tenants to Descope: first for SSO, then for SCIM, since both are handled by the same Cloudflare Worker.
Solution Overview
The following chart demonstrates your current implementation for Single-Sign-On:
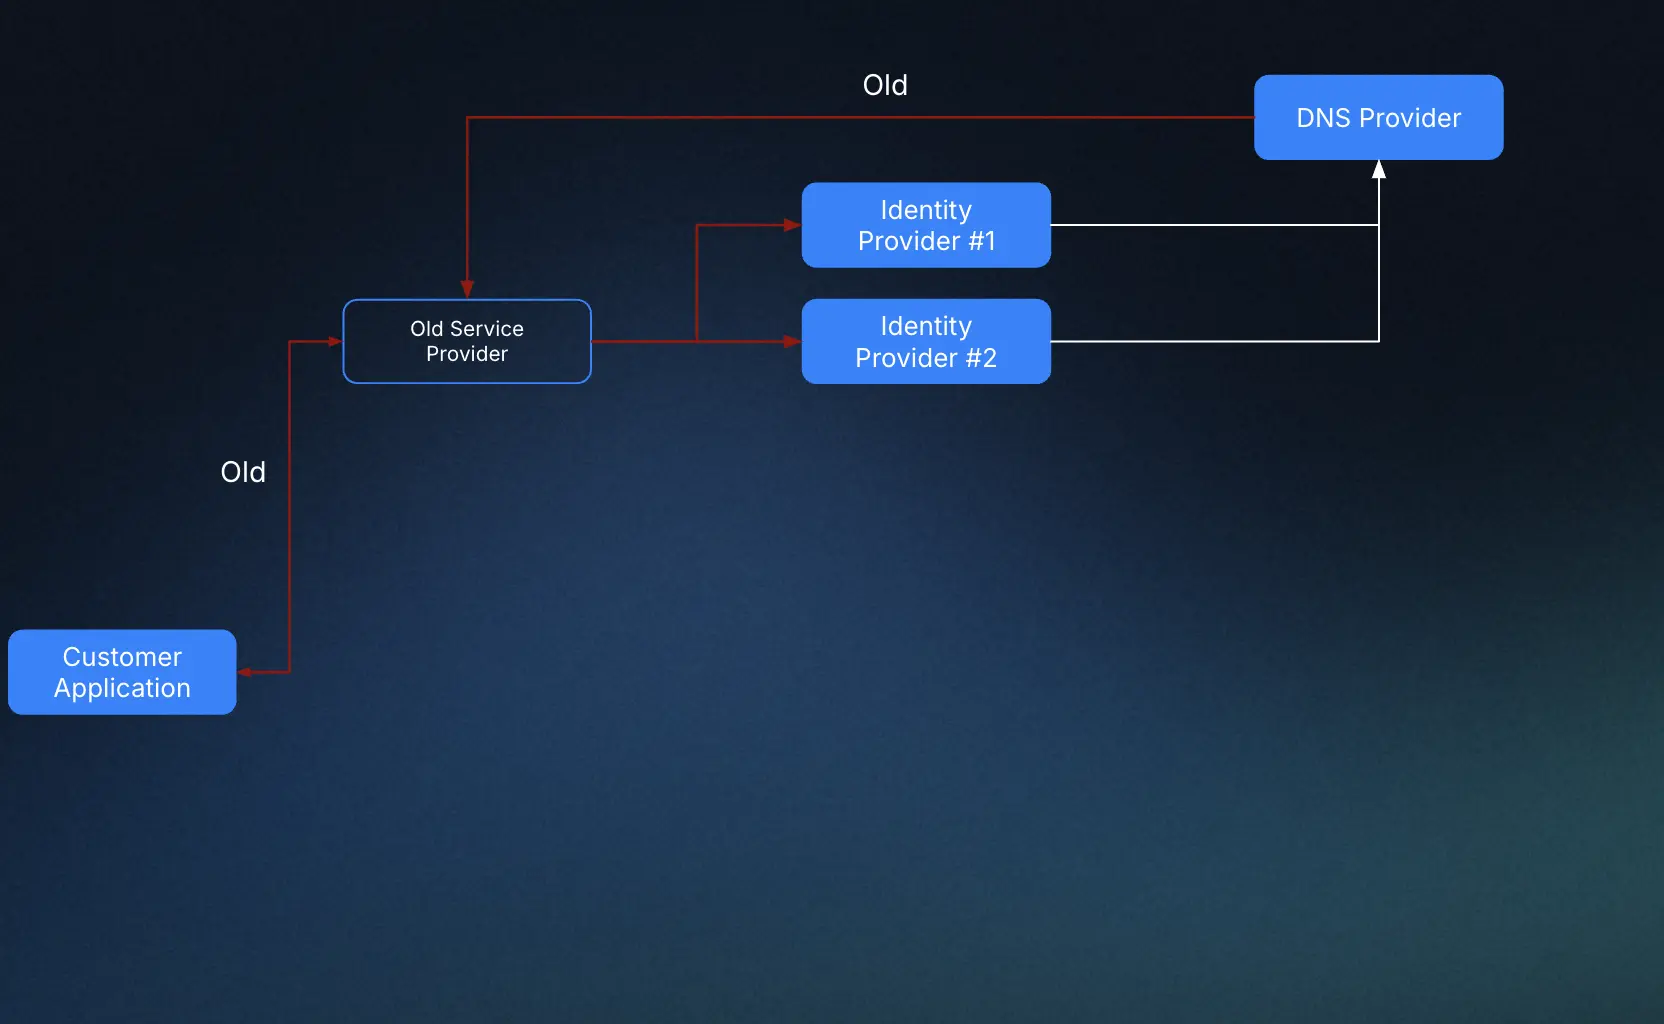
And this chart, demonstrates the implementation, post migration:
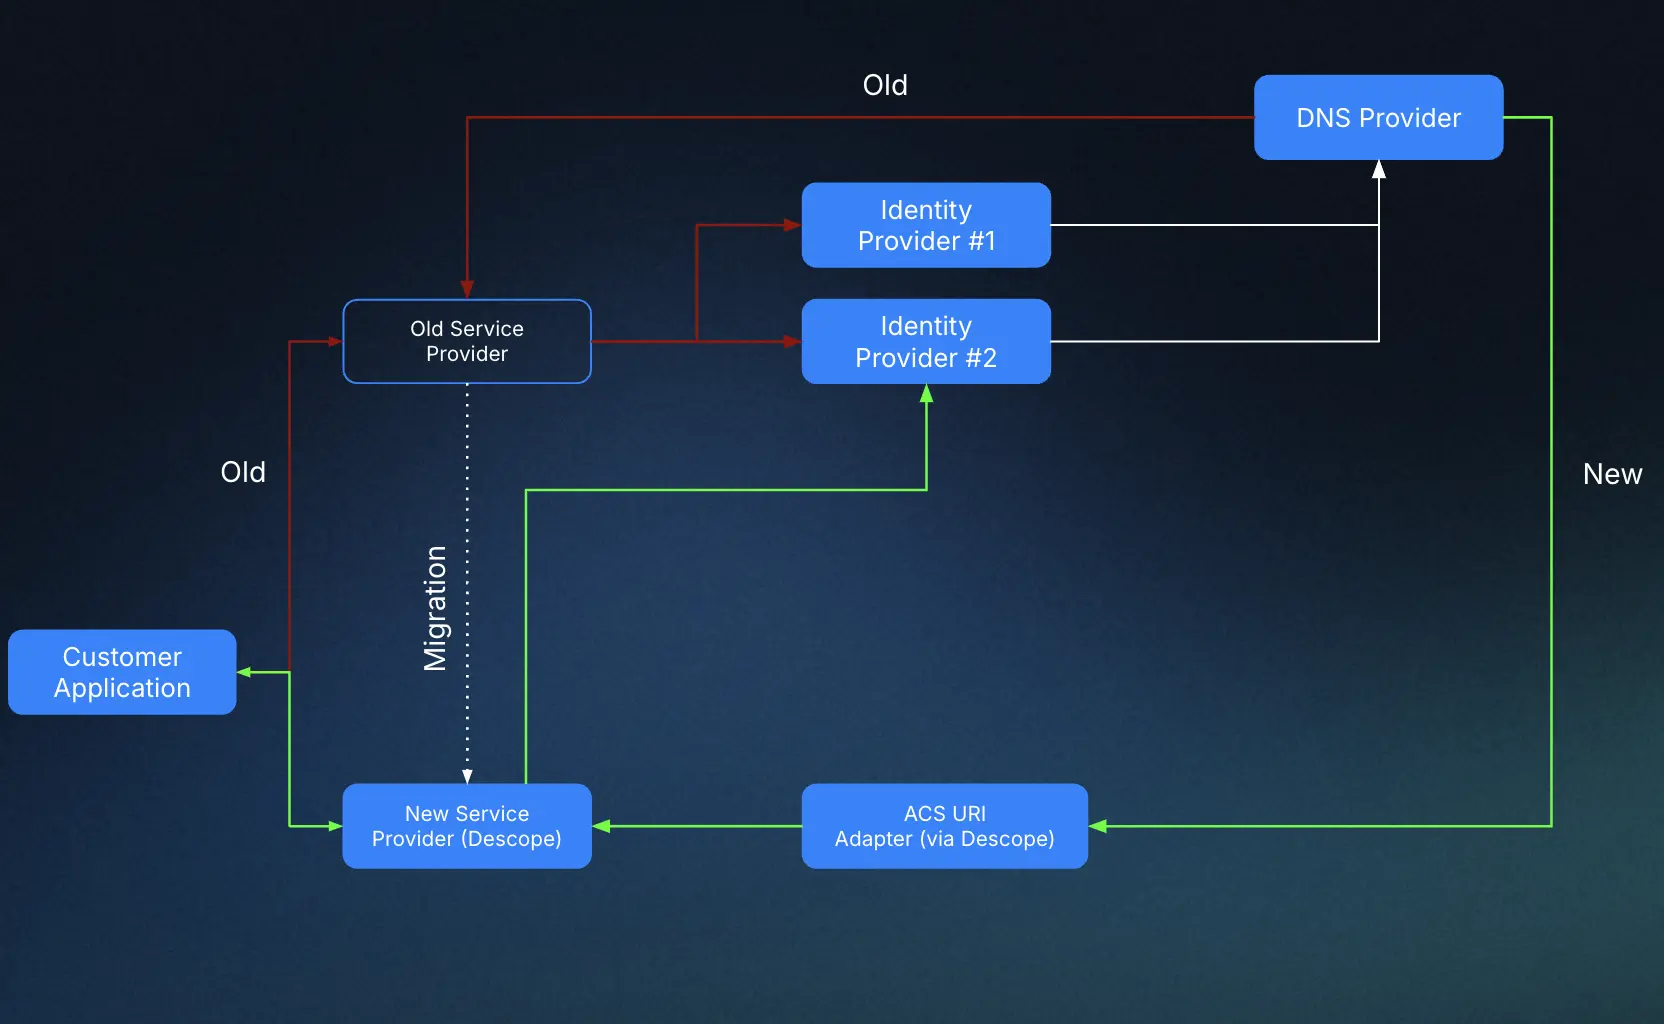
- When the end user starts the SSO authentication, a Descope relay state will be created.
- Once the user is redirected to the IdP, authentication happens as usual.
- Once the authentication is complete, the IdP response returns to the same SP ACS URL the customer had set previously in the IdP's settings.
- Using a DNS provider, the response will be redirected to Descope, passing all the needed parameters to complete the authentication.
- Descope will handle the final response and authenticate the user.
- The user will be authenticated and logged in.
Prerequisites
- A Descope project with Descope API/SDK access.
- A custom domain set up.
- A DNS provider.
- If you're also migrating SCIM provisioning, for each tenant being migrated:
- A SCIM access key
- The connection ID, tenant slug, or org ID segment the previous provider used in its SCIM URLs for that tenant (usually visible in the SCIM app configuration on the IdP side)
Setup Process
Setup overview:
- Implementing SSO authentication with Descope Flows / SDK
- Setting up the Descope tenants with the SSO settings
- Setting up the DNS redirect (and, optionally, SCIM provisioning)
- Testing the Integration
- Moving Forward With Descope
Implementing SSO authentication with Descope Flows / SDK.
First, SSO with Descope should be implemented in the application.
- Authenticate with SSO Using Flows.
- Authenticate with SSO Using SDK - client side, server-side or mobile.
Not sure? Follow this guide to get a general perspective on the implementation.
To ensure a smooth migration, with the ability to "A/B test" and rollback in case things go wrong, the authentication with Descope should be set up with a specific and customized logic that will ensure only specific tenants (customers) will use Descope.
Here is a simple example (using React):
function login (tenant) {

    if (migrationTenants.includes(tenant)) {
        <div>
        <Descope flowId='<flow-id>'
        tenant
        >
        </Descope>
      </div>
    } else {
      // old SP logic
    }
}
Setting up the Descope tenants with the SSO settings
After making sure that the authentication works, set up the customer tenants.
Set up a Descope tenant for each migrating customer. Follow the instructions below to match the required protocol.
SAML
- Create the tenants.
- Acquire the settings from the previous identity provider. These settings are tenant (customer) specific and should match the same values your customer had provided for the previous provider.
Warning
The parameters should match exactly what the customer had set, including fields that are not listed above.
To allow Descope to accept and communicate with the customer's IdP, the default Descope 'EntityId' and 'ACS URL' need to be changed.
These values, referred to commonly below as spEntityId and spAcsUrl, should correspond to what is already set in the customer's IdP.
Use the API or SDK to set the following values:
curl -X POST "__BaseURL__/v1/mgmt/sso/saml" \
  -H "Content-Type: application/json" \
  -H "Authorization: Bearer <ProjectId:ManagementKey>" \
  -d '{
  "tenantId": "xxxxx",
  "settings": {
    ...
    "spACSUrl": "https://mydomain.com/saml",
    "spEntityId": "my-custom-entityid"
  },
  "domains": [
    "mydomain.com"
  ]
}'- Verify the settings by viewing the created tenants -> Select the tenant -> Authetication Methods -> SSO. Or by using the API.
OIDC
- Create the tenants.
- Acquire the settings from the previous identity provider. These settings are tenant (customer) specific and should match the same values your customer had provided for the previous provider.
Warning
The parameters should match exactly what the customer had set, including fields that are not listed above.
-
Set up the SSO OIDC settings, by following this guide.
-
Verify the settings by viewing the created tenants -> Select the tenant -> Authetication Methods -> SSO. Or by using the API.
Setting Up the DNS Redirect
After creating the customer tenants, set up the DNS redirect.
CloudFlare
Using CloudFlare as the DNS provider, a "Worker" is needed to process and redirect the requests using custom logic.
Follow these instructions to create and deploy a new Cloudflare Worker to handle the redirect.
Note
You can have additional logic inside the Worker and customize it to fit your use case better.
-
Create an Account level token:
- Manage Account > Account API Tokens > Create token > "Edit Cloudflare Workers"
-
Copy the created token and export it as an environment variable locally:
export CLOUDFLARE_API_TOKEN=<CLOUDFLARE_TOKEN>-
Clone the worker template, from our official template from here.
-
Update
wrangler.toml- Line 27 - set your old backend host (old-auth.example.com).
- Lines 14-15 to your pattern and zone.
-
Run and deploy:
npm i && npm run deploySCIM Provisioning (Optional)
If a tenant also has an existing SCIM provisioning setup with the previous provider, the same worker can proxy that traffic to Descope. The IdP keeps sending SCIM requests to the same base URL and token it always has, while the worker rewrites the path and swaps the token so Descope receives a valid SCIM request for the right tenant. This means the tenant's IT admin never needs to touch the SCIM app configuration on the IdP side.
Note
If SCIM provisioning is not yet configured for these tenants in Descope, set that up first: see SCIM Management and the IdP-specific guides for Azure or Okta.
Alongside wrangler.toml, the worker reads a src/projectConfig.json file that maps each incoming hostname to a Descope project, with independent sso and scim blocks:
cp src/projectConfig.example.json src/projectConfig.jsonWarning
src/projectConfig.json is listed in .gitignore because it contains SCIM bearer tokens. Never commit it with real values.
{
  "login.example.com": {
    "newCname": "auth.example.com",
    "projectId": "YOUR_DESCOPE_PROJECT_ID",
    "sso": {
      "enabled": true,
      "logOnly": false
    },
    "scim": {
      "enabled": true,
      "logOnly": false,
      "tenants": {
        "<connection_id>": {
          "tenantId": "<descope_tenant_id>",
          "token": "Bearer <descope_project_id>:<descope_scim_token>"
        }
      }
    }
  }
}| Field | Default | Description |
|---|---|---|
enabled | false | Enables SCIM proxying for this hostname. |
logOnly | false | When true, logs the rewrite the worker would have made but forwards the original request unchanged. Use this to validate detection before going live. |
tenants | "*" | Proxies every request as-is, forwarding the original Authorization header unchanged (use only if the previous provider issued one shared token). A map performs a per-tenant token swap, described below. |
Mapping tenants: for a real migration, tenants should be a map, not "*", so a single worker can handle many customer tenants, each with its own Descope SCIM token. Each key must equal the path segment that appears immediately before the SCIM resource type in the incoming URL, regardless of what that segment represented for the previous provider (connection ID, tenant slug, org ID, etc.):
/scim/v2/connections/con_OVM407qBECcvwRSG/Users  →  key is "con_OVM407qBECcvwRSG"
/scim/v2/tenants/tenant_xyz/Groups               →  key is "tenant_xyz"
/scim/v2/orgs/org_abc/Users                      →  key is "org_abc"
Each entry maps that segment to a Descope tenant and its SCIM access key:
"tenants": {
  "con_OVM407qBECcvwRSG": {
    "tenantId": "T2abc123",
    "token": "Bearer <projectId>:<scimToken>"
  },
  "tenant_xyz": {
    "tenantId": "T2xyz456",
    "token": "Bearer <projectId>:<anotherScimToken>"
  }
}- Requests whose segment is found in the map have their
Authorizationheader replaced with the mapped Descope token before being forwarded. - Requests whose segment is not found in the map are rejected with
401 Unauthorized. Add every tenant being migrated to the map before enabling SCIM proxying for that hostname.
The worker also normalizes the path itself, stripping the provider-specific segment so Descope receives its standard SCIM path:
/scim/v2/connections/con_abc/Users/123  →  /scim/v2/Users/123
/scim/v2/tenants/tenant_xyz/Groups      →  /scim/v2/Groups
Supported SCIM resource types: Users, Groups, Schemas, ServiceProviderConfig, ResourceTypes, Bulk, Me.
Before flipping a tenant over, set logOnly: true on its scim block and trigger a sync from the IdP (or wait for its next cycle). Confirm in the worker logs that the request is matched to the correct tenant and would be rewritten correctly, then set logOnly: false to start forwarding for real.
Testing the Integration
After completing the migration steps, test the integration with your own tenants or test accounts.
Moving Forward With Descope
Migration works? here are details on what's next.
Once migration is set, it will serve your customer as long as the same values are used or valid. For reasons like a pro-active change of settings or expiry of a certificate, perform a seamless migration to Descope with the Tenant Self Service Provisioning. For home-grown implementations, read our documentation about Tenant Management to update the settings accordingly.
If you also enabled SCIM proxying, confirm requests are arriving by checking the audit log for SCIMEvent entries scoped to the tenant, as described in SCIM Best Practices.
Eventually, the users should be able to seamlessly sign in with their respective IdPs, without having to force the administrators to change any settings on their end.