Setting Up a Gateway
Early access
The Descope Agent Gateway is in early access. To use it, ask Descope Support to enable it for your project. The screens below may change before general availability.
The Gateways page is where you set up the Descope Agent Gateway.
You create a gateway, deploy it in your own infrastructure with the credentials Descope issues, and then add a route for every API or MCP server you want agents to reach through it. When you create a gateway, Descope creates a gateway Resource, which agents authenticate to, and a Client the gateway uses for token exchange. Each route is backed by a Resource of its own, either a new one or one you already have.
For how gateways work, including the architecture, token exchange, and where policies apply, see Gateways. This page covers creating and configuring a gateway in the Descope Console.
Creating a Gateway
One gateway or one per customer?
For an internal gateway that your employees' agents use, create one gateway. For an external gateway that your customers' agents use, you can share one gateway across every customer or create one per customer, so each gets a base URL of their own. Each customer is a tenant either way. A gateway per customer adds a separate URL on top of the tenant rather than replacing it.
See Internal and External Gateways for how the two compare.
You can create as many gateways as you need, for example one per environment or one per product line. The Gateways page lists each one with its template, connection status, number of routes, and creation date.
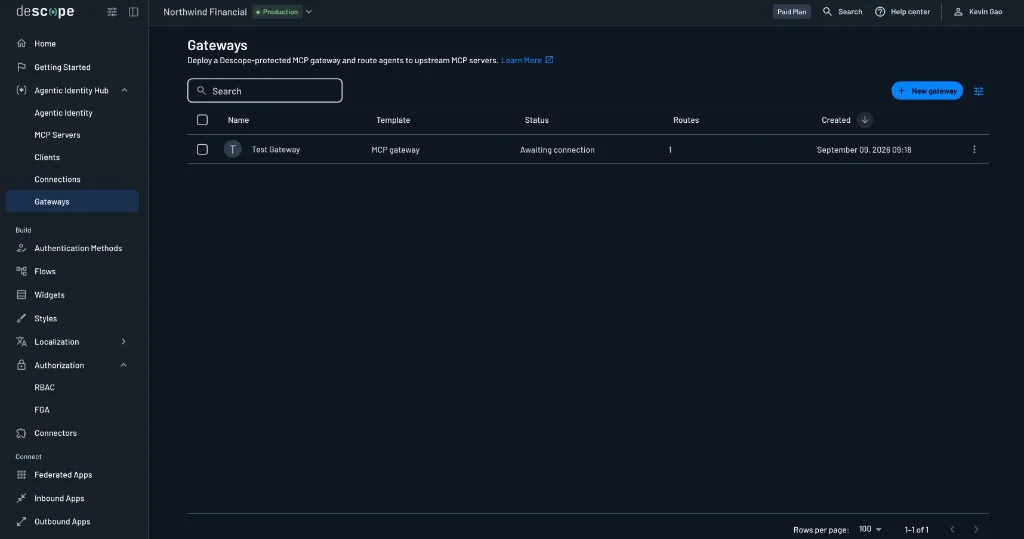
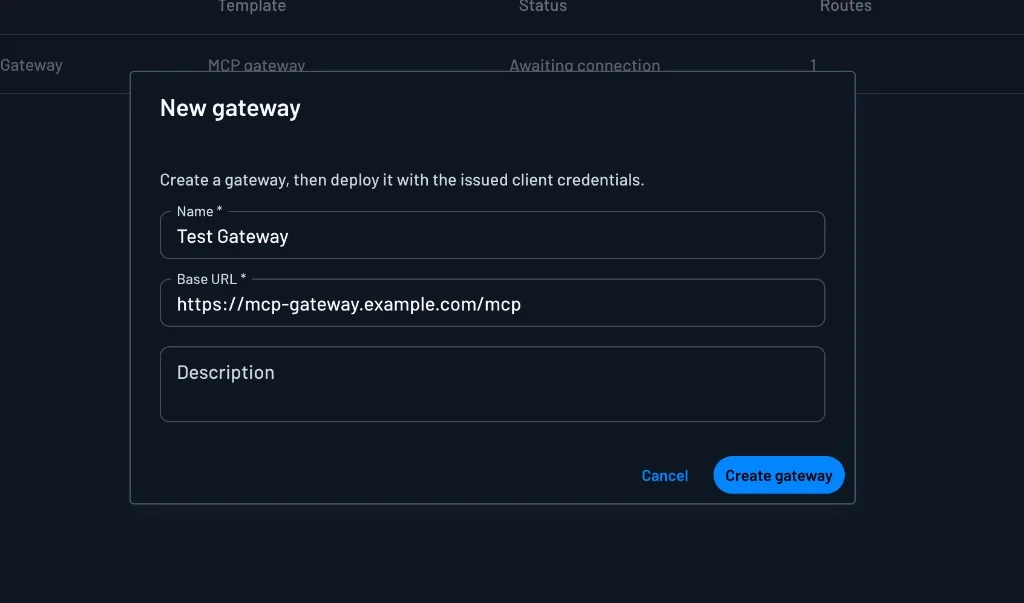
To create one, click + New gateway and fill in:
- Name: A display name for the gateway.
- Base URL: The public URL where you'll deploy the gateway, such as
https://mcp-gateway.example.com/mcp. This is the URL you give agents, and route endpoints are built under it. - Description: Optional notes for your team.
Gateway Details
Note
The gateway shows Awaiting connection as a label until your deployment connects to Descope.
After you create a gateway, Descope automatically issues it a Client ID and Client secret. The deployed gateway uses these to authenticate to Descope when it performs token exchange and fetches Connection tokens on a route's behalf.
Keep the secret on the gateway, never in an agent or client, and use Rotate secret if it may have been exposed.
The Download agentgateway configuration button downloads a configuration file for deploying the gateway with agentgateway.
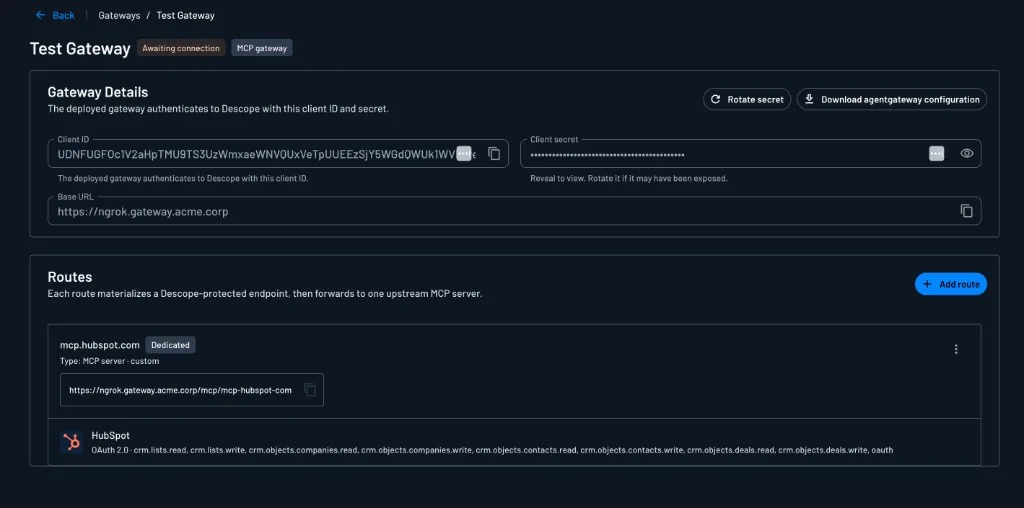
The Routes section lists every route on the gateway, with its endpoint URL and the Connection attached to it, including the scopes that Connection can mint.
Before You Add Routes
Create a Connection first
If a route fronts a third-party API or MCP server, create a Connection for it before you add the route. Examples include HubSpot, Amplitude, or an internal system that takes an API key. The route dialog asks you to pick the Connection, so it has to exist already.
The Connection is where Descope stores and refreshes the OAuth tokens or API keys that the upstream service needs. To set one up:
- For OAuth providers, register an app with the provider and create an OAuth Connection with its client ID and secret.
- For API keys, create an API Key Connection.
- Then get tokens into it for your users or tenants, using one of the methods in Storing Connection Tokens.
You can create Connections per tenant, so each of your customers gets their own client ID and secret, or their own API key. Set the Associated Tenant on the Connection (see Connection Details), or create tenant-specific instances from a DCR preset Connection.
When a call comes in, Descope uses the Connection that matches the tenant on the agent's token. Multi-Tenancy with Connections covers how user and tenant tokens are kept apart.
You can skip this step if upstream credentials come from somewhere else. If you use another STS, such as Azure issuing tokens for native Azure APIs, that STS handles the downstream tokens and you don't need a Descope Connection for those services. The same goes for your own APIs and MCP servers that already validate Descope tokens, covered below.
Adding Routes
Click + Add route to put a new downstream API or MCP server behind the gateway. Adding a route takes two steps: pick the target, then attach the Connection that supplies its credential, if it needs one.
Depending on what you pick, the route either creates a new Resource for the target or reuses an existing one.
Step 1: Choose the Target
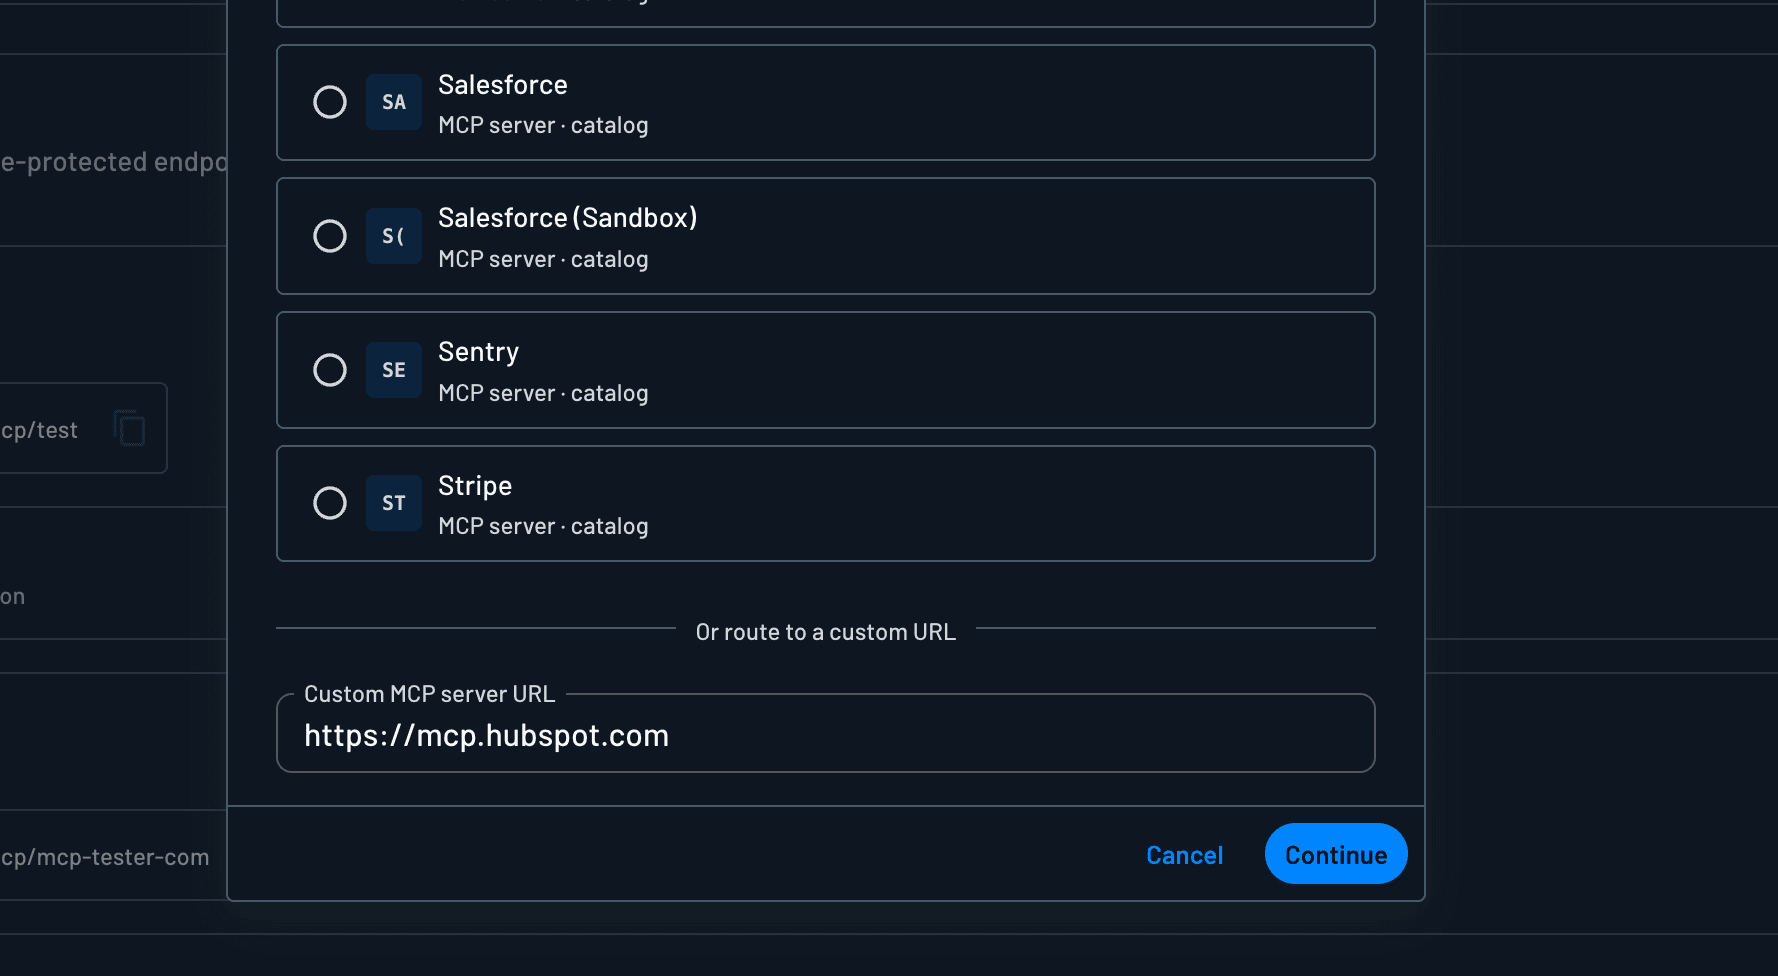
The first screen of the Add route dialog asks what the route points to. You can pick one of three kinds of target:
- Your MCP servers: An MCP server that's already a Resource in your Descope project. The route reuses that Resource.
- Catalog: A third-party MCP server from the Descope catalog, such as Notion, HubSpot, or Linear. The route uses a Connection to hold that provider's credentials.
- Custom MCP server URL: Any other API or MCP server, entered by URL, such as
https://mcp.example.com/mcporhttps://api.example.com/billing. Descope creates a new Resource for the route.
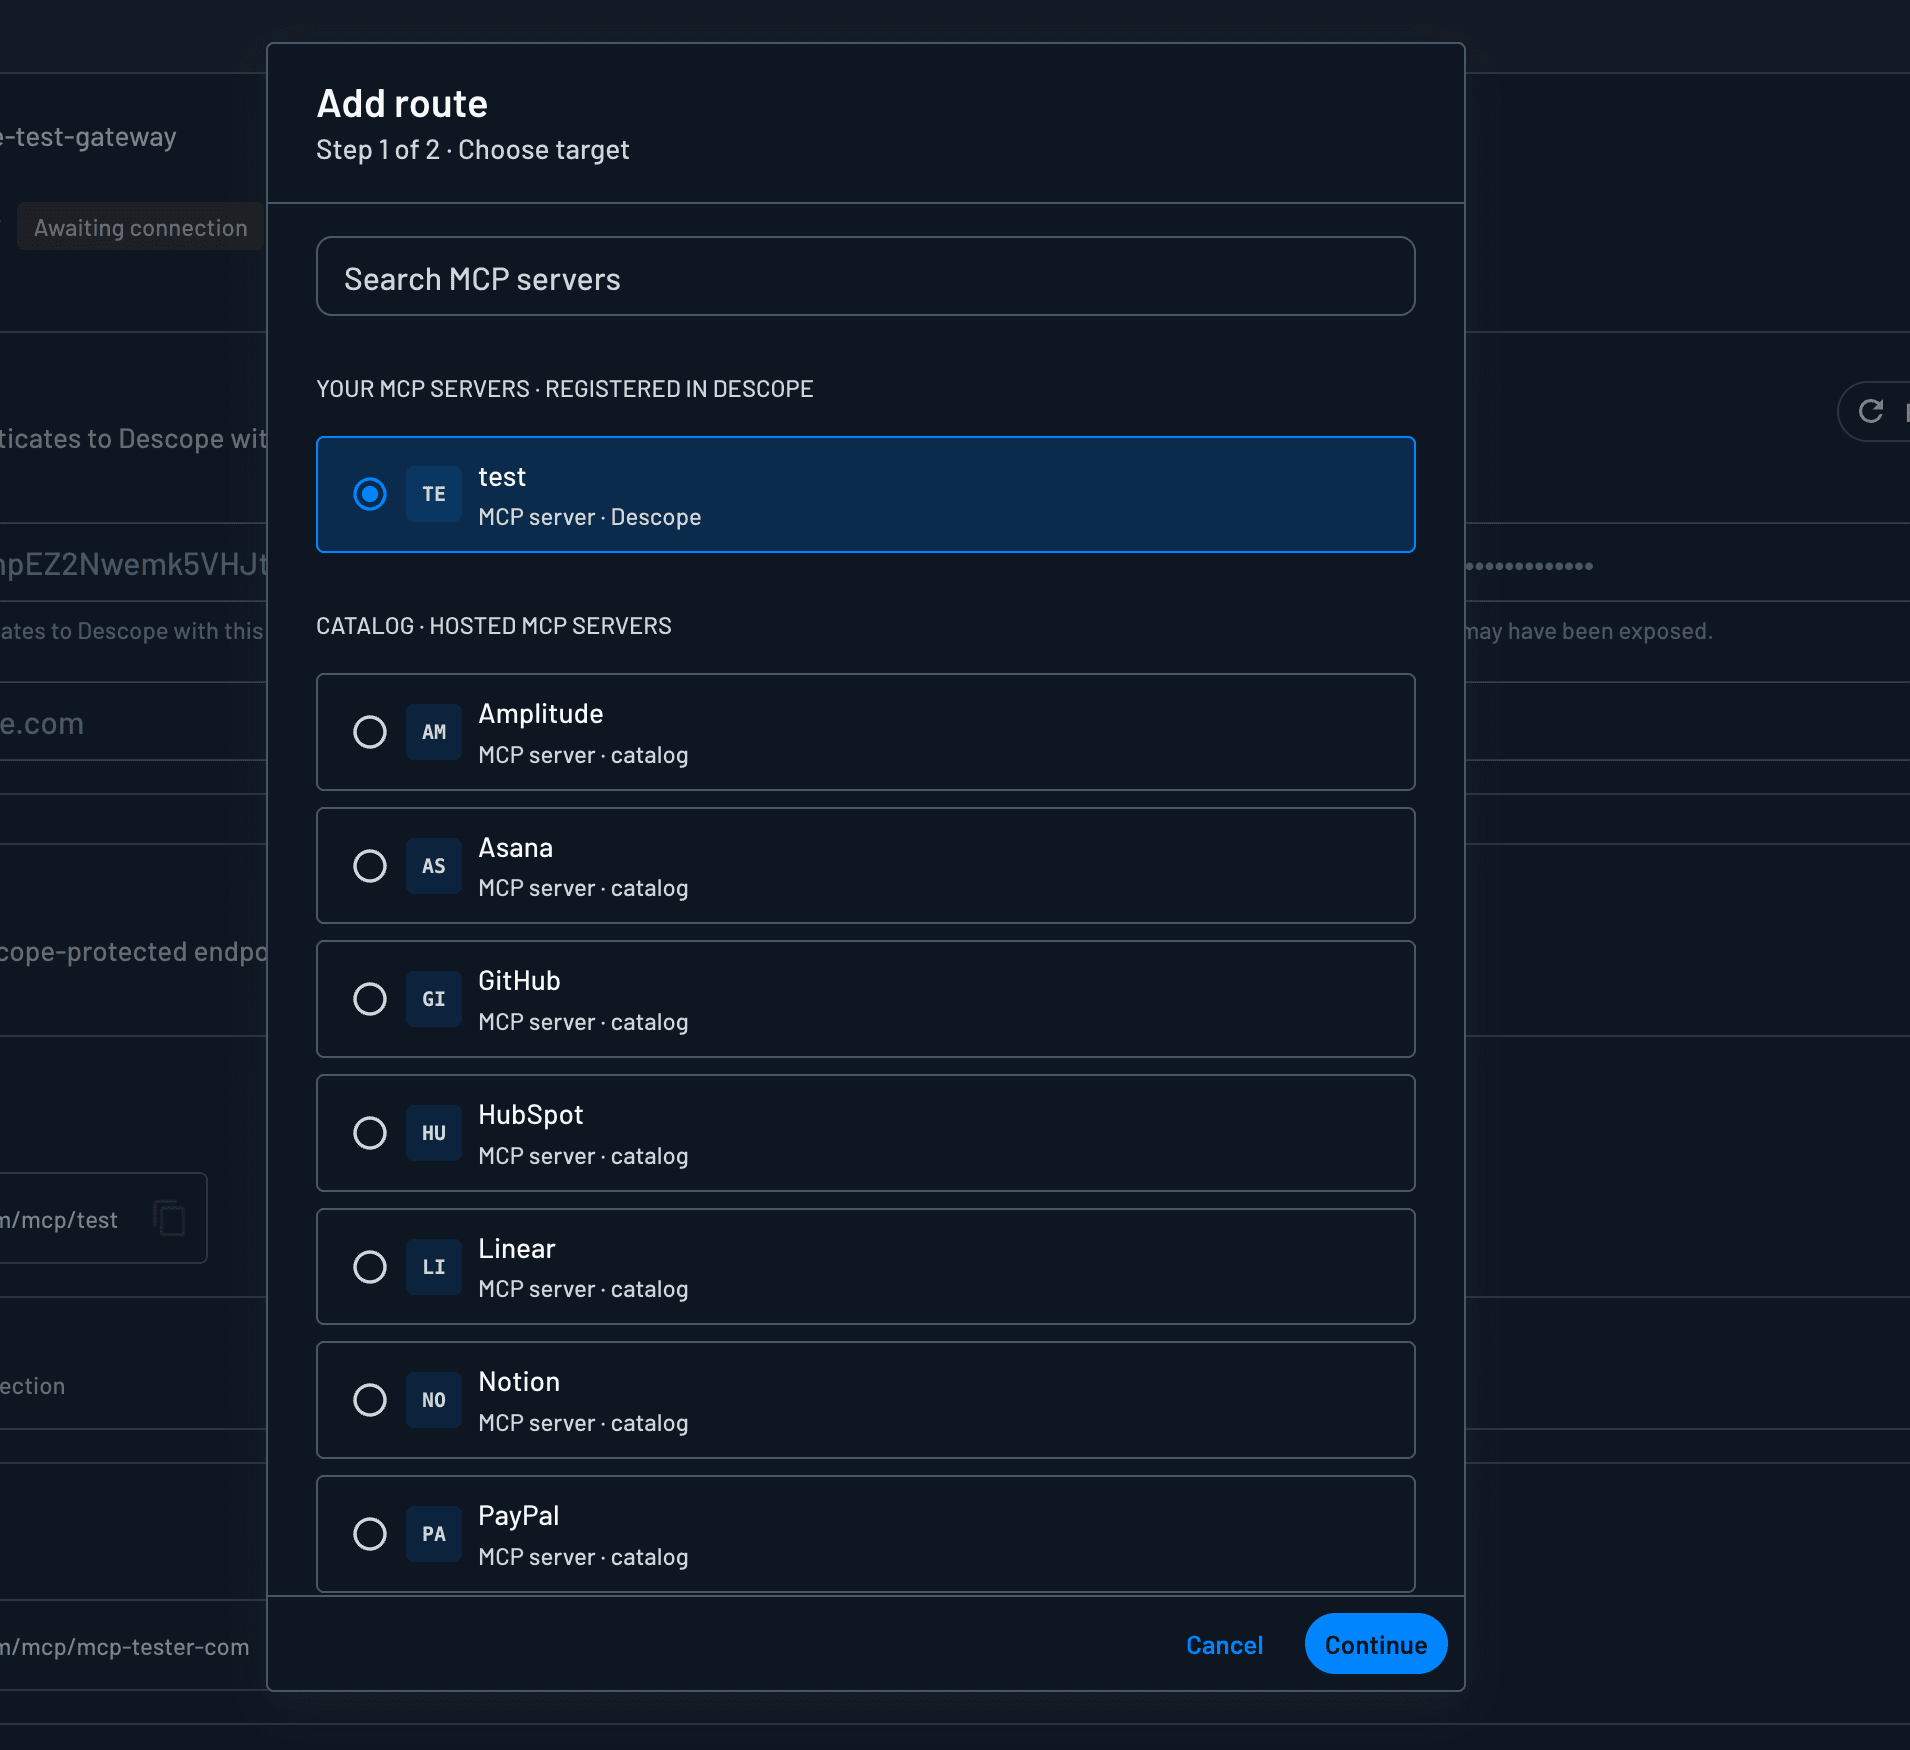
To use a custom target, enter its URL in the Custom MCP server URL field.
Step 2: Attach a Connection
To call the target, the gateway needs a credential the target accepts. For an MCP server that's already a Resource in Descope, that's a Descope token the gateway gets with a token exchange, so there's nothing to attach. For a catalog or custom target, it's an OAuth token or API key stored in a Connection, and this step is where you pick that Connection. What the dialog asks for depends on which kind of target you picked in Step 1.
Your MCP Servers
When you pick a server under Your MCP servers in Step 1, the dialog shows a confirmation screen instead of asking for a Connection, because the route reuses that server's existing Resource. Confirm, and Descope adds the route to the gateway.
The route uses the default Allow All policy. To limit which agents and users the gateway can exchange for on this route, write a Delegated access (token exchange) policy with the server's Resource as the target.
Catalog
When you pick a server from the Catalog in Step 1, the dialog asks for the Connection that holds that provider's credentials. Select it, and click Add route. If you don't have one yet, create it first, as described in Before You Add Routes.
The route uses the default Allow All policy. To limit which agents and users the gateway can fetch credentials for, write a Delegated access (token exchange) policy with the Connection as the target.
Custom MCP Server URL
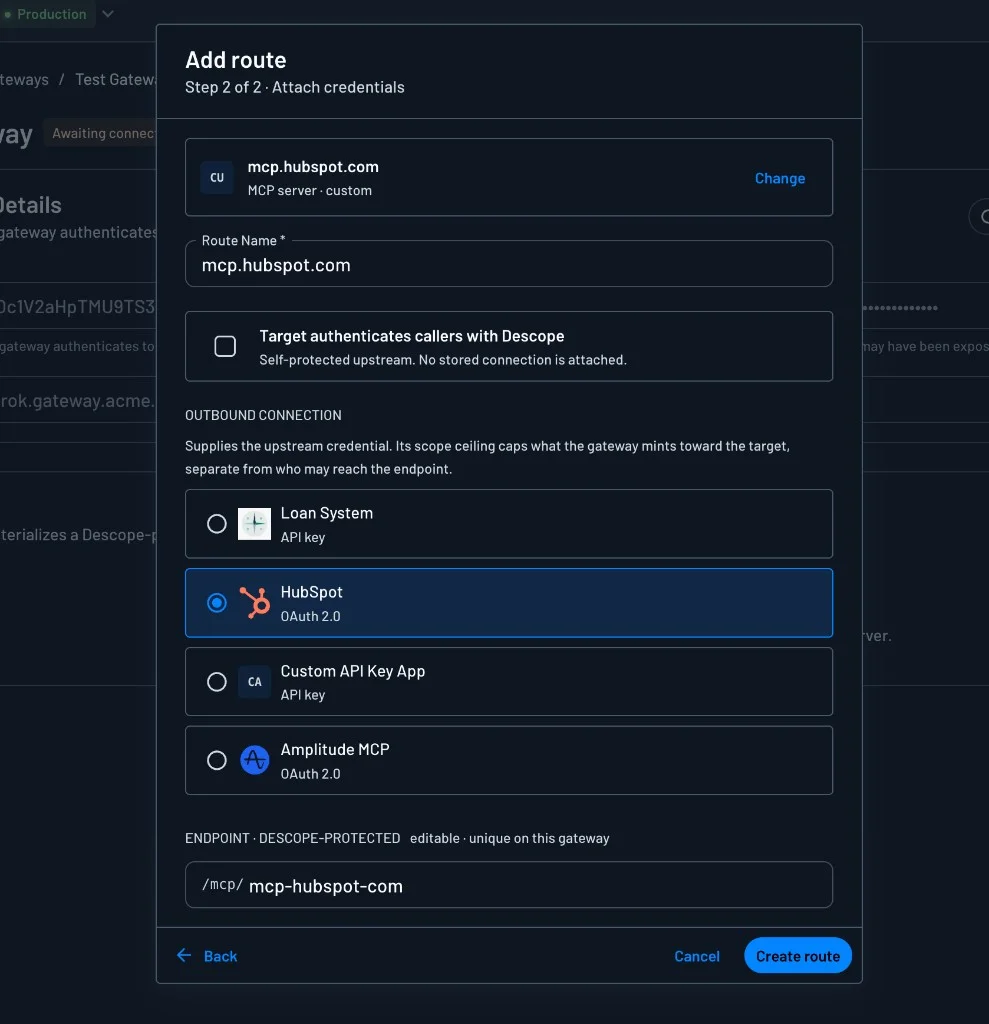
When you enter a URL in the Custom MCP server URL field in Step 1, the dialog asks for a Route Name. If the target doesn't require authentication, click Create route. Otherwise, select an Outbound connection: the Connection you set up earlier that supplies the upstream credential, such as an API key.
Descope creates a new Resource for the route. If the target is your own API or MCP server and it's already a Resource in Descope, select it under Your MCP servers in Step 1 instead, so the route reuses that Resource.
After you create the route, you can write a Delegated access (token exchange) policy with the new Resource as the target. You can also define scopes on the Resource and, if the route uses a Connection, map them to Connection scopes.
Route Endpoints
Every route gets an endpoint under the gateway's base URL, such as https://mcp-gateway.example.com/mcp/mcp-hubspot-com. The path defaults to a slug of the target, and you can edit it as long as it stays unique on the gateway.
https://mcp-gateway.example.com/mcp/mcp-hubspot-com
└─────────── base URL ────────────┘└─ route path ─┘
└──────────── route endpoint (Resource audience) ──┘
When a route creates a new Resource, the route endpoint is that Resource's audience, so it's the aud on the token the gateway gets when it exchanges the agent's token for this route. Agents never configure route endpoints. Agents connect to the gateway's base URL, and the gateway sends each call to the right route.
Next Steps
Write policies for both sides of the gateway: User access policies for which agents and users may connect to the gateway, and Delegated access (token exchange) policies for which routes the gateway may exchange for, and with which scopes.
If routes use Connections, make sure the tokens are stored for the right users or tenants, as covered in Storing Connection Tokens.
For the architecture behind routes and token exchange, see Gateways. For internal and external setups, see Use Cases and MCP Gateways.