Claude
This guide sets up your Descope project as the identity provider for your Claude organization, so Claude connectors such as Notion, Supabase, or your own MCP servers connect through Enterprise-Managed Authorization (XAA) with Descope as the issuer. Employees sign in to Claude through Descope, and Claude gets an XAA token (ID-JAG) from Descope for each connector instead of asking every employee to authorize every connector.
Without managed authorization, each person connects each connector with their own sign-in, and IT has no single place to see or revoke that access. With Descope as the issuer, a connector only connects when a Descope policy allows it, and access follows the user's identity in Descope, so removing someone's access in Descope removes it from their connectors too.
Each connector's access is shown as an agentic identity in Descope, so you can see who has access to what, and revoke it if needed.
For how the token exchange works underneath, see How XAA Works.
The steps below are configured in Claude's organization settings, so they apply to your whole Claude organization wherever members use connectors: Claude.ai, Claude Desktop, and Claude Code cloud sessions. The Claude Code CLI connects to MCP servers separately and doesn't use these connector settings, so each developer points the CLI at Descope on their own machine, as described in Claude Code CLI.
Before You Start
Single sign-on and managed authorization are available on Claude Team and Enterprise plans, and you need the Owner or Primary Owner role in Claude to change either one.
Claude also requires your company's email domains to be verified before you can connect an identity provider, which you do by adding a DNS TXT record. Anthropic's Set up single sign-on guide walks through the domain verification steps.
If your employees sign in with your company's identity provider, such as Okta or Microsoft Entra ID, set it up as SSO on a Descope tenant before you begin, so the sign-in flow in step 2 can route employees to it.
Note
Descope will not re-use the SSO connection you set up for your Descope Company, at this time. You must set up a new SSO connection for a specific tenant in a specific project, in order to use XAA.
If you don't have company SSO, you can skip this, and employees sign in with an email magic link instead.
How the Pieces Fit
Claude only talks to Descope through one Inbound App, which Claude treats as a custom OpenID Connect (OIDC) provider. The Inbound App's flow signs employees in, the same app requests XAA tokens on their behalf, and for each connector, a Descope Resource and policy decide whether Descope issues the token.
The steps below set those up in order: the Inbound App and its flow in Descope, the OIDC connection in Claude, the connector Resources in Descope, and then managed authorization on each connector in Claude.
Steps
Create an Inbound App for Claude
On the Inbound Apps page of the Descope Console, click + Add Inbound App and name it, for example Claude. Inbound Apps created in the Console are confidential clients by default, which is what Claude needs: a client ID and a client secret.
Under Grant Types, make sure Authorization Code is turned on. Keep the app open, since later steps need its Client ID and Client Secret from Client Authentication, and its Discovery URL from Connection Information.
Use the XAA issuer sign-in flow
Descope has a ready-made flow for signing employees in when Descope is the XAA issuer. Add the XAA Issuer Sign-In template to your project from the Flow Library.
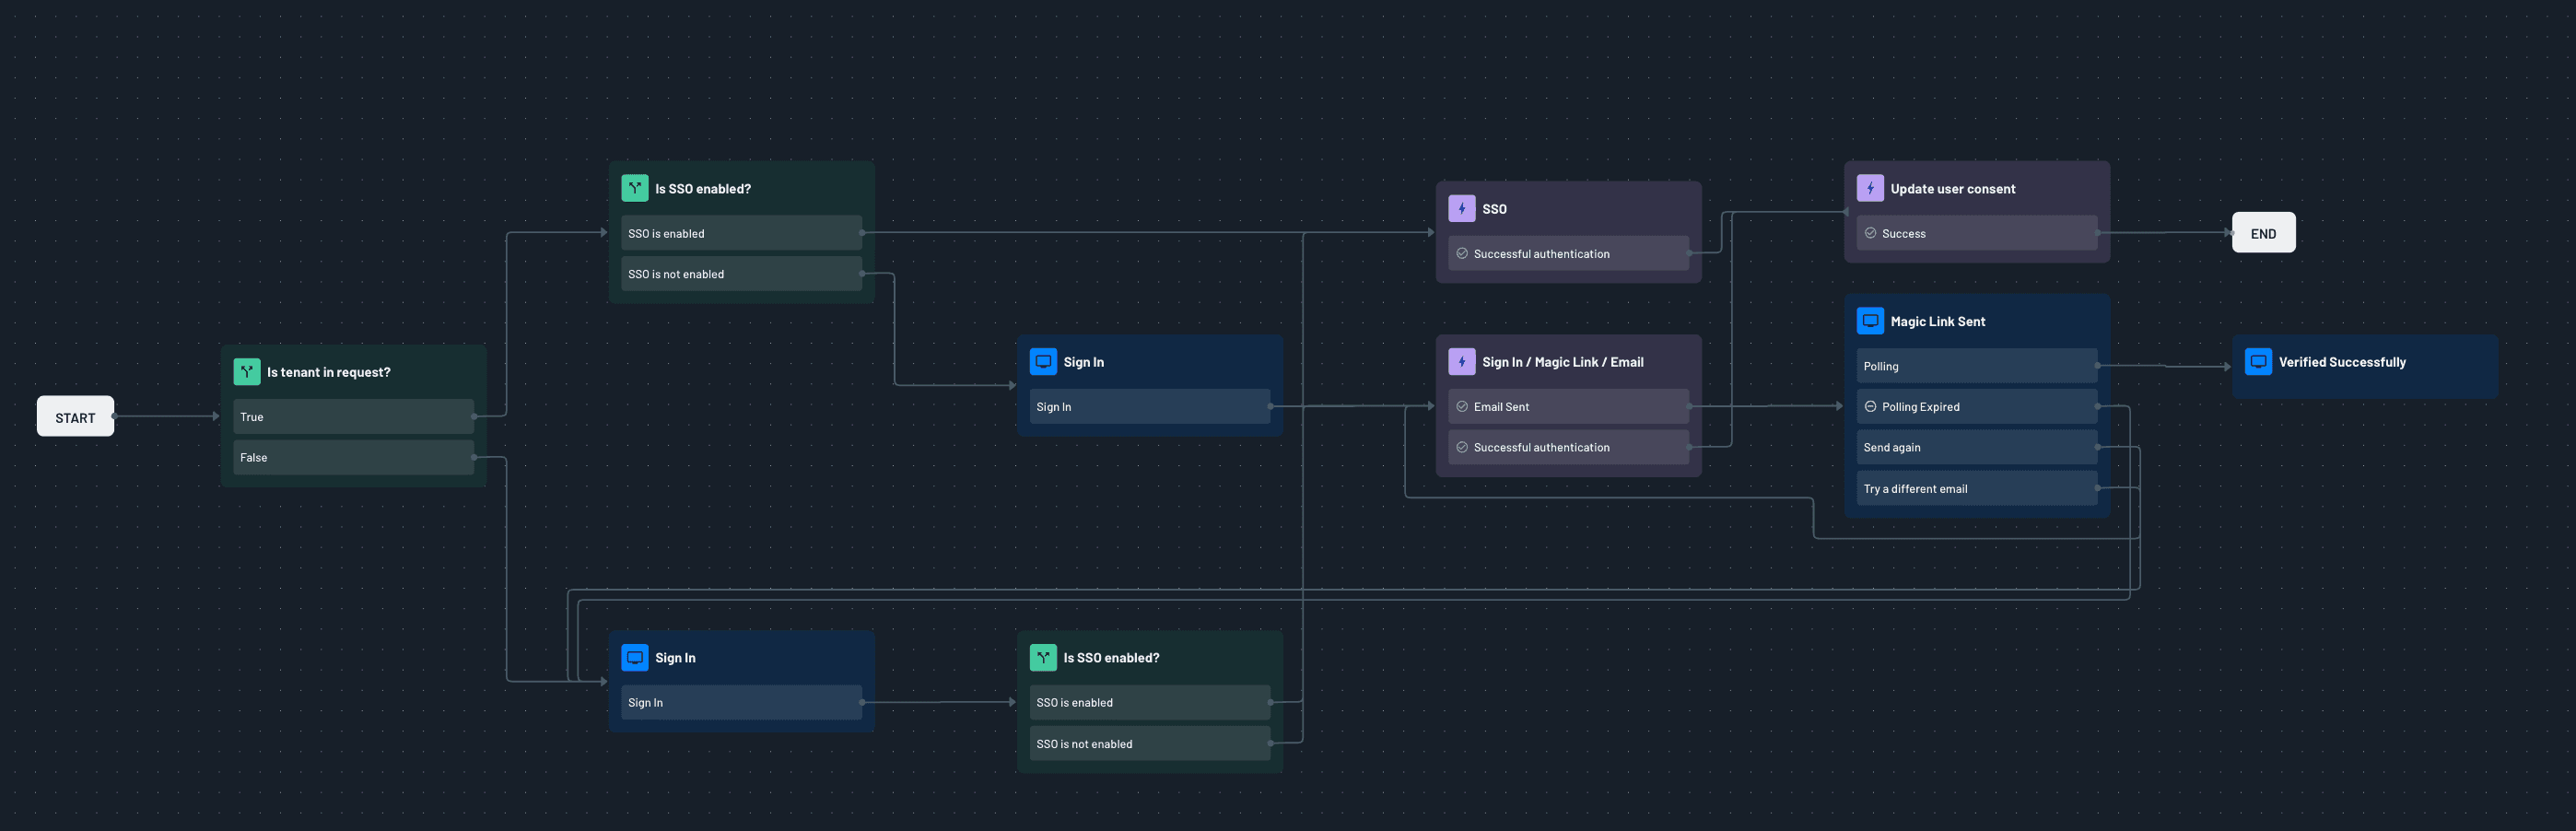
The flow checks whether the sign-in request names a tenant. When it does and the tenant has SSO configured, the employee signs in through your company's identity provider. Otherwise, the employee signs in with an email magic link. Either way, the flow ends by recording the user's consent.
In the Inbound App's Flows section, select this flow as the User Consent flow, then click the gear icon next to it to open the flow hosting configuration. If your company signs in with SSO through a Descope tenant, select that tenant under Tenant. The Flow Hosting URL then includes the tenant, and every employee who signs in to Claude goes straight to your SSO.
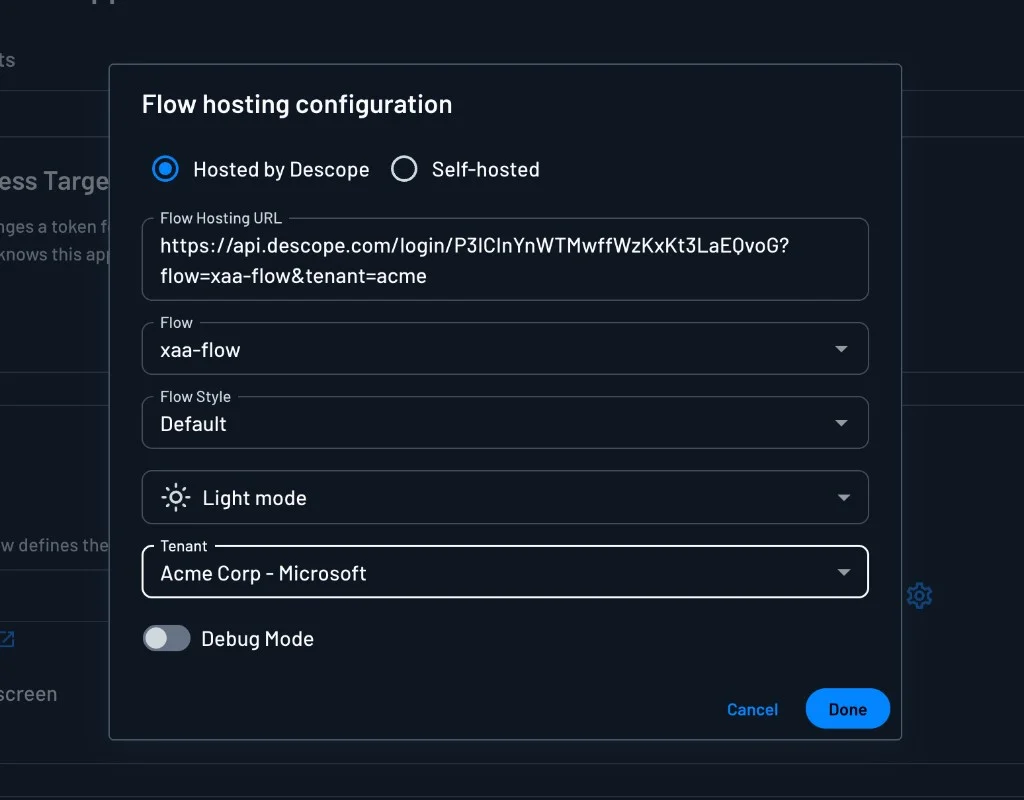
Leave Tenant empty if you don't have SSO set up in Descope, and employees sign in with a magic link instead.
Check the attribute scopes
Claude requires the profile, email, and offline_access attribute scopes from its OIDC provider. The profile and email scopes give Claude each employee's name and email address, and offline_access lets Claude refresh the session without sending the employee back through sign-in.
Every project starts with profile and email, but offline_access isn't one of the defaults. Create it on the Attribute Scopes tab under Resources with + Scope, unless your project already has it.
Then confirm all three appear under Attribute scopes on the Claude Inbound App, and add any missing one with Add project-level scope.
Connect Descope to Claude as a custom OIDC provider
In Claude, open Organization and access settings. Confirm your domains show as Verified under Domains, then click Setup SSO (or Manage SSO) under Authentication.
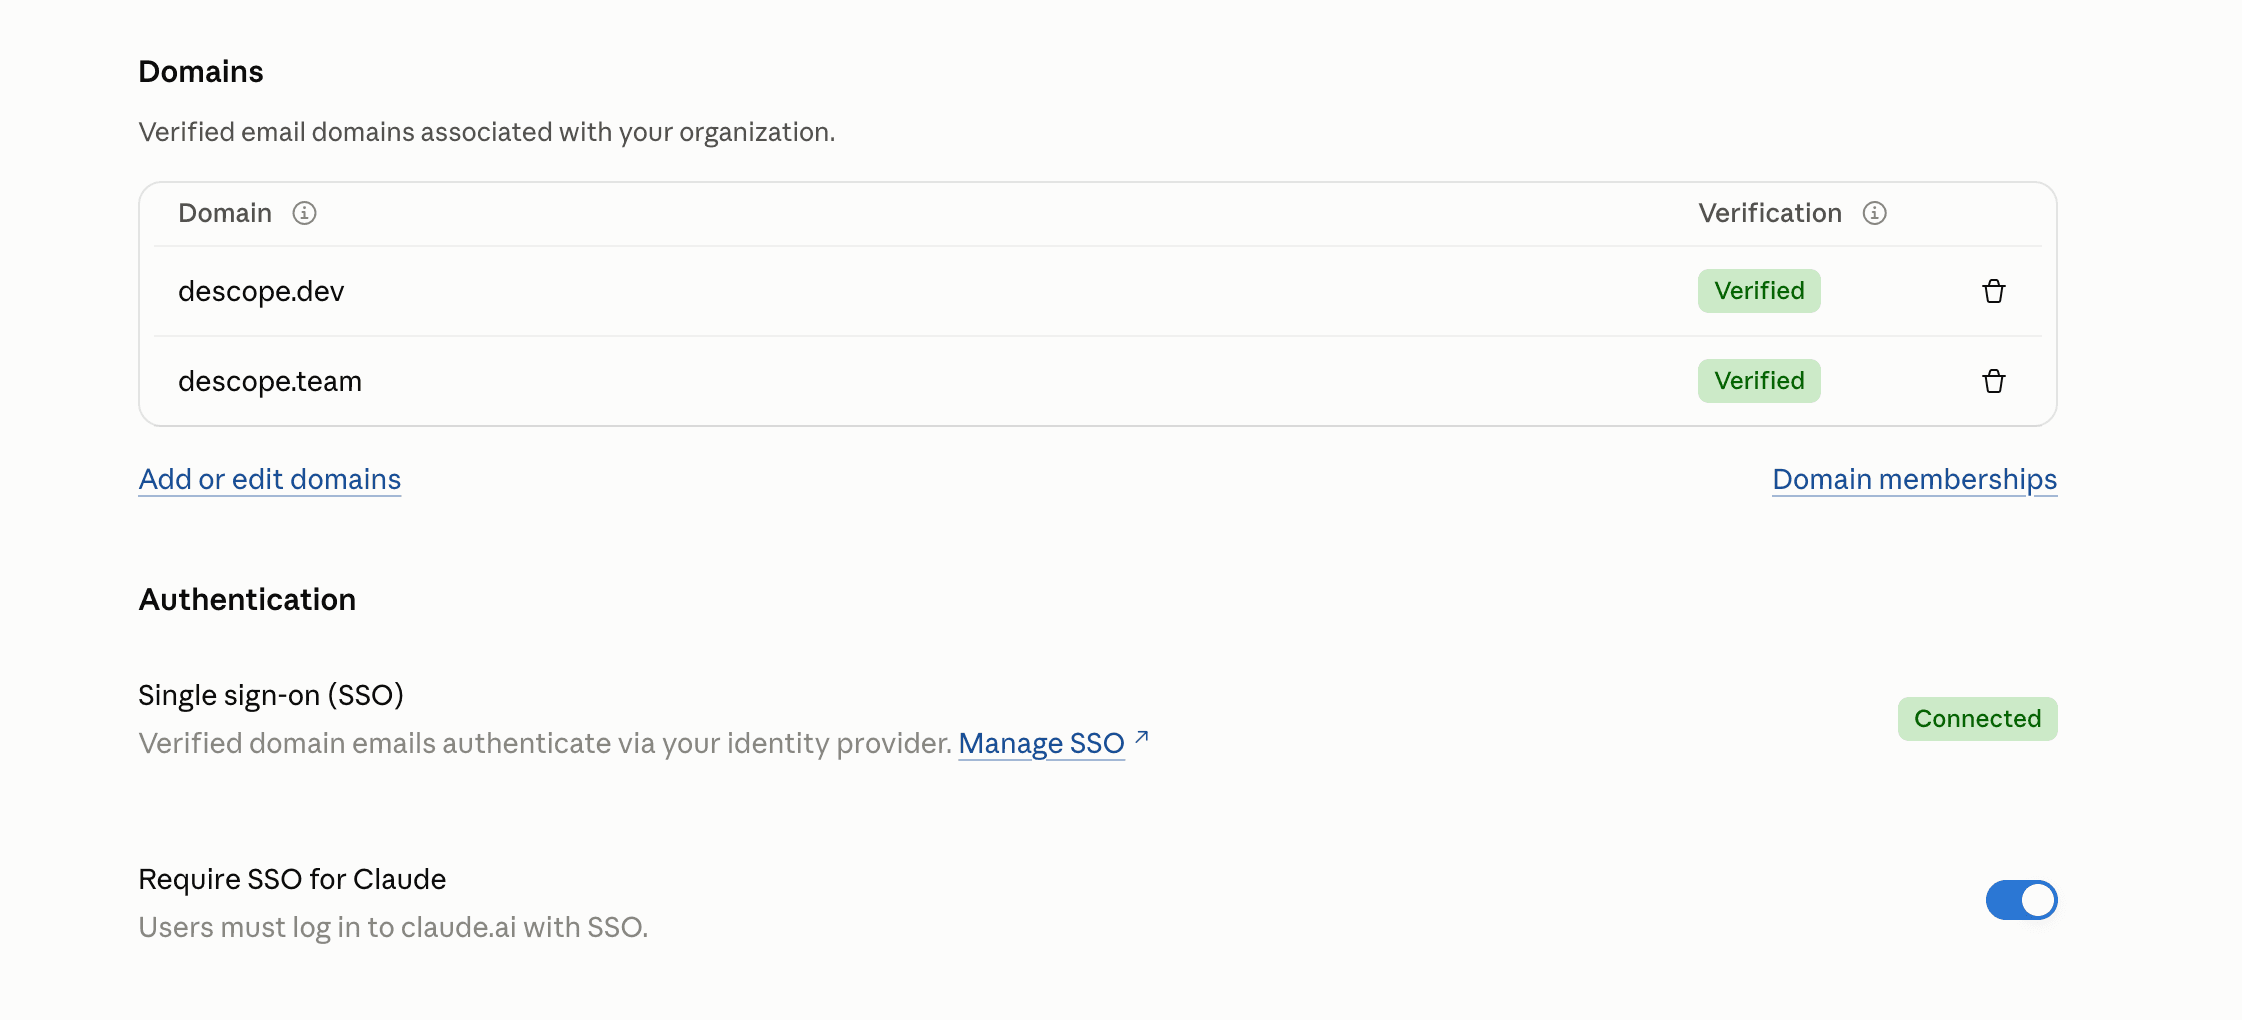
Claude's SSO setup runs through WorkOS. Choose a custom OIDC provider, and the setup asks for three values from Descope:
- Client ID: The Inbound App's Client ID
- Client Secret: The Inbound App's Client Secret
- Discovery Endpoint: The Inbound App's Discovery URL, which ends in
/.well-known/openid-configuration
The setup also shows a Redirect URI. Back in Descope, open the Inbound App's Authorization Code grant, click Manage, and add that URI to the approved redirect URLs. The URI has to match exactly, or the sign-in fails at the redirect.
Click Test sign-in to run the flow end to end. When it succeeds, Claude shows the connection as activated with Custom OIDC as the identity provider.
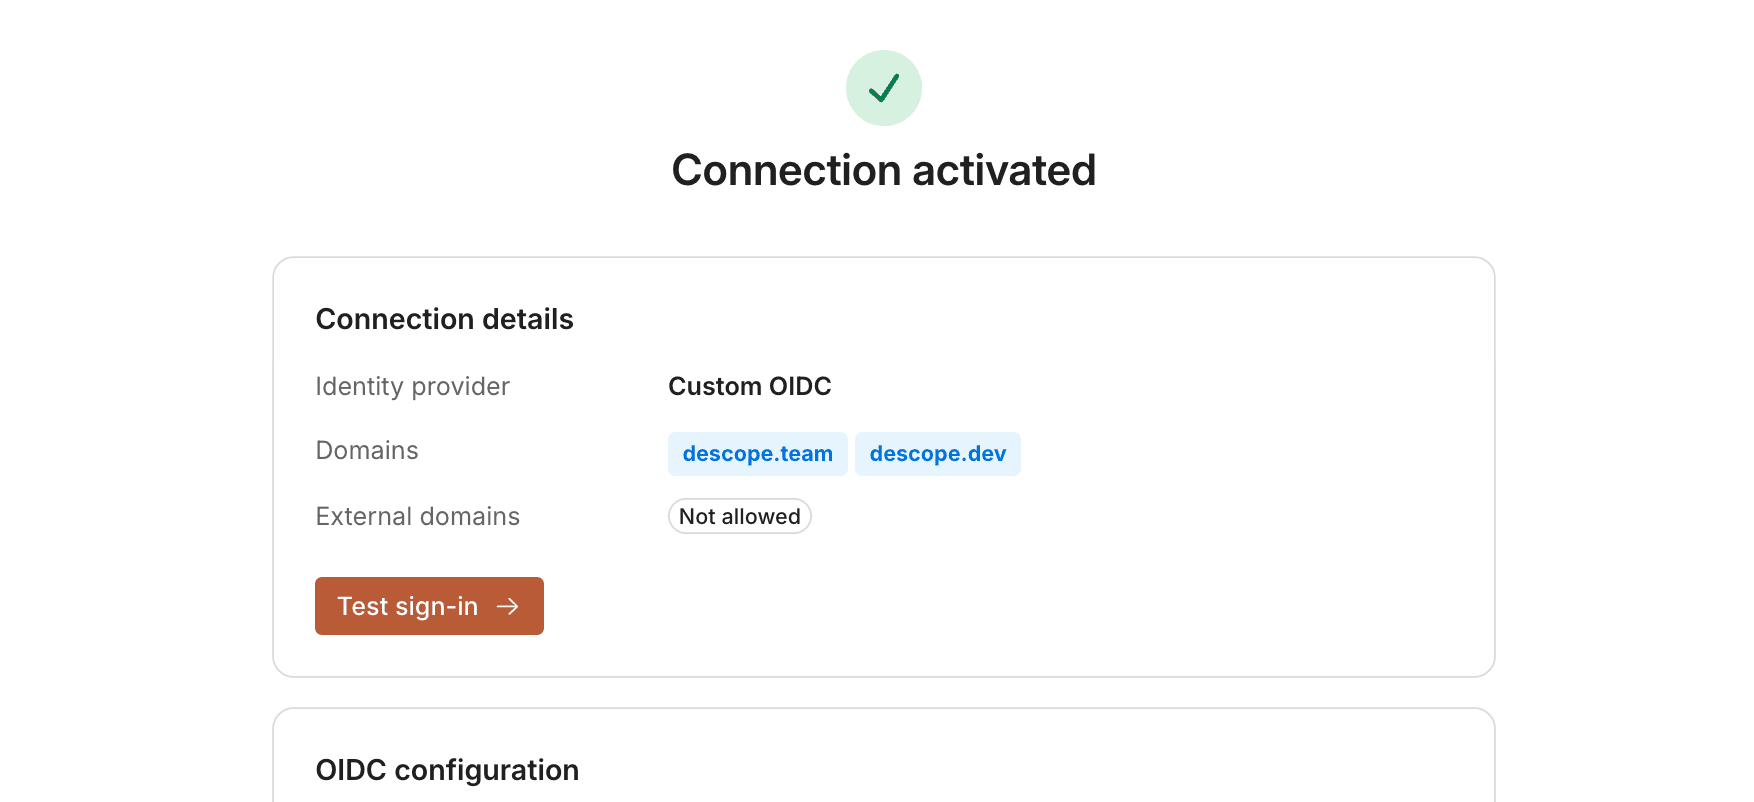
Once the test passes, you can turn on Require SSO for Claude under Authentication, so every member signs in to Claude through Descope.
Set up a Resource for each connector
For each connector you want to manage, Descope needs a Resource that represents the connector's MCP server, and a policy that allows Claude to get XAA tokens for it. Follow the XAA setup steps for each connector:
- Create an API Resource whose identifier is the connector's exact MCP server URL, with the same scopes the connector expects.
- Turn on Cross App Access on the Resource, and use Discover to fill in the connector's authorization server.
- On the Claude Inbound App, map the Resource under Cross App Access Targets to the client ID that the connector's authorization server knows Claude by. See Map the Resource to the Client's ID at the Target for how the mapping works.
- Write a token-exchange policy with the Claude Inbound App as the subject and the Resource as the target. Policy conditions such as user roles decide which employees get the connector, and at which scopes.
Turn on managed authorization for each connector
In Claude, go to Organization settings > Connectors and select the connector. On the Configuration tab, click Set up next to Managed authorization.
On the Connect step, Claude shows your identity provider as a generic OIDC provider marked Connected. The setup guide on the same step may also ask you to enable managed auth in the connector's own admin settings, though some connectors skip that. Then click Run test. Claude checks each stage of the XAA flow: discovering the connector's authorization server, requesting an XAA token from Descope, exchanging it for the connector's access token, and calling the connector.
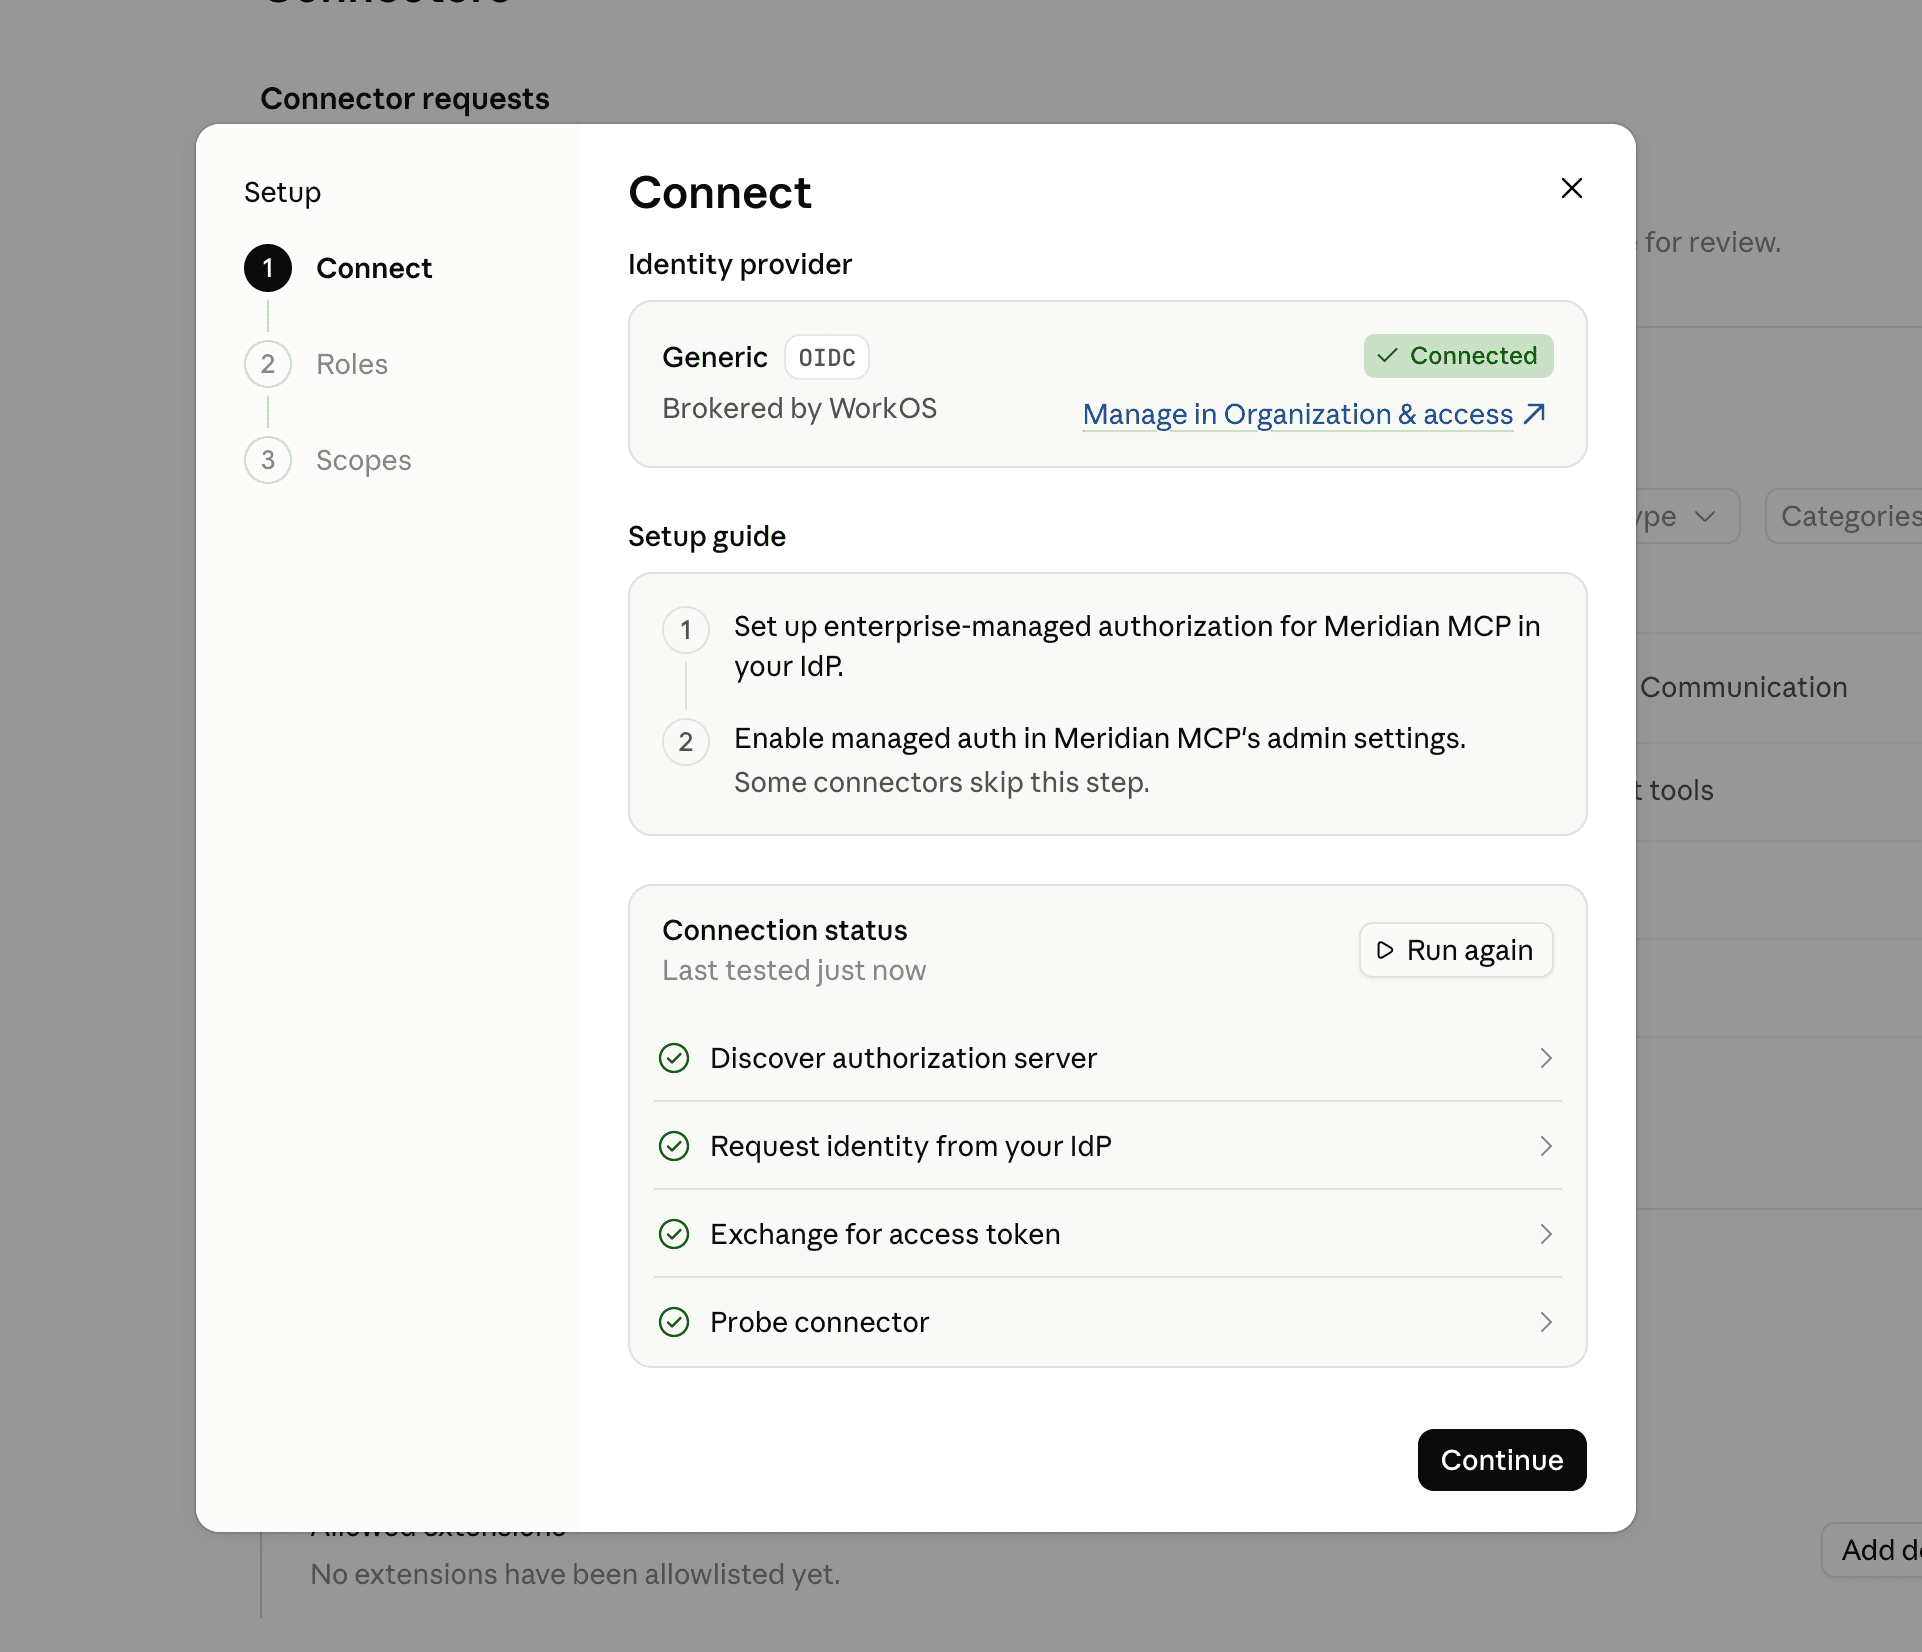
When every check passes, continue to Roles to choose which Claude roles get the connector automatically, then to Scopes to choose which permissions Claude may request. Click Save & turn on. Anthropic's Authorize MCP connectors for your entire organization covers the Roles and Scopes steps in more detail.
Turn off browser sign-in
A connector can have Browser sign-in and Managed authorization on at the same time. When both are on, Claude tries managed authorization first and falls back to asking the member to sign in to the connector individually.
Once managed authorization works for a connector, turn off browser sign-in for it. Go back to the connector's Configuration tab, and under Authentication, switch off the Browser sign-in toggle. Managed authorization stays on and shows Connected, along with the Applied roles and Scopes you chose, which you can change later with Edit. If you change something in Descope, click Test connection to run the checks again.
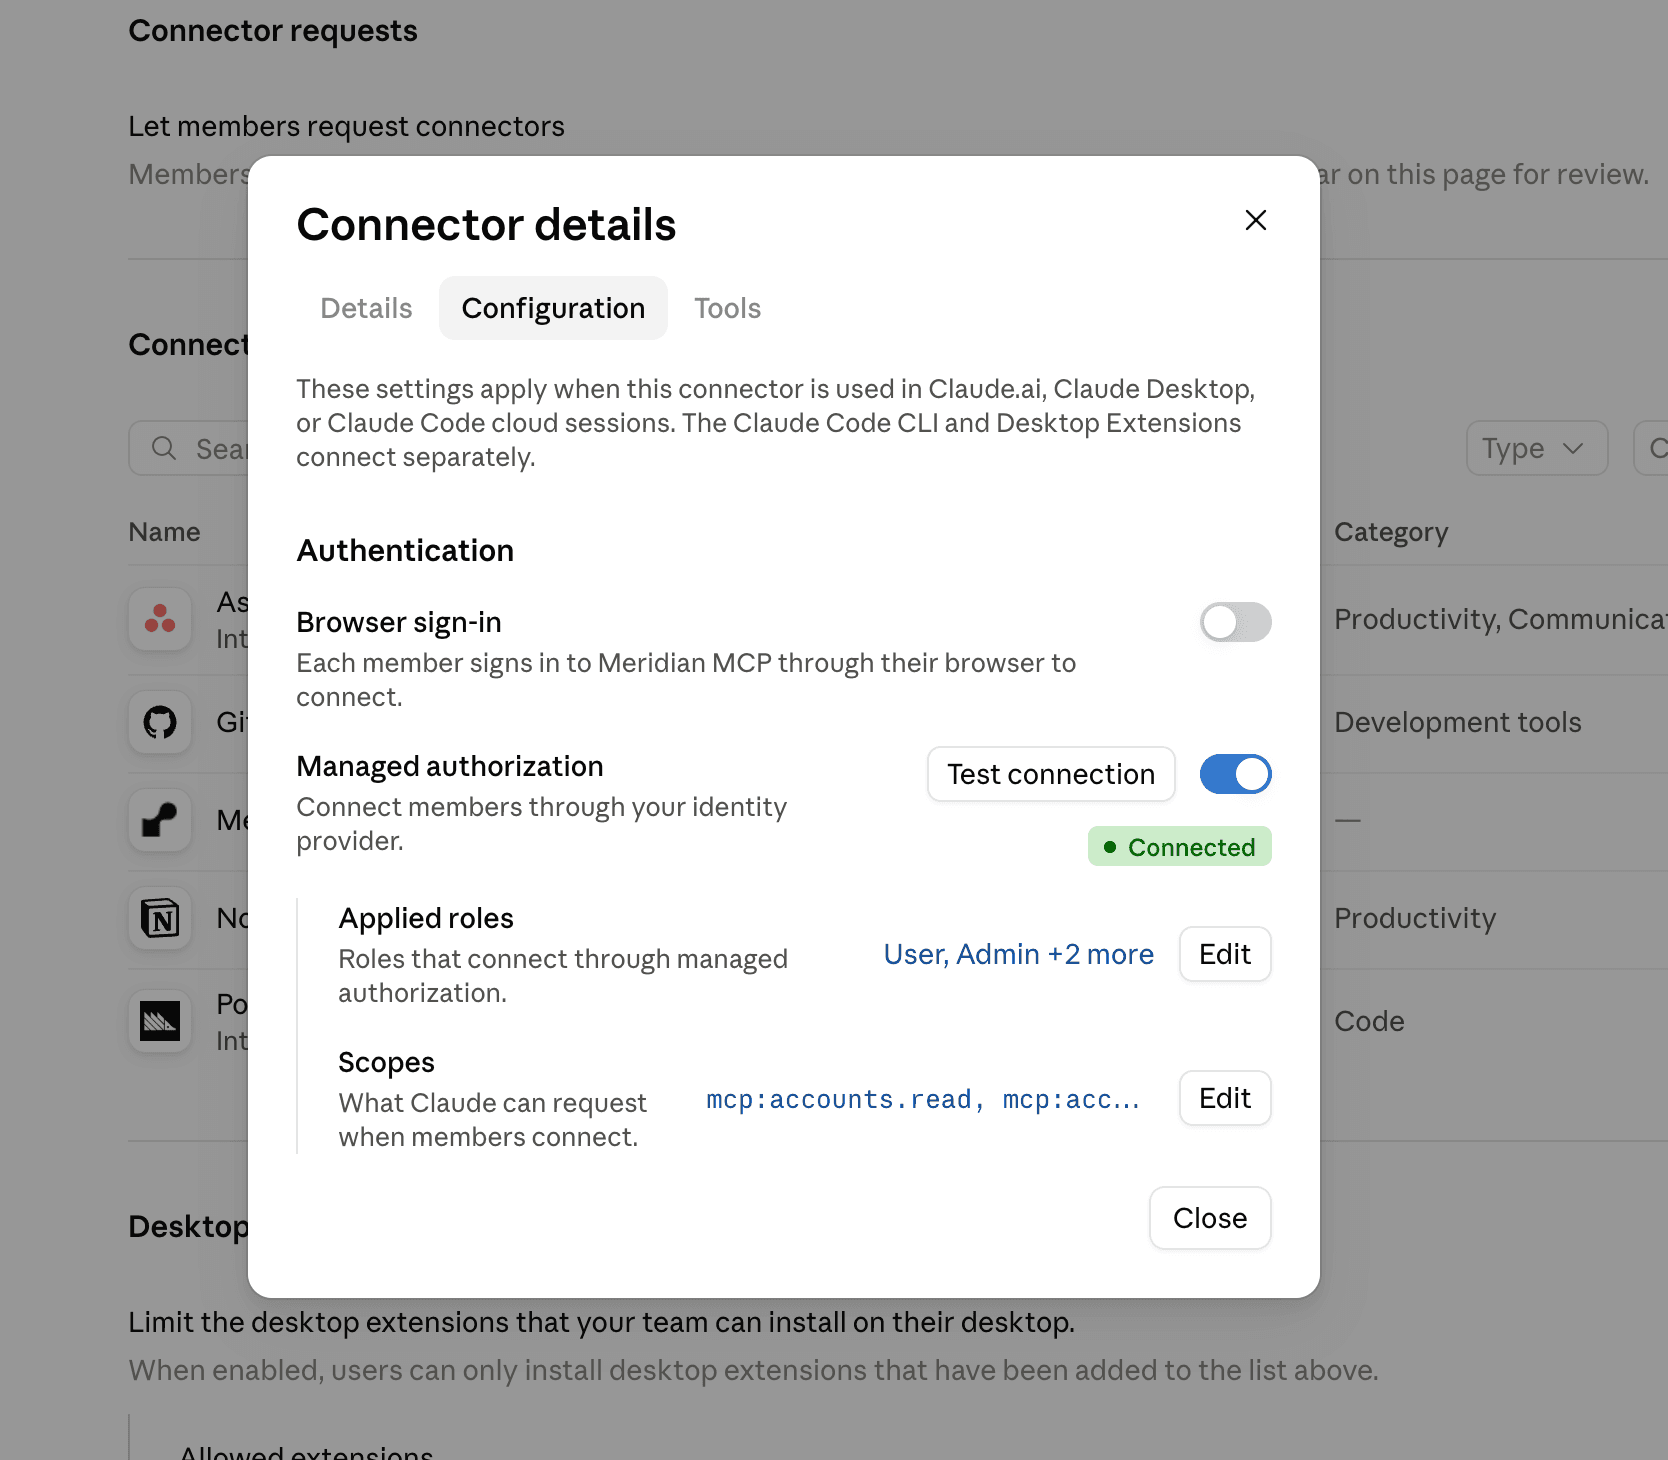
Every connection to that connector then goes through Descope, so access is governed by your Descope policies, and personal accounts stay out of your work tools.
Managing Access After Setup
With browser sign-in off, Descope is the one place that decides which employees reach which connectors. You change access by editing the token-exchange policy for a connector's Resource, and a new XAA token reflects the change the next time Claude requests one. Removing an employee's access in Descope stops Descope from issuing XAA tokens for them, and their existing connector session ends when the connector's access token expires or is revoked.
Troubleshooting
When Run test fails, the failing check points to the part of the setup to look at.
| What fails | What to check |
|---|---|
| Test sign-in in Claude's SSO setup | The Redirect URI from Claude is in the Inbound App's approved redirect URLs, exactly as shown, and the Client Secret and Discovery URL were copied from the same Inbound App. |
| Discover authorization server | The connector supports managed authorization, and its MCP server publishes protected resource metadata. Check the connector's own documentation. |
| Request identity from your IdP | Descope didn't issue an XAA token. Confirm the Resource exists with Cross App Access turned on, and that a token-exchange policy allows the Claude Inbound App and the test user to get the requested scopes. |
| Exchange for access token | The connector's authorization server rejected the XAA token. Check the authorization server URL in the Resource's Cross App Access settings, the client ID mapping under Cross App Access Targets, and that managed auth is enabled in the connector's admin settings. |
| Probe connector | The connector rejected calls with the new access token. Confirm the scopes on the Resource match the scopes the connector expects. |
Denied token exchanges are also written to the audit trail with the client, target, and requested scopes, which helps tell a policy problem apart from a configuration problem.
Claude Code CLI
The Claude Code CLI doesn't use your organization's connector settings. Each developer connects the CLI to Descope once, and the CLI then gets an XAA token in the background whenever it calls an MCP server, with no sign-in per server.
The Descope side works the same way as for organization connectors. Each MCP server needs a Resource with Cross App Access turned on, as in the Resource step. The CLI signs in to Descope as its own client, separate from the Claude Inbound App, so the token-exchange policy for each Resource has to allow that client too.
Turn on XAA in the CLI
Set CLAUDE_CODE_ENABLE_XAA=1 in your shell profile so it persists. The CLI checks it both when you run the commands below and when your agent connects to a server.
export CLAUDE_CODE_ENABLE_XAA=1Connect the CLI to Descope
Run setup once with your Descope issuer, which is the Inbound Apps issuer https://api.descope.com/v1/apps/<Your Project ID>. The host is different if you use a custom domain or a different regional base URL. If your project has imported apps with custom client IDs, use https://api.descope.com/v1/apps/customized/<Your Project ID> in the commands below instead, as described in Issuer After Importing Client IDs.
When you leave out a client ID, Claude Code registers with Descope through CIMD:
claude mcp xaa setup --issuer https://api.descope.com/v1/apps/<Your Project ID>If you pre-registered a confidential client in Descope for the CLI, pass its client ID instead. The --client-secret flag takes no inline value. It reads the secret from MCP_XAA_IDP_CLIENT_SECRET.
export MCP_XAA_IDP_CLIENT_SECRET='<your Descope client secret>'
claude mcp xaa setup --issuer https://api.descope.com/v1/apps/<Your Project ID> --client-id <your Descope client ID> --client-secret
Add --callback-port <port> only if the Descope client doesn't allow any loopback port for the browser sign-in.
Sign in to Descope
Sign in once. The CLI opens Descope in your browser and caches the session.
claude mcp xaa loginIf you can't use a browser, pass a Descope-issued ID token with claude mcp xaa login --id-token <descope_id_token> instead.
Add each MCP server
Add each server by URL. Set --transport to http or sse to match the server, since the CLI supports only those two transports for XAA.
claude mcp add --xaa --transport http <name> <url>If the server's authorization server doesn't support CIMD, you also need a client ID and secret at that authorization server. The server's owner issues those, not Descope. Pass them with --client-id <client ID> and --client-secret, which prompts for the secret or reads it from MCP_CLIENT_SECRET, a different variable from the one in the setup step.
To check your connection, run claude mcp xaa show. To sign in again after your access changes, run claude mcp xaa login --force, and to start over, run claude mcp xaa clear.
| What you see | What to check |
|---|---|
XAA is not enabled (set CLAUDE_CODE_ENABLE_XAA=1) | Set CLAUDE_CODE_ENABLE_XAA=1 in your shell profile and restart your shell. |
XAA: no IdP connection configured | Run claude mcp xaa setup, then claude mcp xaa login. |
XAA: server '<name>' needs an AS client_id or a missing AS client secret | The server's authorization server doesn't support CIMD. Run claude mcp add --xaa again for that server with its client ID and secret. |
Resource server does not implement OAuth 2.0 Protected Resource Metadata, or no authorization server supports jwt-bearer | The server isn't set up to accept XAA tokens. Ask the server's owner, and point them to Accept Your Customers' XAA Tokens for the server-side setup. |
| The token request is denied for a missing scope | Descope's policy doesn't grant you that scope. Ask your Descope admin to update the token-exchange policy for the server's Resource. |
Next Steps
For the protocol behind each step, see How XAA Works. To write finer-grained rules for which employees get which connectors, see Policies, and for other XAA clients, see the XAA client setup guides.