Widget Flows
Descope Widgets are powered by Flows running underneath each component. This means you have full control over the logic and user experience for every widget action.
Customizing Widget Behavior
Each widget component has associated flows that handle the underlying operations. You can modify these flows to customize the logic for actions like:
- Email Updates: Control the verification process when users update their email, including how verification codes are sent and validated
- Passkey Management: Customize the logic for adding or removing passkeys, including any additional security checks
- Password Changes: Add custom validation rules, strength requirements, or notification logic when users reset their passwords
- Authentication Factors: Control the configuration of additional authentication factors, like SMS OTP through the phone attribute
- Profile Updates: Add custom validation or approval workflows for profile changes
- User Creation/Management: Customize approval processes, notification logic, or validation rules for admin widgets
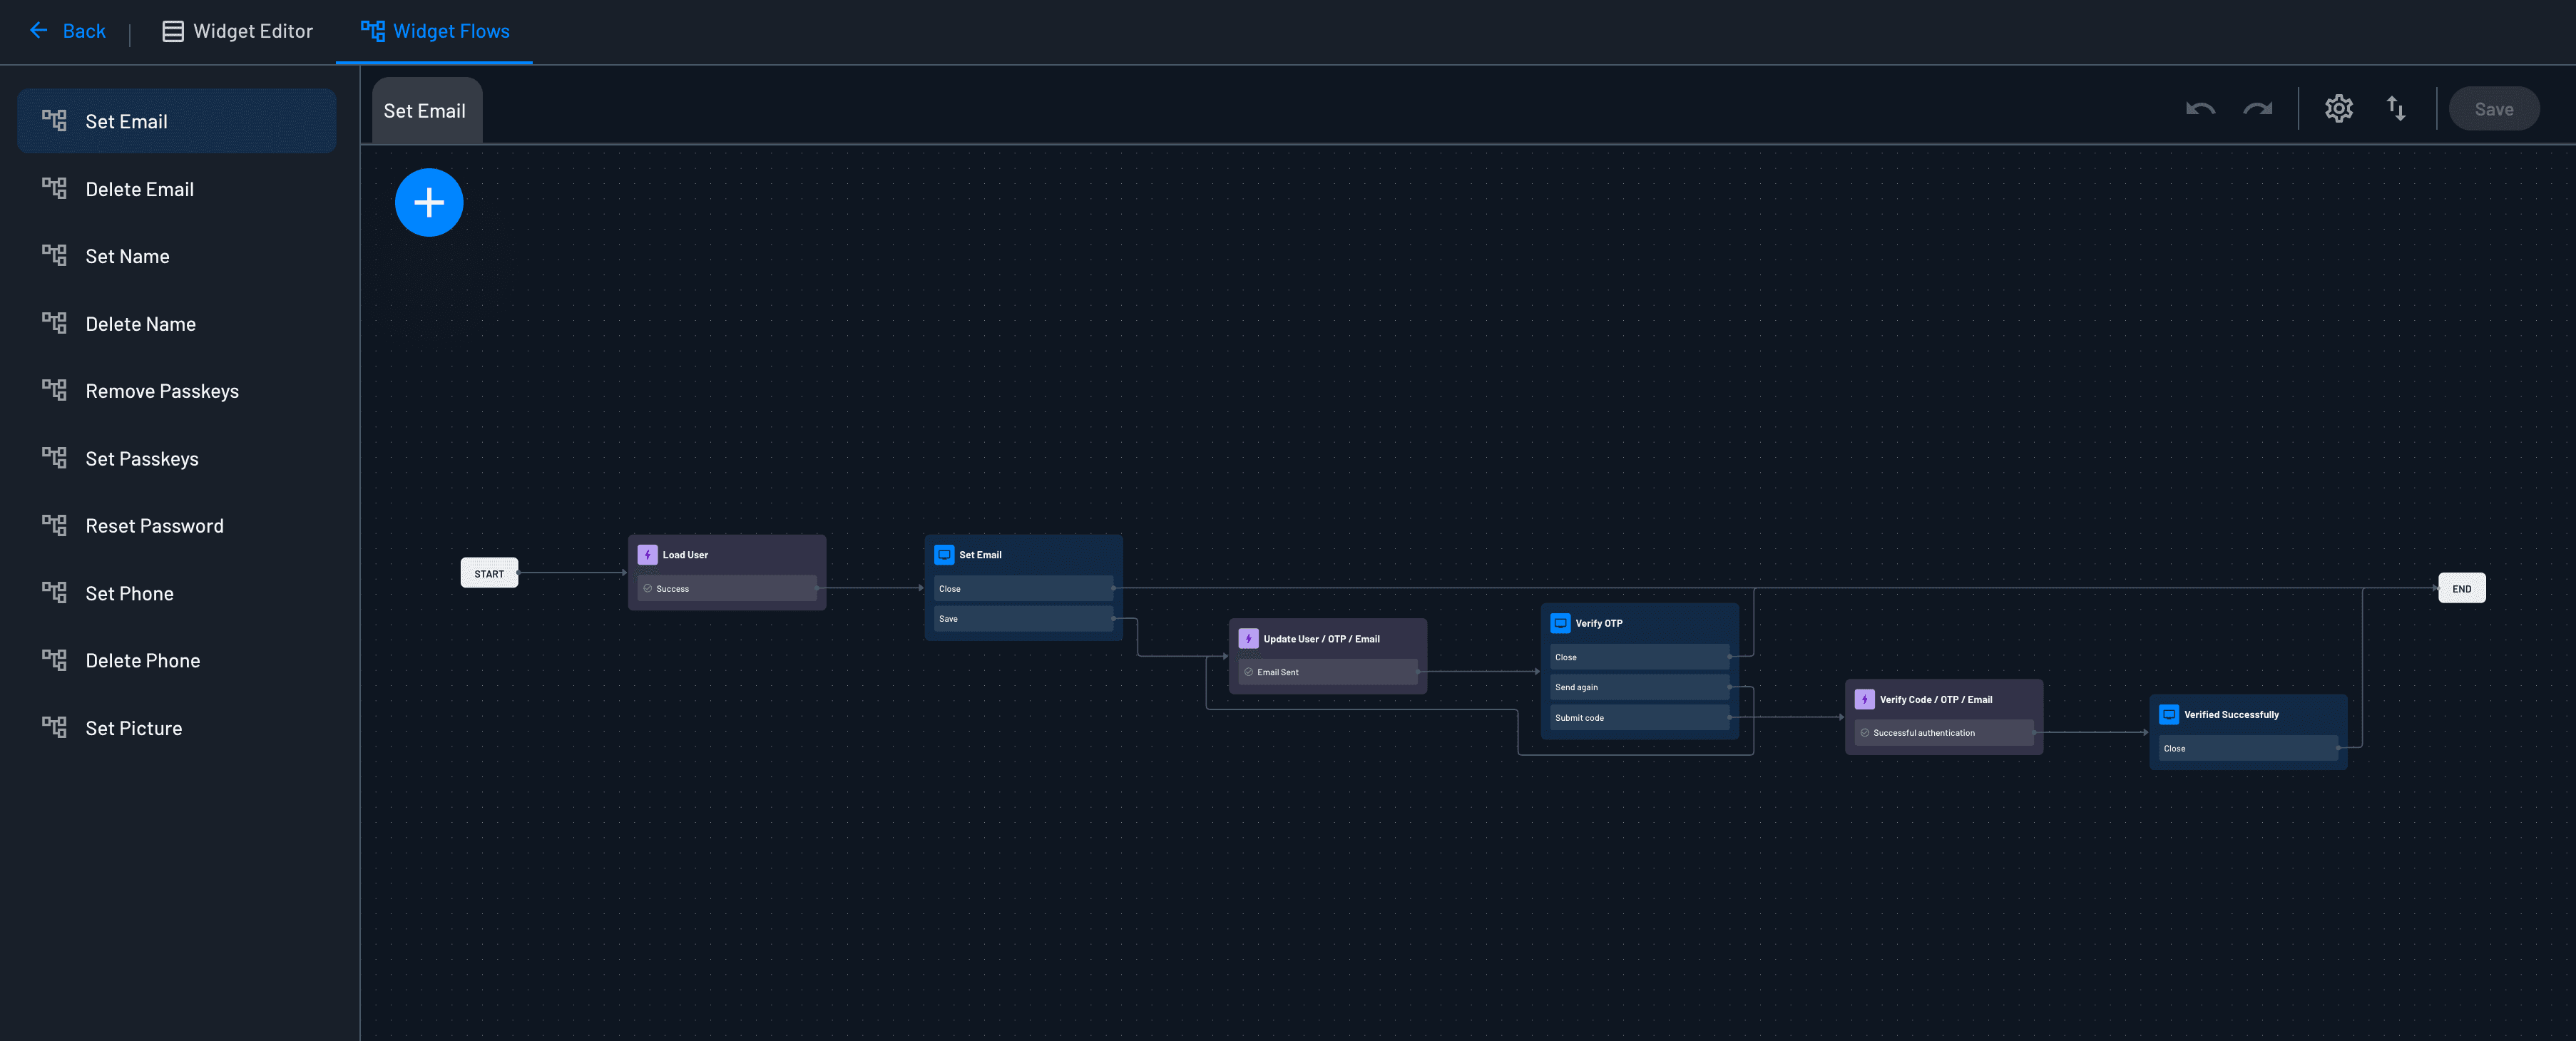
Configuring Component Flows
Every widget consists of components that have associated flows you can modify. There are several ways to configure and customize these flows:
-
Component Flows: Each widget component has flows that handle its operations. You can modify these flows directly to customize the behavior, such as changing how email verification works or how profile updates are processed.
-
Custom Button Actions: Some widgets (like the User Management Widget) allow you to add custom buttons. Newly added buttons include an empty flow that you can access under the Behavior tab in order to fully customize any logic you need for a button. For bulk operations on multiple selected users, see Batch User Actions below. To edit roles for a single selected user, see Editing a Single User's Roles below, and to edit other details for the widget user, see Editing a Widget User's Details.
-
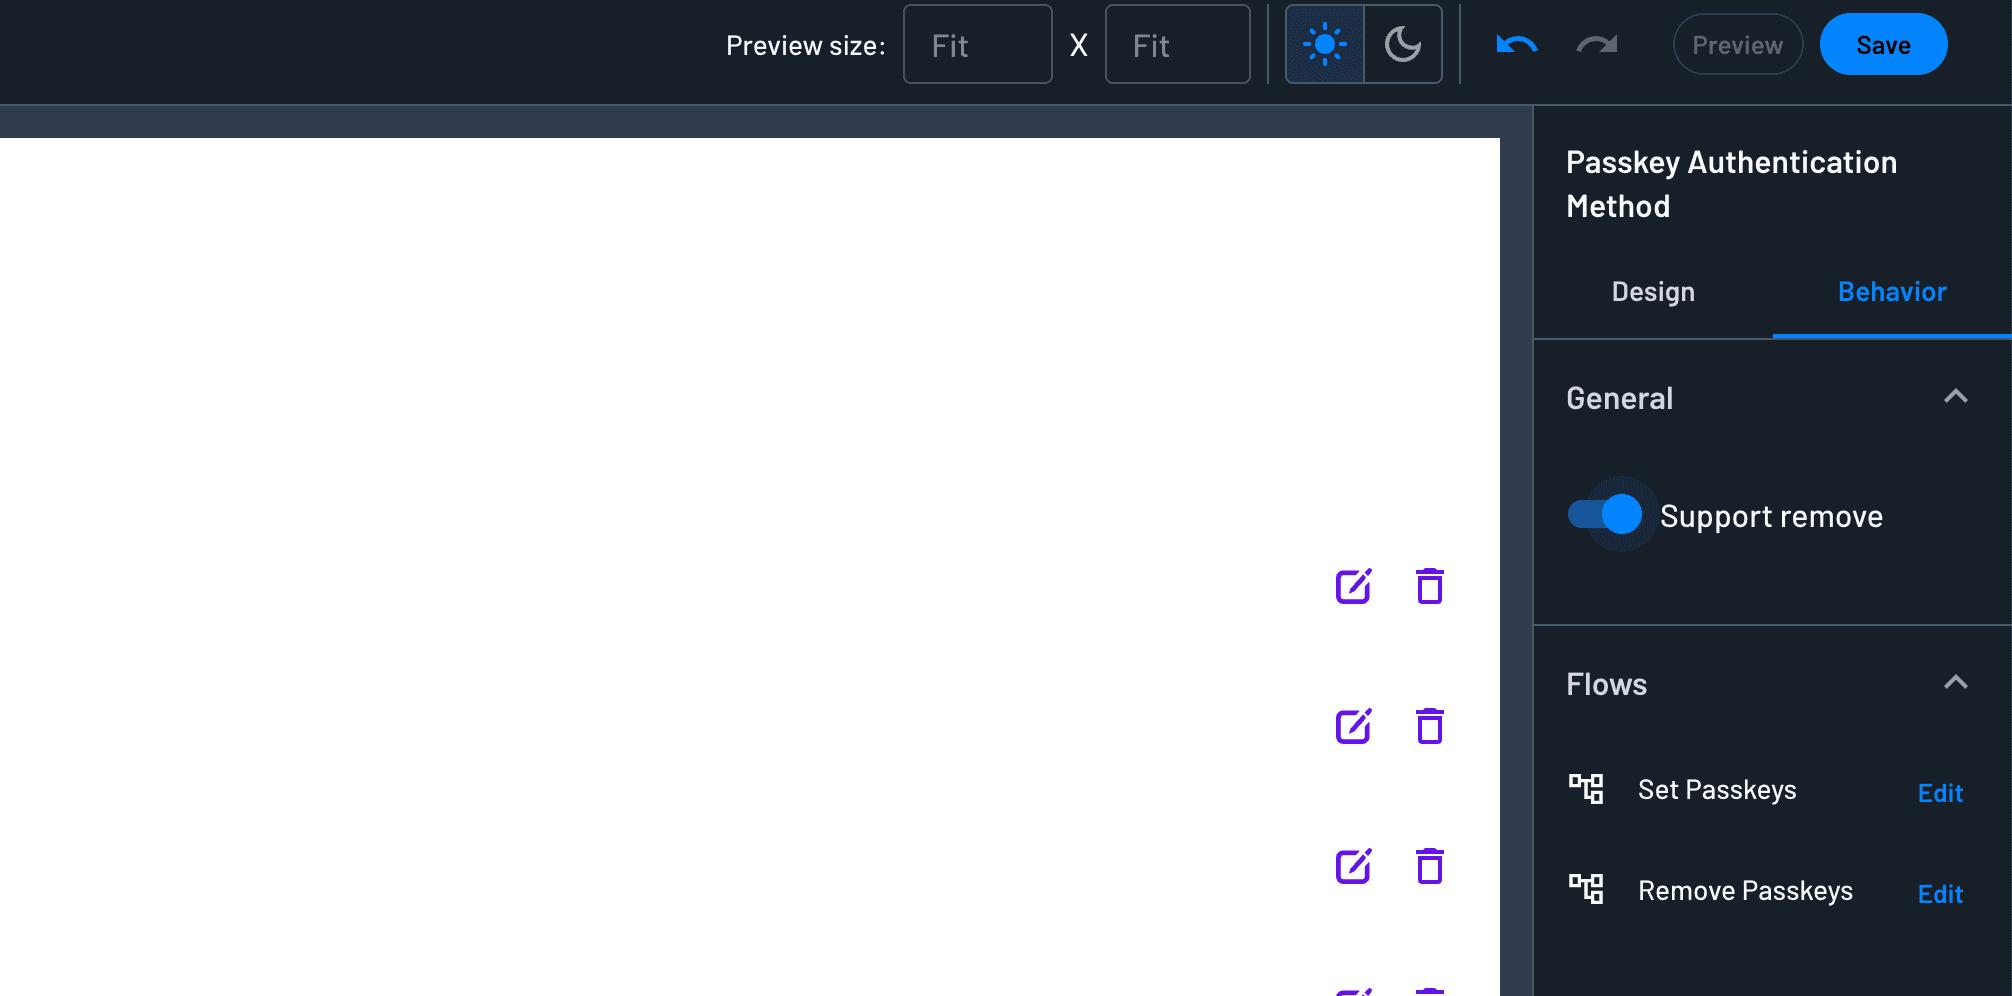
Behavior Settings: You can enable additional built-in capabilities from the Behavior tab in the widget settings. For example, in the User Profile Widget, the passkeys section lists every passkey registered to the user; enabling the ability to remove passkeys lets users select and remove a specific one, which activates a flow that you can then modify to customize the removal process.
To edit a flow, click on the component or button you want to customize, navigate to the Behavior tab in the settings panel on the right, and click Edit next to the relevant flow to open the flow editor.
Batch User Actions
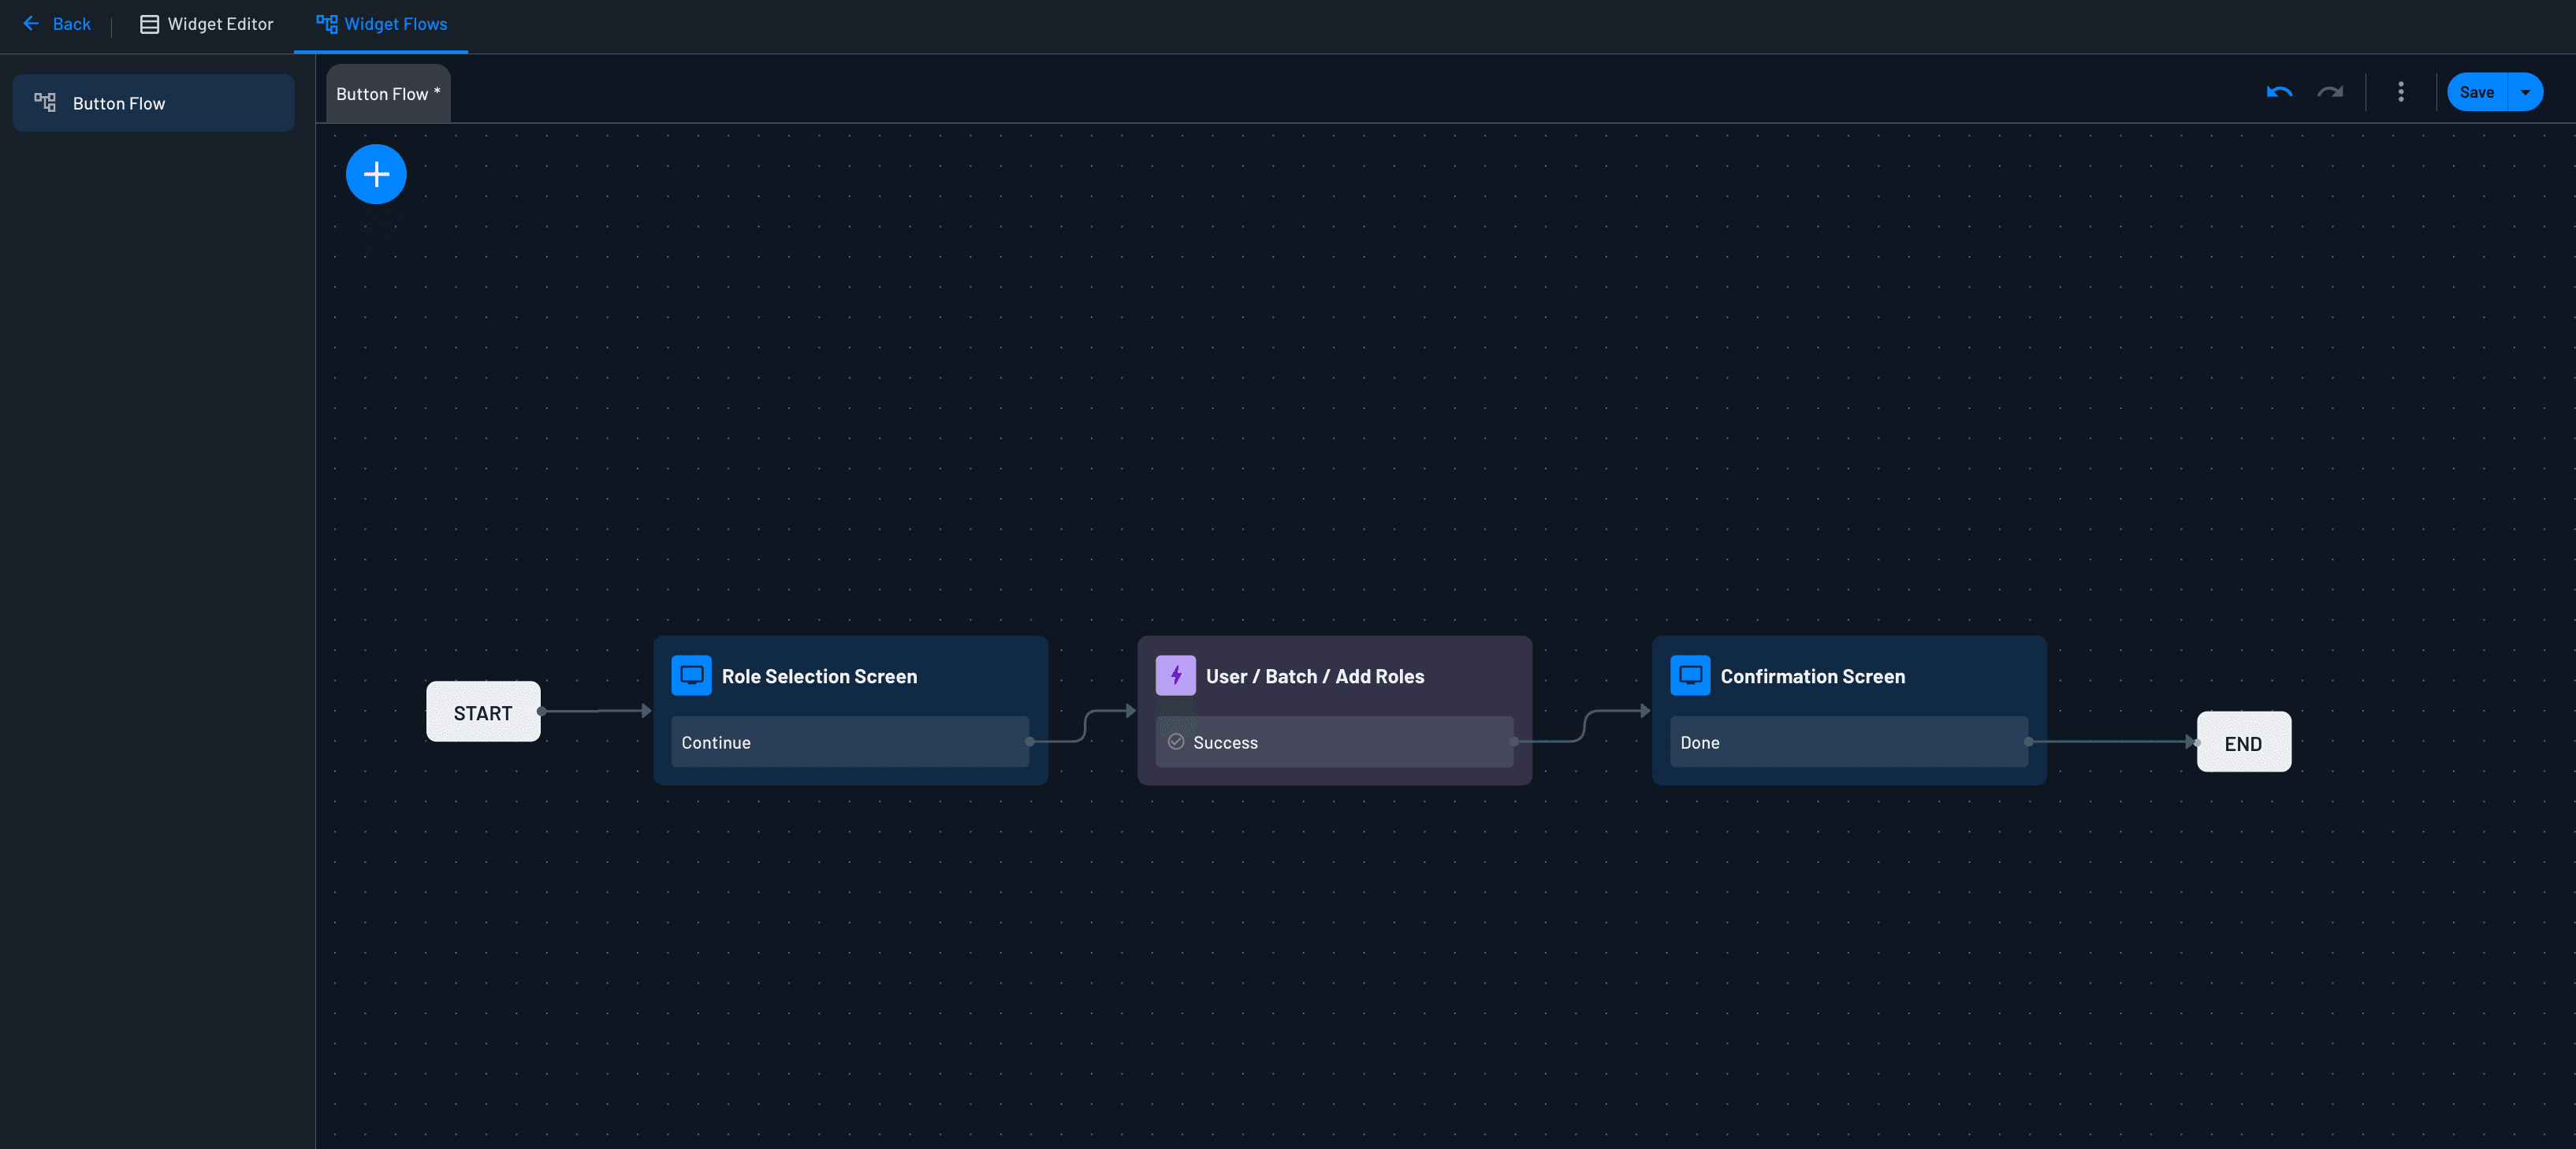
In the User Management Widget, administrators can select multiple users from the table and run a custom button flow to perform bulk operations on all selected users using User / Batch Actions.
| Available Batch Actions | Functionality |
|---|---|
| User / Batch / Delete | Delete selected users |
| User / Batch / Set Roles | Set roles for selected users (replaces existing roles) |
| User / Batch / Add Roles | Add roles to selected users |
| User / Batch / Remove Roles | Remove roles from selected users |
| User / Batch / Add Applications | Add federated applications to selected users |
| User / Batch / Delete Applications | Remove federated applications from selected users |
| User / Batch / Update Status | Update status of selected users |
| User / Batch / Remove TOTP seed | Remove the TOTP seed for selected users |
Build the Flow
When the custom button is clicked, the widget launches its associated flow with context about the selected users. To process them in bulk:
- Open the button's flow from the widget editor (Behavior tab → Flows → Edit).
- Add any screens or inputs needed to collect additional information from the administrator.
- Add a
User / BatchAction to the flow. - Configure the action, such as deleting users, updating their status, assigning roles, or adding applications.
- Optionally add a confirmation screen, audit event, connector action, or webhook at the end.
Using Role or Application Selectors
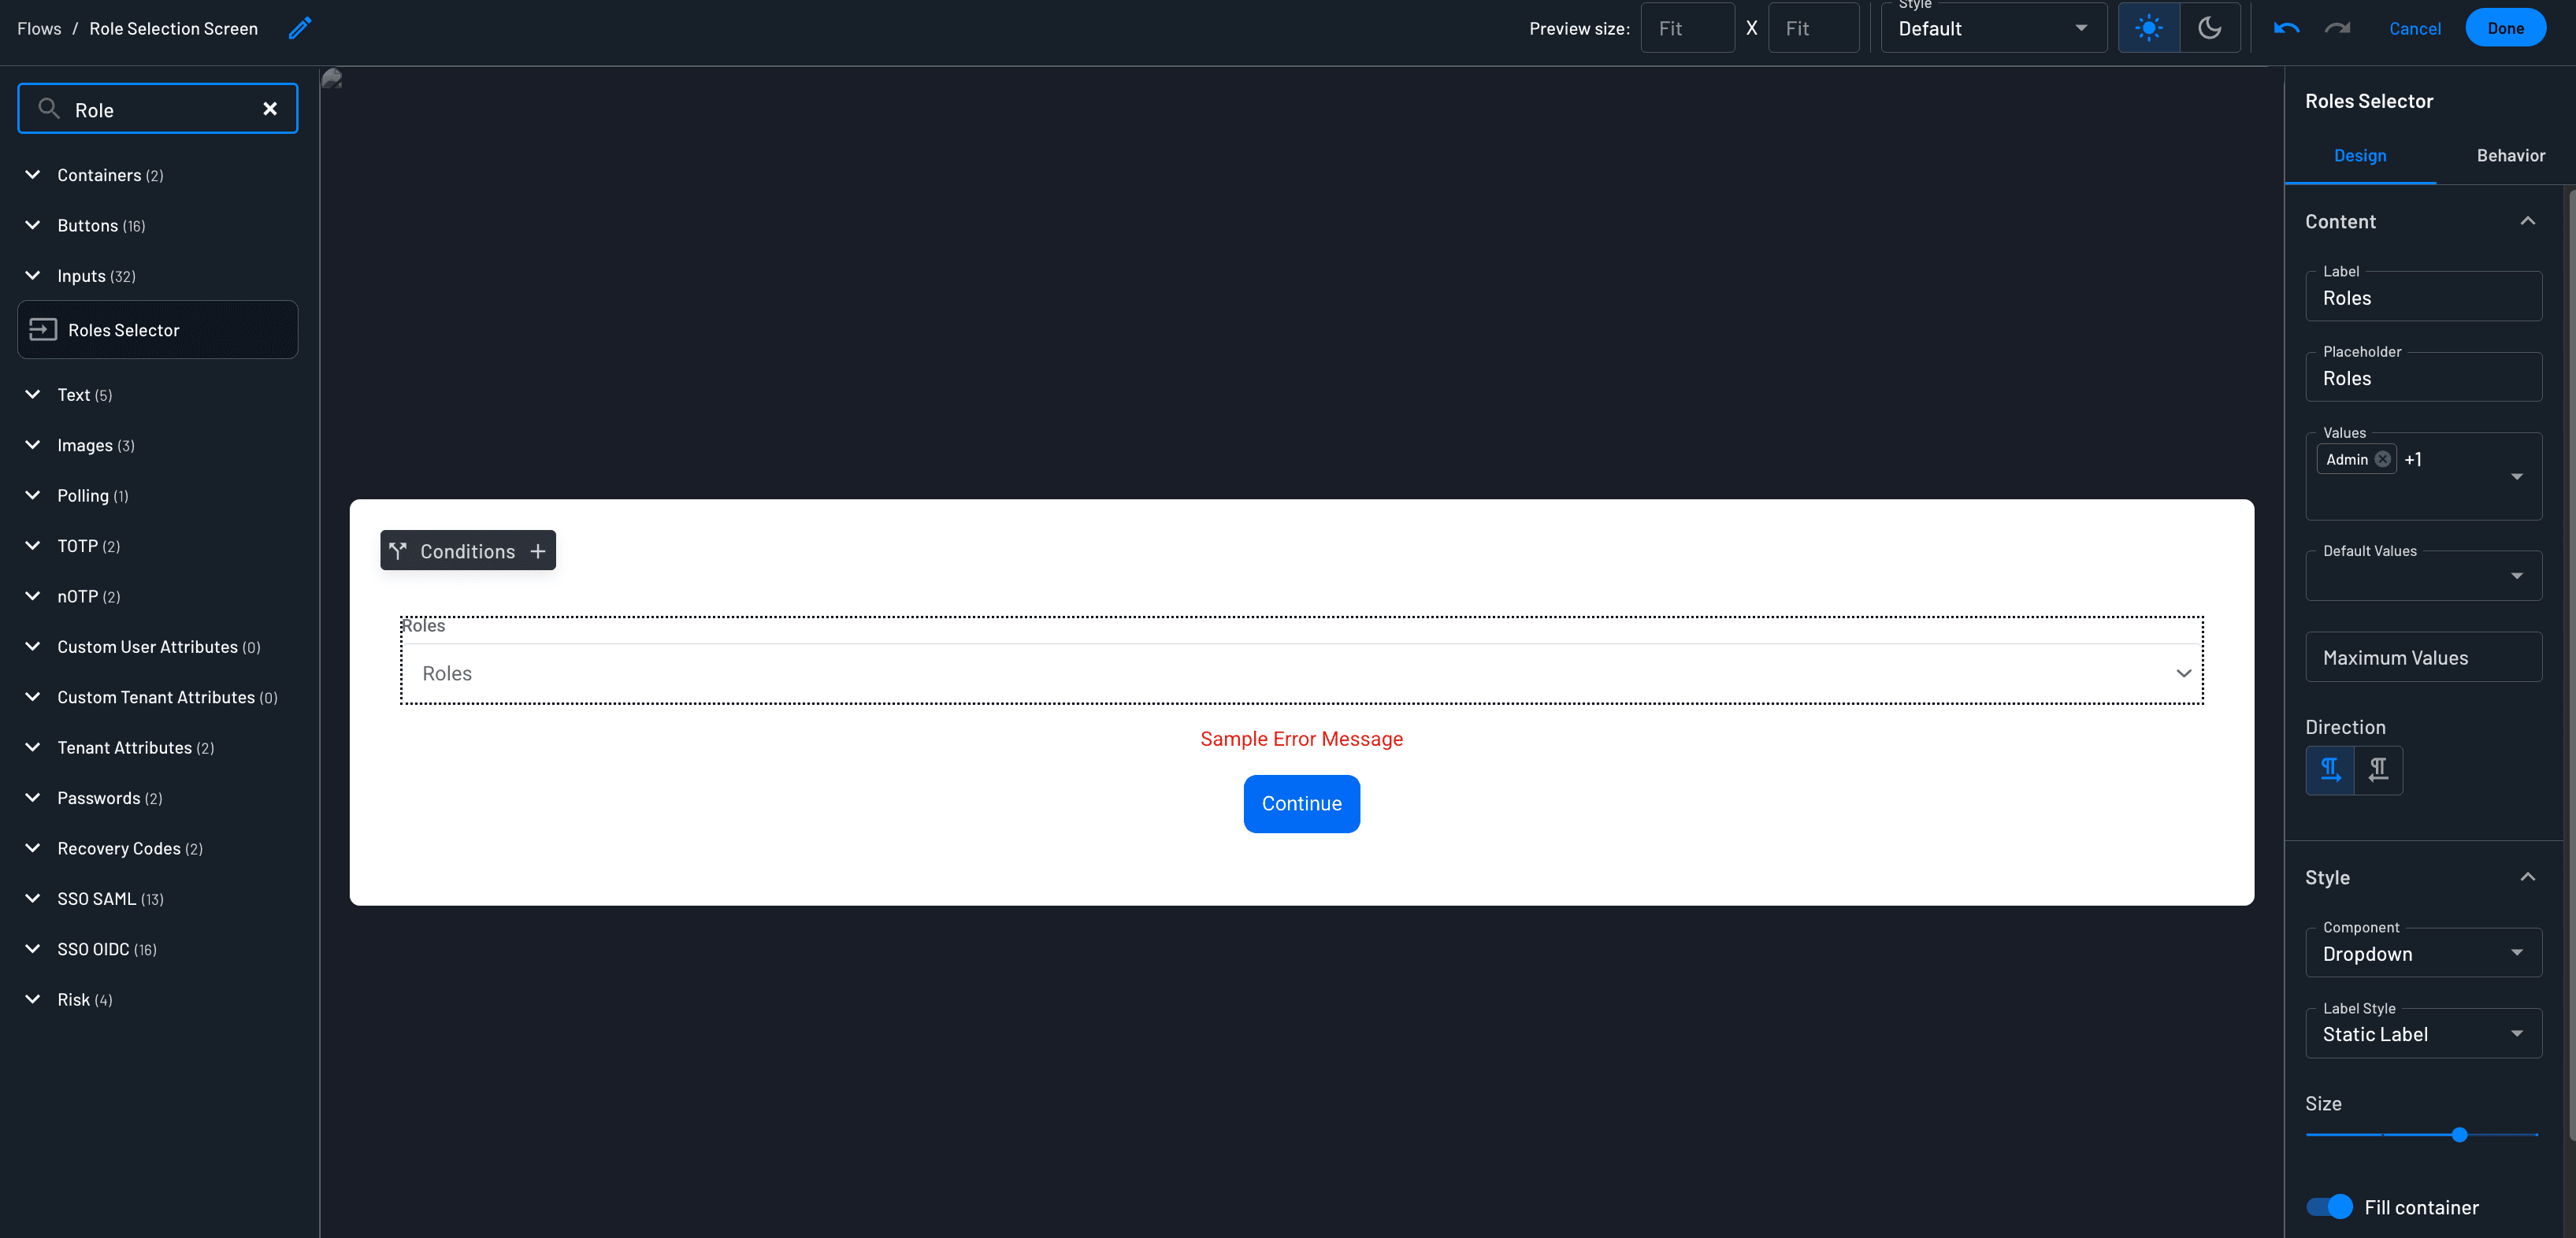
Some batch actions require the administrator to choose roles or applications before the batch action can run.
For actions involving roles, such as Set Roles, Add Roles, or Remove Roles, add a screen to the flow with a Roles Selector input component. The values which will appear in the dropdown can be populated under the Behavior tab → Values. The selected roles will then be passed into the relevant User / Batch role action.
Similarly, for actions involving applications, such as Add Applications or Delete Applications, add a screen to the flow with an Applications Selector input component. The values which will appear in the dropdown can be populated under the Behavior tab → Values. The selected applications will then be passed into the relevant User / Batch application action.
Passing Flow Inputs to Widgets
Widget flows run with empty inputs by default, which means any {{form.*}} or {{client.*}} dynamic references in a flow step will silently resolve to an empty string unless you pass values through the widget. Use the form and client properties to supply those values from your application.
A common use case is customizing the refreshCookieName on a widget's End step. Without passing the value in, the cookie falls back to the default name (DSR). With form:
import { UserProfile } from '@descope/react-sdk';

<UserProfile
  widgetId="user-profile-widget"
  form={{ cookieName: 'my-refresh-cookie' }}
/>
When a flow step is configured with refreshCookieName = {{form.cookieName}}, it will receive my-refresh-cookie instead of resolving to empty.
Widget-internal values (such as passkey or device IDs set by the widget itself) take precedence over caller-supplied form and client values when the same key is present in both.
Editing a Single User's Roles
You can add a custom button that lets an administrator edit one selected user's roles, without exposing other attributes like email or name. This suits B2B use cases where a tenant admin manages roles within their tenant but shouldn't touch anything else about the user.
To build this, add a screen to the button's flow with a Roles Selector input component. When the administrator selects exactly one user, the selector pre-populates with that user's current roles instead of starting empty, so the administrator only needs to add or remove from there.
Connect the selector to a role-update action that applies the selection. Instead of replacing the user's full role set, this action compares the new selection against the user's existing roles and adds or removes only the difference.
Editing a Widget User's Details
When using admin widgets, typically you are modifying another user's information/permissions. However, if you want to modify information of the user interacting with the widget from an admin widget, you can use custom button flows.
A form built on {{user.email}} or {{user.customAttributes.department}} therefore shows the administrator's values rather than the selected user's. Add the User / Load / Selected User action to load the selected user into flow context, so a screen further along can show and edit that user's current values.
To build an edit-user button:
- Add a custom button to the User Management Widget and open its flow from the Behavior tab.
- Add a
User / Load / Selected Useraction as the first step. - Add a screen whose input components reference the user dynamic values you want to edit, such as
{{user.name}},{{user.email}}, or{{user.customAttributes.<attribute-name>}}. Each input opens with the selected user's current value. - Connect the screen to the
Update Useraction that applies the edit. - Optionally add a confirmation screen or a
Generate Audit Eventaction at the end.
The action loads one user at a time and returns an error when the administrator has selected none or more than one. For operations across several users, use Batch User Actions.
Example Use Case: Requiring MFA Before Editing Sensitive Attributes
Each attribute row in the User Profile Widget (Name, Phone, Email, and so on) has its own flow behind its Edit action. To require step-up verification before an edit is allowed:
- Open the flow behind the attribute you want to protect from the widget's Behavior tab.
- At the start of the flow, add a Condition that checks whether the current session already carries the
sustep-up claim. - If the session isn't stepped up, route to a screen with an authentication method action (for example, OTP, passkeys, or an authenticator app) marked as step-up. On success, the session is updated with the
suclaim. - Only after the step-up check passes should the flow continue to the actual attribute-update action.
Because each attribute has its own flow, you can require step-up selectively, for example on Email and Phone, while leaving lower-risk attributes like profile picture untouched.
Example Use Case: Notifying Both the Old and New Email on Change
Since a user's email is often used as a login identifier, it's important to alert them whenever their email changes. If an attacker compromises an account and changes the email, the legitimate user should be notified at both the old and new addresses to make sure they are aware of the change. To alert a user at both addresses whenever their login email changes:
- Open the flow behind the Email attribute's Edit action from the widget's Behavior tab.
- Near the start of the flow, before the new email is verified and applied, add a
Load Useraction so the current (soon to be old) address is available as{{user.email}}. Reference or store that value here, since after the update runs later in the flow,{{user.email}}will reflect the new address. - After the new email is verified and the update action completes, add two messaging actions using a Messaging Connector (such as SMTP, SendGrid, or AWS SES) — one addressed to the old email you captured in step 2, and one addressed to the now-current
{{user.email}}— each explaining that the account's login email changed. - Optionally, add a
Generate Audit Eventaction alongside the notifications to log the change for compliance and security review.