Preventing IRSF and SMS Pumping
International Revenue Share Fraud (IRSF) drives a high volume of SMS OTP sends to premium-rate number ranges the attacker profits from, often through automated scripts or bots that repeatedly trigger sign-up or sign-in flows. You bear the cost, not the attacker, so the controls that matter most run before the OTP is sent.
This guide covers five no-code steps to take in the Descope Console to reduce your exposure to IRSF attacks. The first closes off any way to trigger SMS OTP that bypasses your flow, and the remaining four stack independently inside the flow. They're laid out in order of impact, followed by the monitoring you'll want once changes are live.
The stack at a glance
Each of the five steps below defends against a different angle of attack, and together they form a layered defense: even if an attacker gets past one, the next one is still in the way.
| What it does | How | Configured in |
|---|---|---|
| Closes the surface area | Disables API and SDK access for methods you only use in flows | Authentication method settings |
| Restricts the destination | Sets Allowed Countries on the phone input | Screen builder |
| Blocks sign-in attempts from disallowed countries | Holds the country policy in a List, then checks incoming sign-in attempts against it before anything renders | Project Settings → Lists + Flow condition |
| Checks for anonymity | Looks for VPN and bot signals | Flow condition |
| Caps velocity | Rate limits by IP, ASN, or JA4 | Flow action |
Step 1: Close every path that bypasses the flow
Every step below only applies to traffic that goes through the flow. If the same authentication method is also reachable through a direct SDK or API call, an attacker can hit that endpoint directly and bypass your conditions, rate limits, and every other protection here. Close this path first: nothing else in this guide matters until you do.
If you only ever trigger OTP from a flow, set Trigger Method to Disable API & SDK on the One-time Password authentication method:
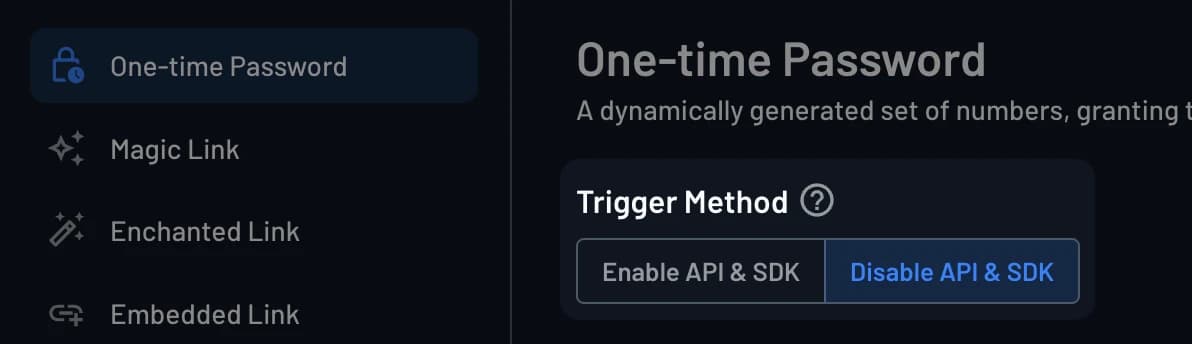
- Enable API & SDK: OTP can be triggered via flows, the Management API, and the client/server SDKs.
- Disable API & SDK: OTP can only be triggered by a flow, or by a call made with a valid management key.
Flows keep working exactly as before once this is disabled, since they don't rely on the public API or SDK to trigger OTP. The unprotected entry point that let an attacker skip the flow disappears.
If you use both flows and direct API/SDK calls for OTP, check whether the direct calls could be expressed as a flow instead, since that lets you close the unprotected path too. Where that isn't possible, treat the remaining SDK surface as unprotected traffic, and make sure it's covered by your provider-side controls and monitoring instead (covered further down in this guide). Audit method by method rather than assuming: any authentication method enabled for API/SDK use but never called that way from your application is a candidate for disabling it.
Step 2: Restrict the countries a phone number can belong to
Select the phone field on the screen that collects the number and set Allowed Countries, in the component's right-hand panel, to only the codes you send to. Numbers outside that set fail validation immediately, so the OTP action never runs and no message gets sent.
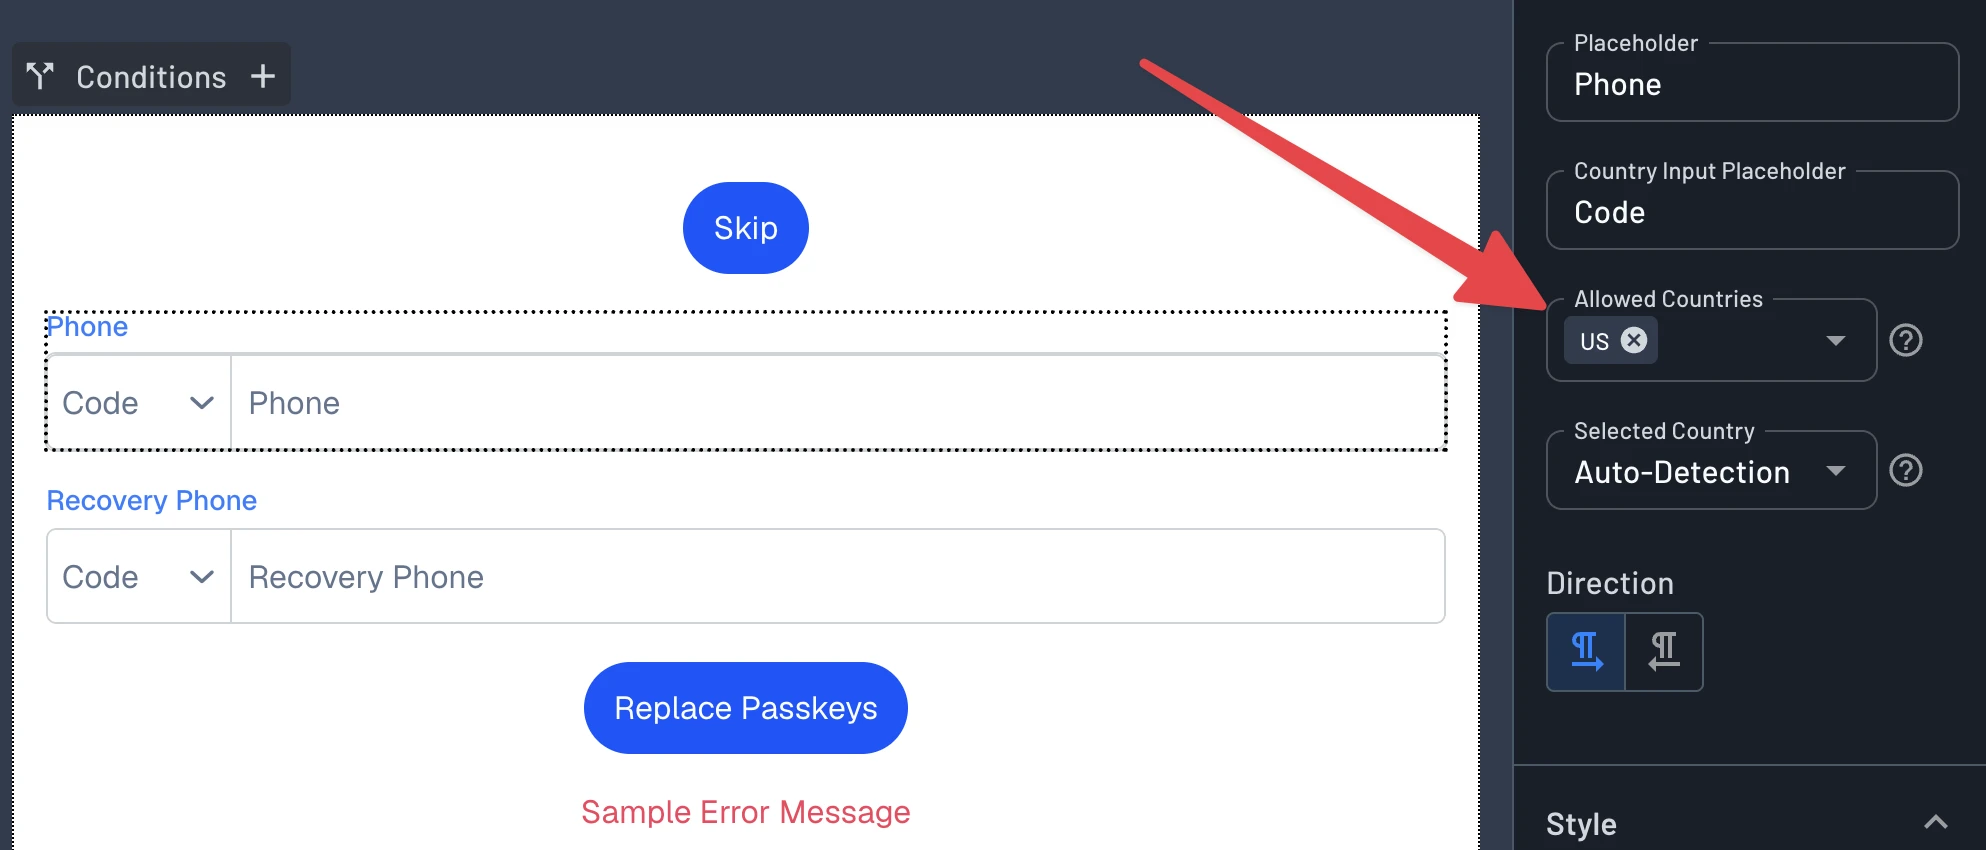
See Phone Numbers for the rest of the component's options, including forcing a single country code for a single-market product. This setting lives on one component in one screen, so it has to be repeated wherever a phone number is collected: sign-up, sign-in, MFA enrollment, recovery phone, and so on. This setting has to be kept in sync by hand with the country policy in the next step. The two check different signals (this one is the phone number's own country code), but both enforce the same policy from two directions instead of duplicating each other.
Turn on Bot Trap on any screen that could otherwise send a message too. It's an invisible field real users never see but simple bots fill in anyway, catching roughly 60% of bots with no added friction.
Step 3: Block sign-in attempts from disallowed countries
The previous step controls where a message is allowed to go, based on the phone number itself. This step controls who's allowed to ask in the first place, based on geo.country, the requester's own location rather than anything derived from a phone number. It also runs at the very start of the flow, before any screen renders, and draws on a single source of truth shared by every flow in the project instead of a setting repeated per screen.
A List is a project-level collection of values that any flow condition can reference, editable from the Console, from flow actions, or through Terraform, so an on-call engineer can update the policy mid-incident without touching a flow. Create one under Project Settings → Lists with a list type of Texts, using ISO 3166-1 alpha-2 country codes, since that's the format the geo.country dynamic key returns.
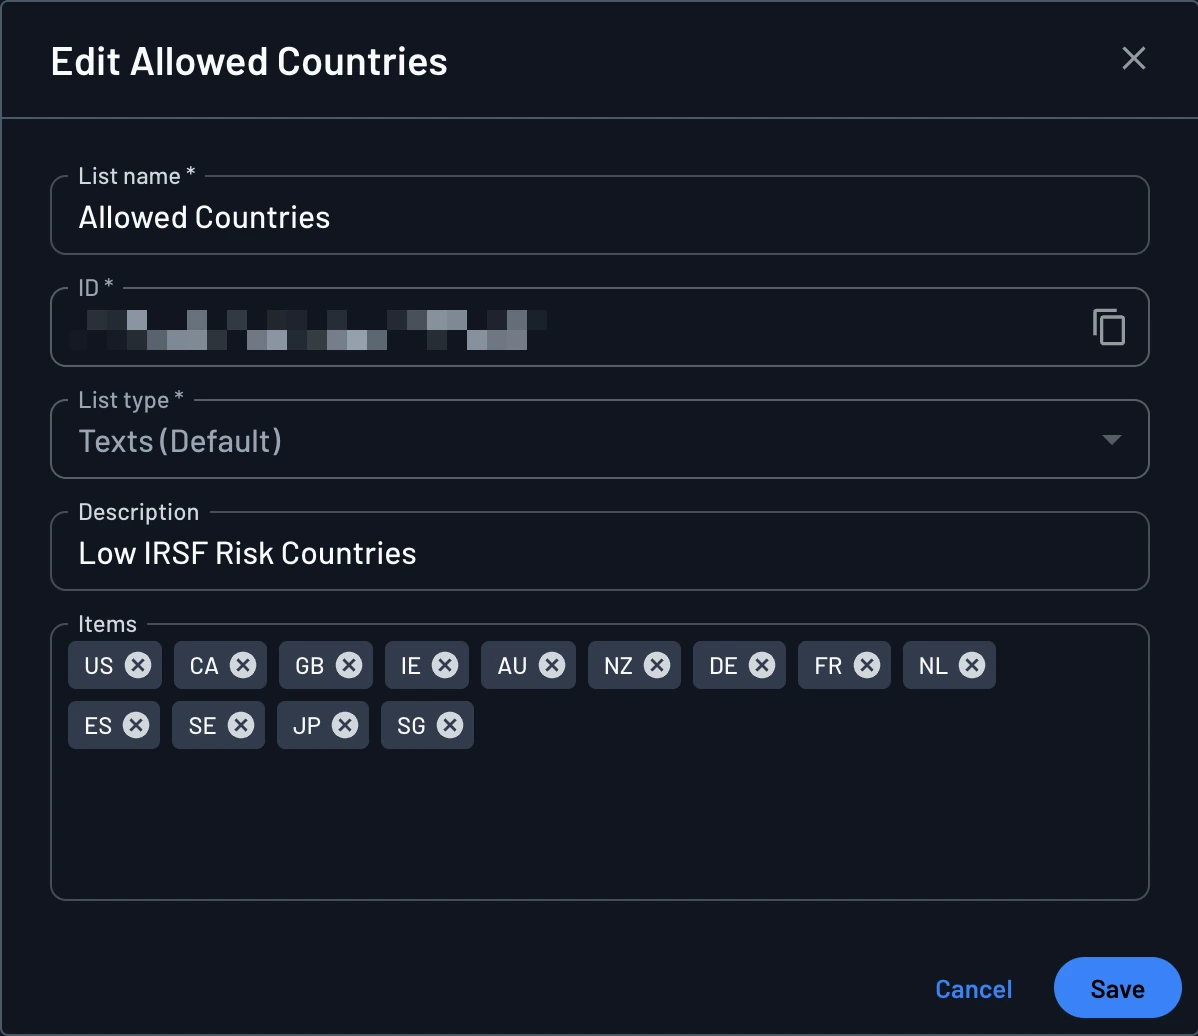
See Block Users by IP Address for the general Lists workflow (creating, editing, referencing from a condition) if you haven't used one before.
Allow-list or deny-list
If you're mostly domestic or only serve a handful of markets, allow-list those markets. If you operate globally, an allow-list becomes nearly every country in the world, so deny-list the specific ranges you won't send to instead.
The mechanism is the same either way: only the operator on the condition changes. Lists Not Contains for an allow-list, Lists Contains for a deny-list. Routing rejected traffic to email OTP instead of a hard block also keeps legitimate travelers from getting locked out.
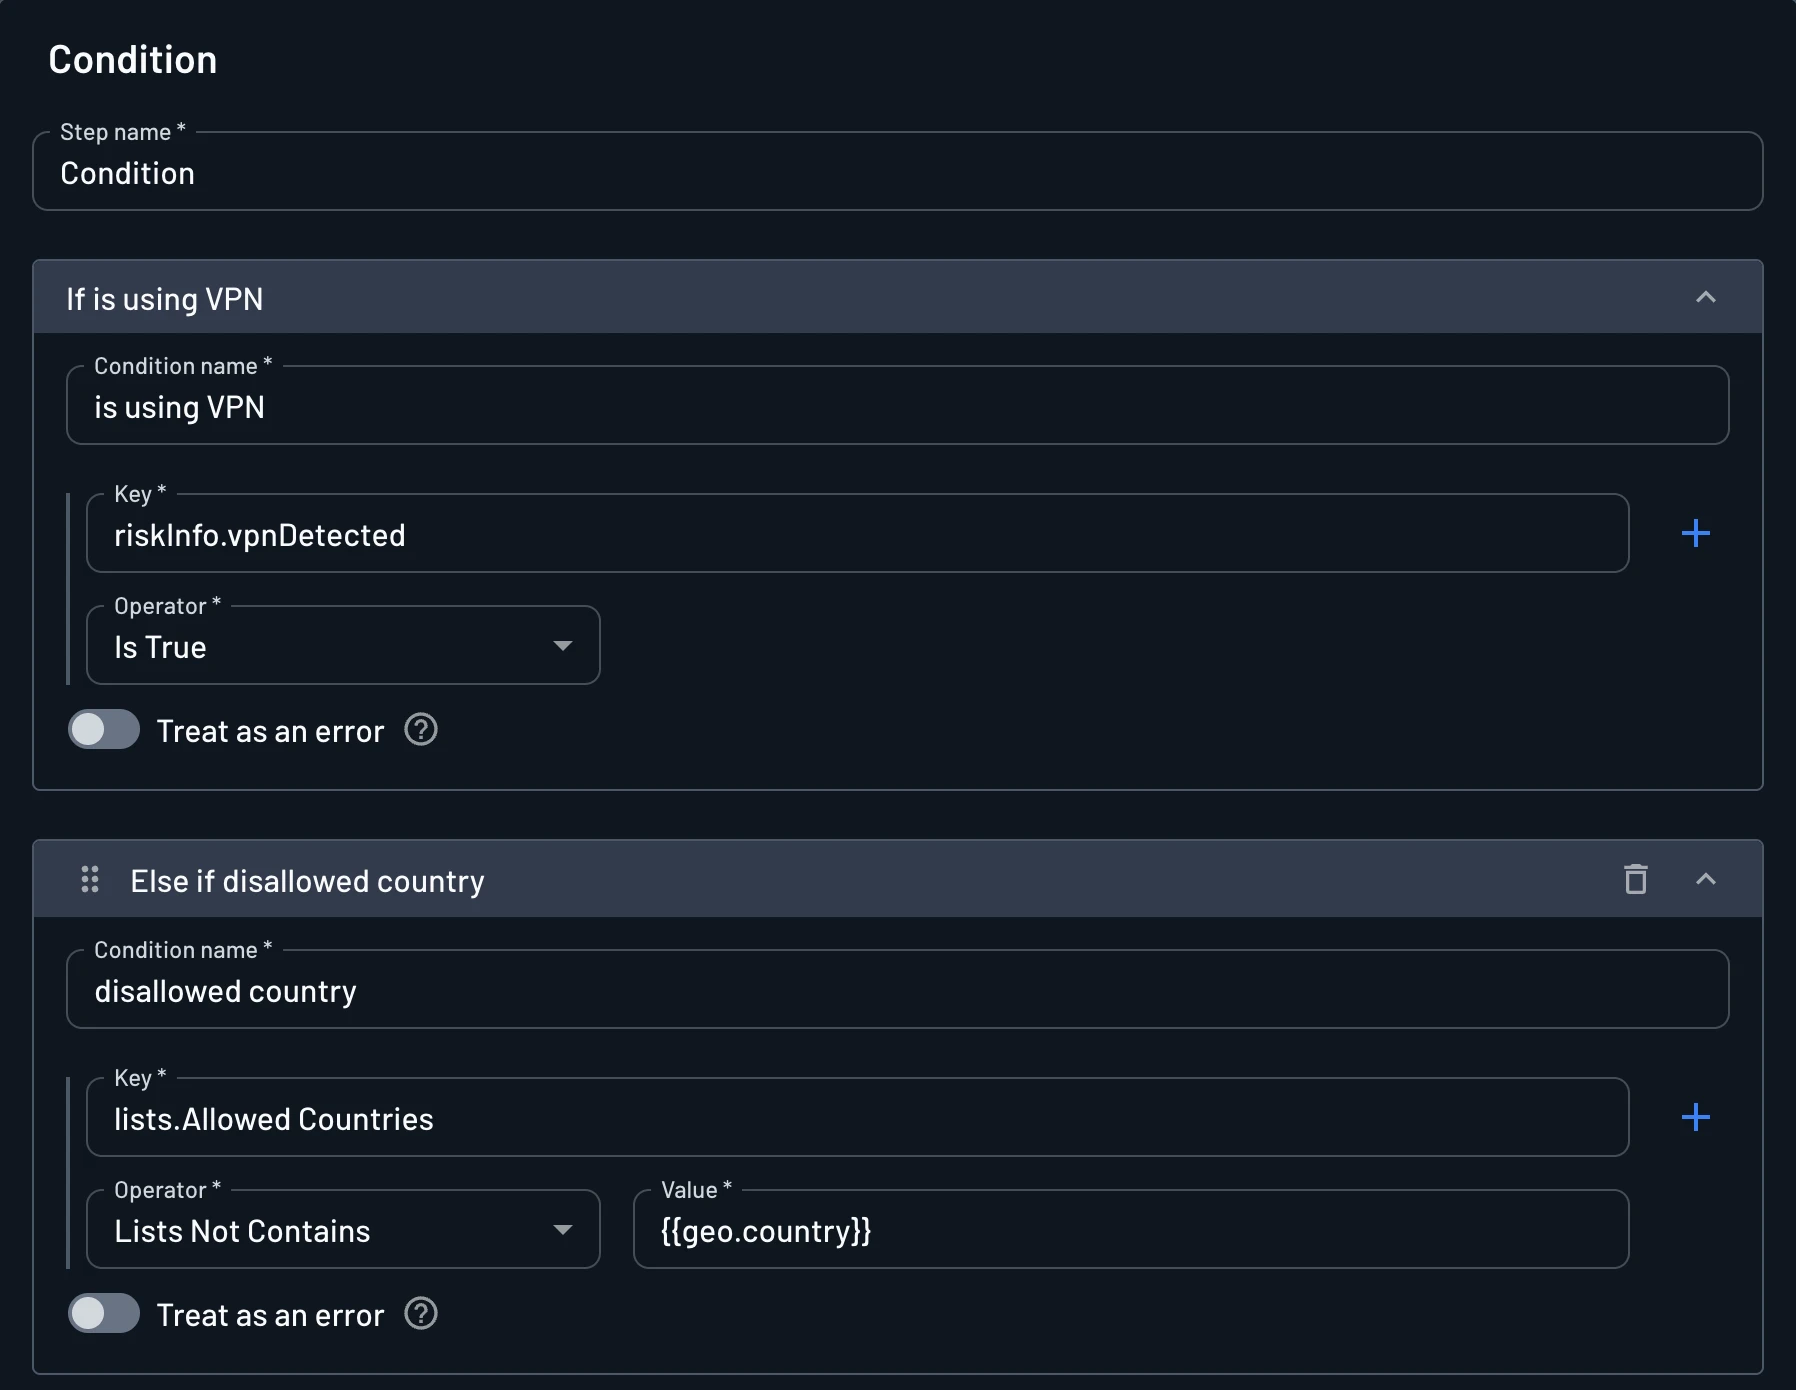
A List by itself doesn't enforce anything; a condition has to read it. Add one at the very start of the flow, before any step that costs you anything runs:
| Key | Operator | Value |
|---|---|---|
lists.Allowed Countries | Lists Not Contains | {{geo.country}} |
Keep this condition to country alone. Network-level attributes like ASN or IP shift constantly, and legitimate traffic often shares infrastructure with abusive traffic, so gating on them this early adds false positives more than real coverage. Anonymizer detection, covered next, is the more reliable companion for catching what country gating alone misses.
Step 4: Add VPN and bot signals
Geo gating alone is easy to route around with a commercial VPN. A request that claims to be domestic but arrives through one is exactly the profile to stop. Implementing Fingerprinting and Fingerprinting cover the full setup and signal reference; the parts specific to IRSF are below.
riskInfo ships with vpnDetected, botDetected, and impossibleTravel out of the box, with no connector setup required. Add a condition step with a branch for each, evaluated in order, so put the most decisive check first:
| Signal | Use for IRSF |
|---|---|
riskInfo.vpnDetected | Flags a request masking its real origin |
riskInfo.botDetected | Flags scripted submission of the phone form |
riskInfo.impossibleTravel | Flags a returning identity being driven from a new region |
Route the VPN and bot branches to a path that doesn't send SMS, such as email OTP or a passkey path. That way the attacker's payout disappears, while a privacy-conscious legitimate user still has a way in.
Note
The Fingerprint connector, or another fraud connector, is an optional alternative for teams that want a deeper or third-party-verified anonymity signal instead of the native one. Connector-based signals need a Fingerprint Assess (or equivalent) action inserted immediately after a Screen, since they're collected client-side.
Step 5: Cap velocity with Check Rate Limit
Pumping is a volume business, so a ceiling per source bounds your exposure no matter which countries or networks the attacker moves to next. Check Rate Limit covers the action's full set of options (key types, error handling modes). For IRSF, add two actions rather than one, since the keys are independent:
- One action keyed on
IP, with a 5 minute timeframe and a max of 5 attempts, to catch a single host hammering the flow. - A second action keyed on
JA4, with a 60 minute timeframe and a max of 30 attempts, to catch a script that rotates IPs but keeps the same TLS fingerprint.
Set error handling to Custom on both, so rate-limited users see a calm "try again shortly" screen instead of a raw error.
Putting it all together
Ordering matters as much as the individual controls do. Each node in the flow should be cheaper to evaluate than the one after it, so a blocked request costs you as little as possible before it's turned away. Step 1 above is a project setting rather than a node in the flow itself, so it doesn't appear in the list below, but it still has to be in place for the rest of this to hold.
The remaining steps form an actual flow like this, node by node:
- Condition. Key
lists.Allowed Countries, operatorLists Not Contains, value{{geo.country}}. A match routes to a short "region unavailable" screen that ends the flow. This is the cheapest check available, so it runs before anything else renders. - Check Rate Limit. Key
IP, timeframe 5, max 5. Error handling set to Custom, routed to a "try again shortly" screen. Placed here, it costs nothing and caps a single host hammering the endpoint before it gets any further. - Screen. The phone input, with Allowed Countries set to the same markets as your List, and the Bot Trap toggle turned on.
- Condition. Branches for
riskInfo.vpnDetectedIs True andriskInfo.botDetectedIs True, both available natively with no extra action needed. Both route to an email OTP or passkey path that never reaches an SMS send. Everything else falls through to the next node. - Check Rate Limit. Key
JA4, timeframe 60, max 30, routed to the same custom error screen as the earlier rate limit. This is the last gate before you spend money, and JA4 is what keeps working even after IP rotation. - Sign up or in / OTP / SMS. The only node in the entire flow that sends a message. Every request that reaches it has already cleared five free checks.
Add a passkey enrollment prompt after either success path, gated on device.webAuthnSupport. Once a user has enrolled, repeat logins can skip the SMS node.
Reducing how much SMS you send at all
Every control above makes SMS harder to abuse, but the more durable fix is structural: make SMS a smaller part of your login mix in the first place. A channel that only a subset of users ever touches is a much smaller target for an attacker, and the per-message cost that funds the attack disappears along with it. These are product decisions that play out on a longer timeline than the steps above. Ship those first, and treat this as follow-up work.
- Passkeys as the primary method: Passkey logins cost nothing to deliver and can't be pumped. Keep SMS for first-time verification, then prompt for passkey enrollment right after, gated on
device.webAuthnSupport. On later logins,user.webauthntells you whether to skip SMS. - Email OTP or magic link as the default channel: Email has no premium-rate equivalent, so switching to it removes the attacker's revenue. Where a phone number isn't a hard product requirement, this is the single largest reduction available, and it composes well with the VPN and bot detection step above, which can route only risky traffic to email.
- nOTP over WhatsApp: One-click authentication with no code to type. It doesn't rely on SMS at all, so SMS pumping isn't a risk for this channel. Pilot it on one flow first, particularly with a heavily international user base.
Provider-side controls
Enable provider geo permissions and provider-side rate limits as a backstop. They fire after the request has already left Descope though, so they're the last line of defense rather than the first. Messaging connectors let you bring your own SMS, voice, or email provider, either set as the default OTP connector or invoked per flow, so you can also lean on whatever fraud controls your provider offers natively.
Monitoring and alerting
Controls tell you what was stopped. Monitoring tells you what's being tried in the first place, which is what lets you tune your Lists and thresholds before a spike turns into an invoice.
- Flow Activity logs every execution, task by task, with status, timing, error detail, origin IP, and login ID, covering the last 120 days. This is where you confirm a block rule is firing, and that legitimate users aren't getting caught by it.
- Request security headers: every authentication event carries
cf-ja4andx-asn. Grouping OTP-send events by ASN is a good way to spot a single hosting provider behind a spike, or to sanity-check a country list against what's happening. - Audit connectors stream events to your own stack via an Audit Webhook, so SMS-send volume can sit on the same dashboards and alert thresholds as everything else you monitor.
- Management Flows run without user interaction and can be triggered by audit events, so you can build an automated response to what your monitoring surfaces instead of reacting by hand.
Related
- Block Users by IP Address
- Implementing Fingerprinting
- Adaptive MFA
- Fraud & Risk Connectors
- Check Rate Limit